


How to Fix iPhone Stuck in Recovery Mode After iOS 27 Update
Force restart your iPhone first. If the recovery screen returns, connect it to Finder on Mac or Apple Devices on Windows and choose Update, not Restore. Update attempts to install iOS without erasing your data. Use Restore only after the non-erasing methods fail.
Seeing the recovery mode screen after an iOS update can be alarming, especially when your iPhone will not restart normally. This issue often happens when the update is interrupted, the firmware installation fails, or the iPhone cannot communicate properly with a computer. The good news is that recovery mode does not always mean your data is lost.
In this guide, we'll explain why an iPhone gets stuck in recovery mode and walk you through several fixes, starting with the safest options before moving to methods that may erase your data. If your iPhone is stuck at an earlier update stage, such as Update Requested, Preparing Update, Verifying Update, or the installation progress bar, see our iOS 27 update guide for the right fix.
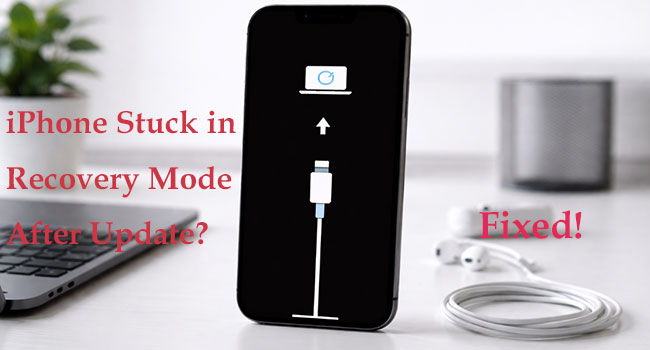
- What Does iPhone Recovery Mode Look Like?
- Why Is My iPhone Stuck in Recovery Mode After an iOS Update?
-
How to Fix an iPhone Stuck in Recovery Mode After an iOS 27 Update
- Method 1. Force Restart the iPhone
- Method 2: Try to Exit Recovery Mode If iOS Is Still Intact
- Method 3. Use Apple Devices or Finder to Update the iPhone
- Method 4. Check the Cable, USB Port, Computer, and Error Codes
- Method 5. Repair iOS with TunesKit Standard Repair HOT
- Method 6. Restore the iPhone
- Method 7. Try a DFU Restore
- FAQs About iPhone Stuck in Recovery Mode
- Closing Thoughts
What Does iPhone Recovery Mode Look Like?
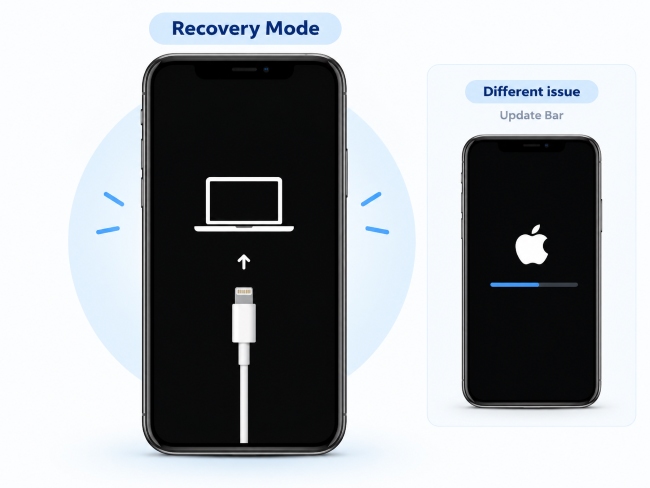
An iPhone in recovery mode usually shows the Connect to Computer screen instead of the normal Lock Screen or Home Screen. When you connect it to a Mac or Windows PC, Finder or Apple Devices may also say that the iPhone needs to be updated or restored.
If your iPhone shows an Apple logo with a progress bar instead, it is a different issue. See our iPhone stuck on update bar guide for the right troubleshooting steps.
Why Is My iPhone Stuck in Recovery Mode After an iOS Update?
An iPhone may get stuck in recovery mode when the update cannot finish correctly or iOS cannot start normally afterward. This does not always mean the device is damaged or your data has been erased.
- Interrupted iOS installation: A sudden shutdown, low battery, disconnected cable, or other interruption can stop the update before installation is complete.
- Incomplete or damaged update files: If the iOS update was not downloaded or prepared correctly, the iPhone may fail to start and return to recovery mode.
- Computer or USB connection problems: A faulty cable, unstable USB port, outdated macOS, Apple Devices, or iTunes may interrupt the update or restore process.
- Temporary iOS startup issue: A software problem during installation or startup can prevent iOS from loading normally and leave the iPhone on the recovery mode screen.
- Possible hardware issue: If the iPhone keeps returning to recovery mode even after a successful update or restore, the charging port, internal storage, logic board, or another component may need professional diagnosis.
Most software-related causes can be fixed without immediately erasing the iPhone, so start with the safest methods below.
How to Fix an iPhone Stuck in Recovery Mode After an iOS 27 Update
Before following the detailed instructions, you can watch this video for a quick overview:
The following table compares each method by data-loss risk and requirements.
| What Happens | What to Try | Data Risk |
|---|---|---|
| Recovery screen appeared once after the update | Force restart | No data loss |
| iPhone entered recovery mode accidentally | Exit recovery mode | No data loss |
| Recovery screen keeps returning | Update with Apple tools | Normally keeps data |
| Computer cannot detect or update the iPhone | Check the connection | No data loss |
| Update still cannot repair iOS | Standard Repair | Designed to preserve data |
| Non-erasing methods fail | Restore | Erases data |
| Restore also fails | DFU Restore | Erases data |
Method 1. Force Restart the iPhone
A force restart may clear a temporary software problem and help the iPhone leave recovery mode. The steps depend on your device model.
For iPhone 8 and Later:
- 1. Quickly press and release the Volume Up button.
- 2. Quickly press and release the Volume Down button.
- 3. Press and hold the Side button.
- 4. Release the button when the Apple logo appears.
For iPhone 7 and iPhone 7 Plus:
Press and hold the Volume Down and Side buttons together. Release them when the Apple logo appears.
For iPhone 6s and Earlier:
Press and hold the Home and Top or Side buttons together. Release them when the Apple logo appears.

Method 2: Try to Exit Recovery Mode If iOS Is Still Intact [Free]
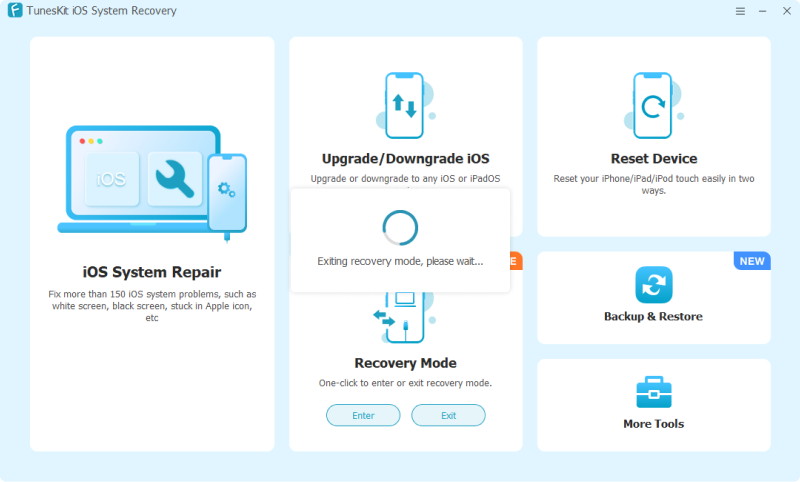
Manually exiting recovery mode may not work if the buttons are damaged or difficult to operate. TunesKit iOS System Recovery provides a one-click option for entering or exiting recovery mode.
This feature is most useful when the iPhone entered recovery mode accidentally. If the iOS installation is incomplete, the device may return to the recovery screen and require an update or system repair.
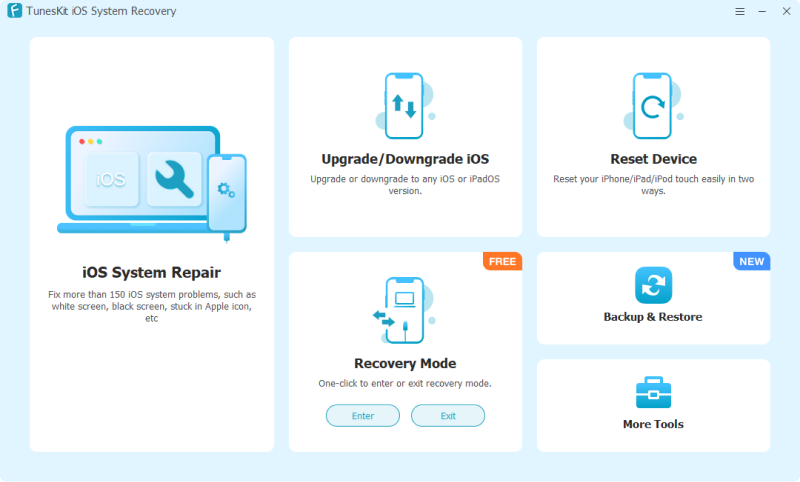
Step 1. Install and launch TunesKit iOS System Recovery on your computer. Connect the iPhone using a compatible USB cable that supports data transfer.
Step 2. Choose Recovery Mode on the main screen. Click Exit button and keep the device connected. The iPhone should restart automatically if no serious system problem is preventing it from loading iOS.
Method 3. Use Apple Devices or Finder to Update the iPhone
If a force restart does not work, use Apple's official device-management software to reinstall iOS. Use:
- Finder on a Mac running macOS Catalina or later;
- Apple Devices on a Windows PC;
- iTunes on macOS Mojave or earlier, or on a Windows PC where Apple Devices is unavailable.
Choosing Update attempts to reinstall iOS without erasing your personal information.
- Step 1. Connect your iPhone directly to the computer with a USB cable.
- Step 2. Open Finder, Apple Devices, or iTunes. Select the iPhone when it appears.
- Step 3. A message should appear saying that there is a problem with the iPhone that requires it to be updated or restored.
- Step 4. Click Update, not Restore. The computer will download and reinstall the latest compatible iOS version while attempting to keep your personal data.
Keep the iPhone connected until the process finishes. If the download takes more than 15 minutes and the iPhone leaves recovery mode, allow the download to finish. Then put the device into recovery mode again and repeat the update.

 For more information, see Apple's instructions for the iPhone Restore screen.
Method 4. Check the Cable, USB Port, Computer, and Error Codes
If Finder, Apple Devices, or iTunes cannot detect or update the iPhone, the problem may be the connection rather than iOS itself.
Try the following checks before using a method that erases data:
- 1. Connect the iPhone directly to the computer using a working data cable.
- 2. Try another cable or USB port if the device disconnects or is not detected.
- 3. Update macOS, Apple Devices, or iTunes, then restart the computer.
- 4. If an error code appears, check it before retrying; if needed, try another computer.
 Note:
Note:
Errors such as 9, 4005, 4013, and 4014 may may indicate a connection or update/restore problem. Check Apple's guidance for the specific code before continuing.
See Apple's guide to iOS update and restore errors for additional troubleshooting.
Method 5. Repair iOS with TunesKit Standard Repair
If the iPhone continues returning to recovery mode after you try the official Update option and connection checks, a system repair tool may help reinstall damaged iOS components.
TunesKit iOS System Recovery offers two repair modes:
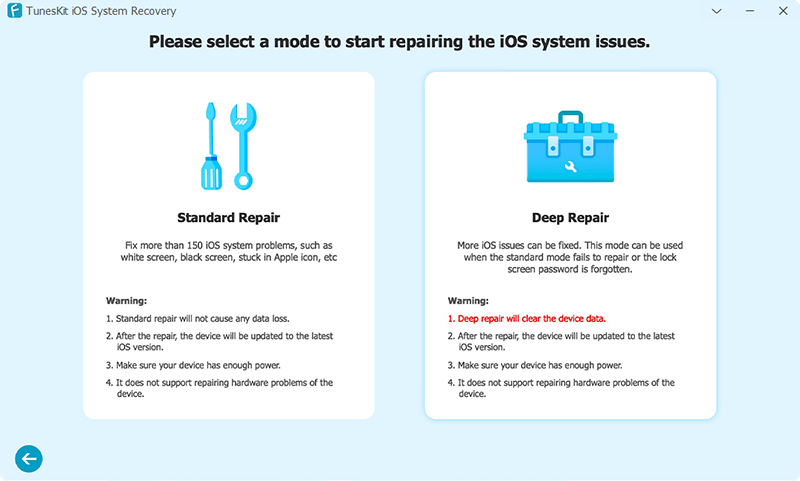
- Standard Repair is designed to repair common iOS system problems without erasing existing data.
- Deep Repair performs a more complete repair but erases data and settings.
Although Standard Repair is designed to keep your data, creating a backup is still recommended whenever possible.
Why Use TunesKit iOS System Recovery?
Repair iOS system issues that may keep your iPhone stuck in Recovery Mode, with Standard Repair designed to preserve existing data.
 600,000+ Downloads
Step 1. Connect the iPhone
Install and open TunesKit iOS System Recovery. Connect your iPhone to the computer and choose iOS System Repair. Select the problem that matches your device, and then click Start.
Step 2. Choose Standard Repair
Select Standard Repair to attempt the repair without erasing existing data. Use Deep Repair only when Standard Repair fails and you understand that Deep Repair will erase the device.
Step 3. Download the Firmware Package
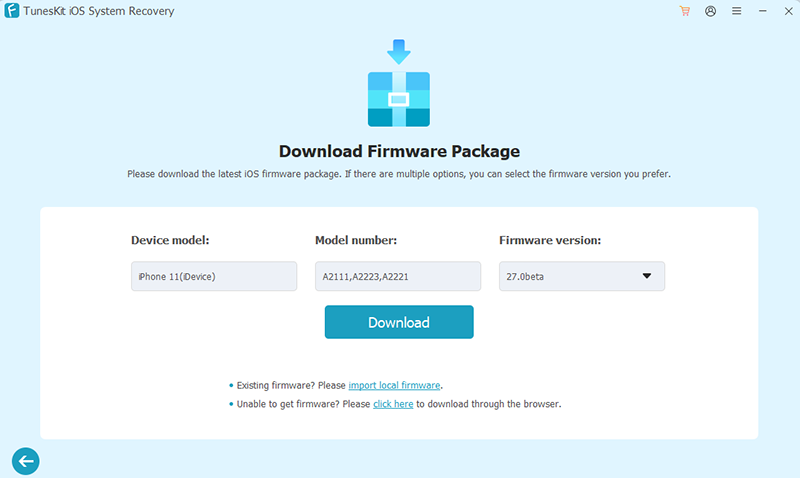
Confirm the detected device model and available firmware version. Click Download to obtain the required firmware package. Make sure the device model and firmware information are correct before continuing.
Step 4. Start the Repair
After the firmware package has downloaded, click Repair. Keep the iPhone connected throughout the process. If the repair succeeds, the iPhone should restart and leave recovery mode.

Method 6. Restore the iPhone
If Update, connection checks, and non-erasing repair methods do not work, you may need to restore the iPhone.
 Warning: Restoring an iPhone erases its data, apps, settings, and accounts. You can recover your information afterward only if you have an iCloud or computer backup.
- Step 1. Open Finder on a Mac or Apple Devices on a Windows PC. Use iTunes only on older systems or when Apple Devices is unavailable. Connect the iPhone and select it when it appears.
- Step 2. When the computer asks you to choose Update or Restore, click Restore. Confirm the action. The computer will erase the device and install the latest compatible version of iOS.
- Step 3. After the process finishes, the iPhone will restart. You can set it up as a new device or restore an available iCloud or computer backup.
If the software download takes more than 15 minutes and the iPhone leaves recovery mode, finish the download first. Then place the device back into recovery mode and repeat the restore.

Method 7. Try a DFU Restore
A Device Firmware Update, or DFU restore, is a deeper restore option for an iPhone that cannot be updated or restored normally.
Unlike regular recovery mode, DFU mode does not load iOS. The iPhone screen remains completely black while the computer detects a device that needs to be restored.
Warning: A DFU restore erases all data and settings on the iPhone. Use it only as a final software troubleshooting method.
How to Enter DFU Mode on iPhone 8 and Later:
- 1. Connect the iPhone to the computer and open Finder or Apple Devices.
- 2. Quickly press and release Volume Up.
- 3. Quickly press and release Volume Down.
- 4. Press and hold the Side button until the screen turns black.
- 5. While continuing to hold the Side button, press and hold Volume Down for about five seconds.
- 6. Release the Side button but continue holding Volume Down for about ten seconds.
The iPhone display should remain black. If the Apple logo or recovery screen appears, the timing was incorrect and you will need to try again.
When Finder, Apple Devices, or iTunes detects the iPhone, choose Restore and keep the device connected until the process finishes.
The button sequence is different on older iPhone models, so follow model-specific DFU instructions when necessary.

FAQs About iPhone Stuck in Recovery Mode
-
Will recovery mode erase my iPhone data?
Simply entering recovery mode does not erase data.
However, the method used to fix the iPhone may affect your information. Choosing Update attempts to reinstall iOS without deleting personal data. Choosing Restore, Deep Repair, or DFU Restore erases the device.
Create a recent backup whenever the iPhone is still accessible.
-
Why does my iPhone keep returning to the recovery screen?
This is often described as a recovery mode loop. It can happen when an iOS installation is incomplete, update files are damaged, the computer connection is interrupted, or iOS cannot start normally.
-
What is the difference between recovery mode and DFU mode?
Recovery mode loads a recovery environment and displays the Connect to Computer screen. It allows Finder, Apple Devices, or iTunes to update or restore iOS.
DFU mode allows the iPhone to communicate with a computer without loading iOS. The screen remains completely black, and the computer can perform a deeper restore.
Both modes can be used to reinstall iOS, but DFU Restore should normally be reserved for cases where a regular update or restore does not work. See more differences between iOS recovery mode and DFU mode.
Closing Thoughts
An iPhone stuck in recovery mode after an iOS 27 update does not always need to be restored or erased. Start with the non-destructive options first, such as a force restart, updating through Finder or Apple Devices, and checking the computer connection.
If the recovery mode screen keeps returning, TunesKit iOS System Recovery offers recovery mode controls and a Standard Repair option designed to fix iOS system issues while preserving existing data. Use Restore or DFU Restore only as a last resort because both can erase the iPhone.
If the device still cannot update, restore, or start normally, contact Apple Support for further diagnosis. For other download, installation, or post-update issues, visit our iOS update troubleshooting center for the right solution.