Full Guide - How to Put iPhone/iPad in DFU Mode
Need to downgrade iOS, fix a failed update, or troubleshoot a serious system issue on your iPhone or iPad? DFU Mode may be the solution. DFU (Device Firmware Update) Mode is Apple's deepest recovery option, allowing your device to restore or update its firmware when standard troubleshooting methods don't work.
This guide will show you how to put iPhone/iPad in DFU Mode step by step.
How to Enter DFU Mode on Different iPhone Models
The steps for entering DFU Mode vary depending on your iPhone model. Follow the instructions below for your device.
For iPhone 8, iPhone X, and Later Models
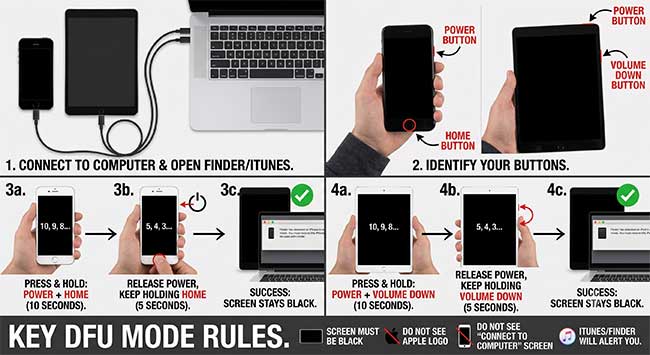
- Step 1. Connect your iPhone to a computer and launch iTunes or Finder.
- Step 2. Quickly press and release the Volume Up button, then quickly press and release the Volume Down button.
- Step 3. Press and hold the Side button until the screen turns black.
- Step 4. While holding the Side button, press and hold the Volume Down button for 5 seconds.
- Step 5. Release the Side button but continue holding the Volume Down button for another 10 seconds.

If the screen remains black and iTunes or Finder detects your device, your iPhone has successfully entered DFU Mode.
For iPhone 7 and iPhone 7 Plus
- Step 1. Connect your iPhone to a computer and open iTunes or Finder.
- Step 2. Turn off your iPhone.
- Step 3. Press and hold the Side button for 3 seconds.
- Step 4. While continuing to hold the Side button, press and hold the Volume Down button for 10 seconds.
- Step 5. Release the Side button and keep holding the Volume Down button for another 5 seconds.

If the screen stays black and your computer detects the device, DFU Mode has been activated successfully.
For iPhone 6s and Earlier Models
- Step 1. Connect your iPhone to a computer and launch iTunes or Finder.
- Step 2. Turn off your iPhone.
- Step 3. Press and hold the Power button for 3 seconds.
- Step 4. While holding the Power button, press and hold the Home button for 10 seconds.
- Step 5. Release the Power button but continue holding the Home button for another 5 seconds.

If the screen remains black and your computer recognizes the device, your iPhone has successfully entered DFU Mode.
How to Put an iPad into DFU Mode
If you need to restore, downgrade, or troubleshoot your iPad, putting it into DFU (Device Firmware Update) mode may help. Follow the instructions below based on whether your iPad has a Home button.
For iPad Models Without a Home Button
- Step 1. Connect your iPad to a Mac or Windows PC using a USB cable. Open Finder (on macOS Catalina or later) or iTunes (on Windows or older macOS versions).
- Step 2. Press and quickly release the Volume Up button. Press and quickly release the Volume Down button. Press and hold the Top (Power) button until the screen turns black.
- Step 3. As soon as the screen goes black, press and hold the Volume Down button while continuing to hold the Top button for about 5 seconds.
- Step 4. Release the Top button but keep holding the Volume Down button for another 10 seconds.

- Step 5. When Finder or iTunes detects your iPad in recovery mode, release the Volume Down button.
![]() Note
Note
If the Apple logo appears, you've held the buttons for too long and will need to start over. In DFU mode, the iPad screen should remain completely black.
For iPad Models With a Home Button
- Step 1. Connect your iPad to a Mac or Windows PC using a USB cable.
- Step 2. Open Finder or iTunes.
- Step 3. Press and hold both the Home button and the Power button for about 10 seconds.
- Step 4. Release the Power button while continuing to hold the Home button.
- Step 5. Keep holding the Home button until Finder or iTunes detects the device.

![]() Note
Note
The iPad screen should stay black while the device is in DFU mode. If the Apple logo appears, repeat the process and try again.
- The iPad screen remains completely black.
- Finder or iTunes detects the device and prompts you to restore it.
- No Apple logo or recovery mode screen is displayed.
What Is DFU Mode, and How Does It Differ from Recovery Mode?
DFU (Device Firmware Update) mode is a special troubleshooting state that allows your iPhone or iPad to communicate with a computer without loading iOS or iPadOS. It is often used to restore a device when standard recovery methods fail.
Although DFU mode and Recovery Mode are both used for troubleshooting, they operate differently. Recovery Mode loads the bootloader and displays the recovery screen, while DFU mode bypasses the operating system and bootloader entirely, allowing deeper-level firmware restoration.
Because DFU mode works at a lower level, it can be useful for resolving severe software issues that Recovery Mode may not be able to fix.

When Should You Use DFU Mode?
In most cases, Recovery Mode is sufficient for updating or restoring an iPhone or iPad. However, DFU mode may be necessary in situations such as:
- Fixing serious software or firmware-related issues.
- Restoring a device that cannot successfully complete a normal recovery.
- Removing beta versions of iOS or iPadOS and returning to a stable release.
- Reinstalling firmware when the device becomes unresponsive or stuck during startup.
Since DFU mode performs a deeper restoration process, it should generally be used only when standard troubleshooting methods have not resolved the issue.
![]() Tips
Tips
To exit DFU mode, perform a force restart on your iPhone or iPad using the right button combination for your model.
Recommended iOS/iPadOS Repair Tool – TunesKit iOS System Recovery
If entering DFU mode doesn't resolve the problem, you may need a dedicated iOS repair tool. TunesKit iOS System Recovery is designed to fix a wide range of iPhone and iPad system issues, including iPhone stuck on the Apple logo, recovery mode loops, black screens, and startup failures.
The software provides a user-friendly interface and guided repair process, making it easy for both beginners and advanced users to troubleshoot iOS and iPadOS problems without complicated steps.
TunesKit iOS System Recovery
Quickly recover your iPhone from DFU mode and restore normal functionality without data loss.
How to Repair Your Device?
Step 1Install TunesKit iOS System Recovery
In the first step, your only task is to download and install the TunesKit iOS System Recovery tool. Next, you'll need to start this third-party tool. Select iOS System Repair on the main screen, and click the Start button.

Step 2Select Standard Repair
Then hit the Standard Repair option to fix your iOS/iPadOS issue without data loss.

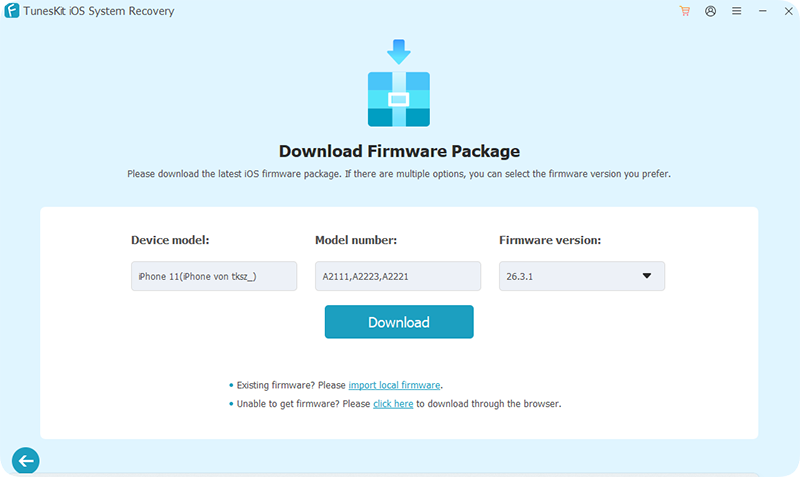
Step 3Download Firmware Package
You'll only need to hit the ''Download'' icon to download the suitable firmware package in this phase.
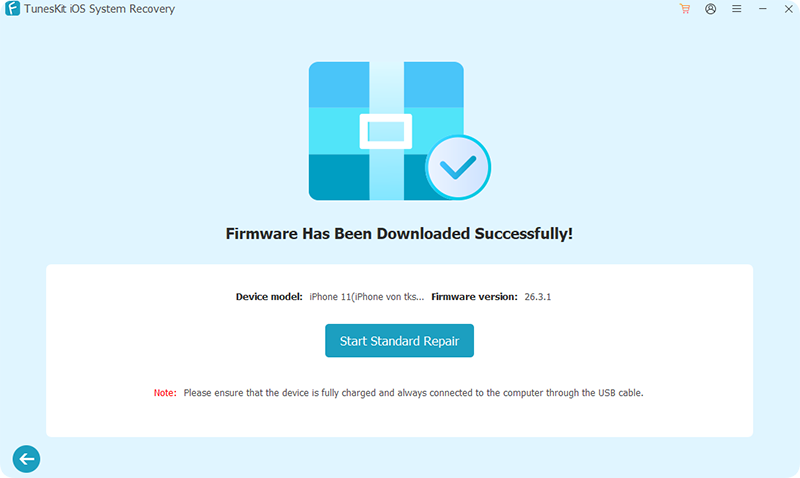
Step 4Start to Repair
After downloading the Firmware Package, your last task is to hit Start Standard Repair to fixing your device. This process will take a few minutes before solving any iOS device issue.
Conclusion
If you are experiencing iOS or iPadOS issues or need to reinstall the system, this guide will show you how to put your iPhone or iPad into DFU mode. However, if DFU mode does not fix the issue, you may try using TunesKit iOS System Recovery. This tool helps restore your device and repair common iOS system problems without losing data when standard methods are not effective.
