- Utilities
- Unlock
- Data Management
- Multimedia
- Solutions
- Support

First, let's watch the following short video and learn how to use TunesKit iOS System Recovery to fix various iOS system issues step by step. You can also enjoy other features of TunesKit, including upgrading or downgrading the iOS system, backing up and restoring data, entering or exiting recovery mode, etc.
Is your iPhone stuck on the Apple logo all of a sudden? Or it keeps rebooting after updating to the latest iOS 17? No worries. The powerful TunesKit iOS System Recovery will help you get it solved immediately. Now simply follow this guide to see how to fix your iOS devices without any data loss with the help of TunesKit in a few clicks only.
Step 1: Launch TunesKit and Connect iPhone to PC
First of all, download and launch TunesKit iOS System Recovery on your Windows or macOS computer. Then connect your iPhone, iPad, or iPod touch to the PC via Apple's original USB cable. Wait till it's detected automatically by TunesKit.
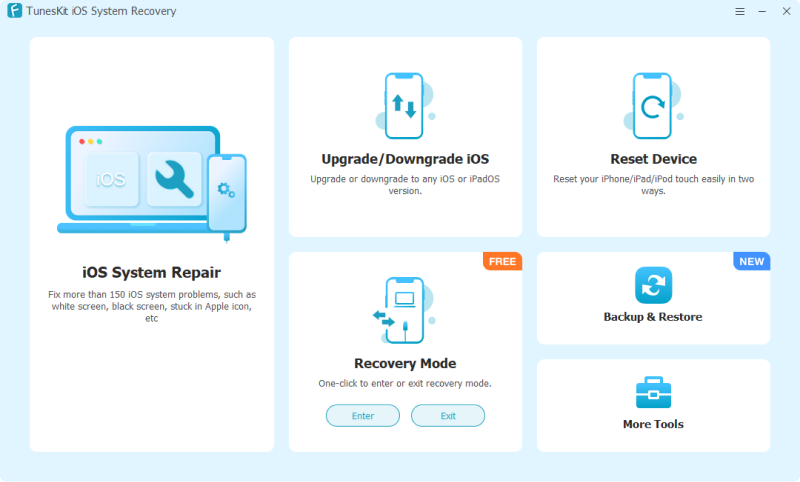
On the main interface, choose the "iOS System Repair" option to fix any system problems on your iOS device. Then click the "Start" button to move forward.
Step 2: Choose a Repair Mode
Here, TunesKit iOS System Recovery offers two kinds of repair modes to help you fix the most common and serious iOS/iPadOS system issues. The Standard Repair Mode is recommended if you need to fix some common iOS issues on your device such as "iPhone stuck in recovery mode" or "iPhone frozen with black screen", etc. This mode won't cause any data loss while repairing the system.

If your device cannot be fixed with the Standard Repair Mode, you are highly recommended to switch to Deep Repair Mode which can solve more serious iOS issues such as "iPhone locked" or "iPhone disabled". But with this mode, it will erase all iOS data on your device.
Step 3: Put iPhone into DFU Mode or Recovery Mode
In the next window, you'll be asked to select the device model you've connected. Then follow the instructions on the interface and put your device into DFU mode. If your device can't boot into DFU mode, you can choose to put it into recovery mode at the bottom. After that, click the "Next" button at the bottom right corner.

If your device is broken and cannot enter recovery mode/DFU mode manually, you can simply use TunesKit's "Enter/Exit Recovery Mode" to put your iOS device into recovery mode automatically.
Step 4: Download and Verify Firmware Package
Here TunesKit will download the latest firmware package matched to your device. Before that, you are suggested to confirm that the device info is correct, including the model version, iOS version, etc. You can correct it if there's anything wrong. Otherwise, click the "Download" button and it will start downloading and verifying the firmware package.

If you failed to download the firmware, you can click "Copy" to download it through a browser. If you have already downloaded the firmware package on your computer, you can click "Select" to import the firmware manually.
Step 5: Start to Recover the iOS System
When the firmware has been downloaded successfully, simply click the "Repair" button and TunesKit iOS System Recovery will begin to fix the device automatically as expected.

Wait a while until the process comes to an end. After that, you can use your device as usual.
Please keep your device connected before the process totally completes. Otherwise, the device might become bricked.
Fail to upgrade your iOS system to the latest version via Settings/iTunes? Not satisfied with the current iOS system and want to revert back to the previous one? Well, you can use TunesKit iOS System Recovery to upgrade or downgrade your iOS system as you like. Next, we'll show you how to upgrade/downgrade the iOS system with TunesKit.
Step 1: Launch TunesKit iOS System Recovery
Download and Launch TunesKit iOS System Recovery on your PC or Mac, and then connect your iOS device via a USB cable to the computer. Then, select the "Upgrade/Downgrade iOS" option on the main interface. And click on the "iOS Upgrade" option to proceed.

Step 2: Start to Upgrade
In this window, ensure that the onscreen information is correct, and choose the firmware version you want to upgrade to. Then click on the "Download" button to download the right firmware package. After downloading the firmware package, click on the "Start Upgrade" button to update the iOS system without data loss.

Step 1: Choose Upgrade/Downgrade iOS
On the main interface of TunesKit iOS System Recovery, select the "Upgrade/Downgrade iOS" option. Click on the "iOS Downgrade" option to downgrade your system.
Step 2: Start to Downgrade
Choose the firmware version (iOS system) you want to revert back to and then click on the "Download" button to download the firmware package. Once the firmware package is downloaded successfully, click on the "Start Downgrade" button to downgrade the iOS system on your device.
Manually forcing an iPhone into Recovery Mode can be tricky and time-consuming. With TunesKit iOS System Recovery, you can enter and exit Recovery mode for free with one simple click. This is quite useful when your buttons are not working, or your iPhone is stuck in the Recovery Mode.
Step 1: Launch TunesKit iOS System Recovery
Download TunesKit iOS System Recovery on your computer. Open the program after the installation is completed. Then, connect your iPhone or iPad to the computer.
Step 2: Enter Recovery Mode
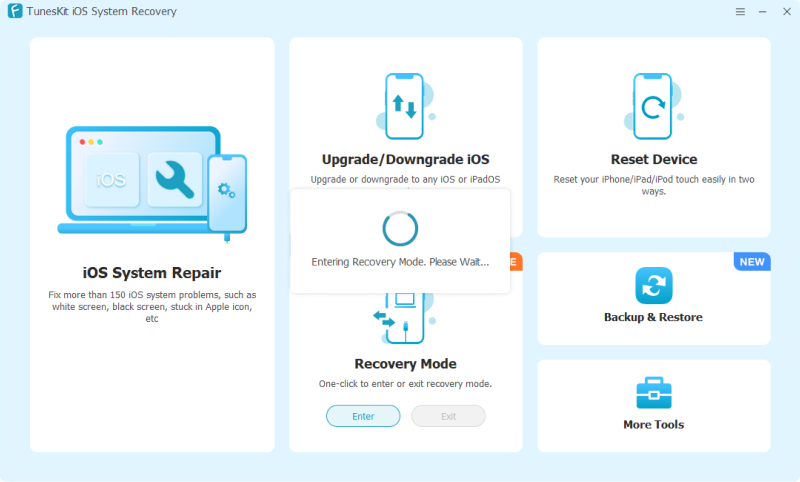
In the Recovery Mode section, click the "Enter" button and TunesKit will put your iPhone or iPad into Recovery mode automatically.
Step 3: Exit Recovery Mode
If your iPhone is stuck in the Recovery mode, just connect your device to the computer and click the "Exit" button. TunesKit iOS System Recovery will help you exit the Recovery mode in a few seconds.
TunesKit iOS System Recovery provides two modes for you to reset your iOS devices with ease. If you remember your device passcode, you can simply use Standard Reset to reset the device to the default settings without data loss. However, if you forgot the passcode for your device, Factory Reset will be the best choice, which will restore your device to factory settings and erase all data. Next, let's see how to reset your iOS device with TunesKit.
Step 1: Install TunesKit iOS System Recovery
Launch TunesKit iOS System Recovery on your computer and connect your iPhone to the computer. Select the "Reset Device" option on the main interface to get started.

Step 2: Start to Reset
Next, click on the "Standard Reset" button to restore your device to the default settings for free. Here, you can follow the onscreen instructions to reset your iPhone settings, including Reset All Settings, Reset Network Settings, Reset Keyboard Dictionary, Reset Home Screen Layout, and Reset Location & Privacy.

Step 1: Choose Reset Device
Open the TunesKit iOS System Recovery program and connect your iPhone to the computer. Select the "Reset Device" option, and then click on the "Factory Reset" button to restore your iOS device to factory settings.
Step 2: Start to Factory Reset
Next, you need to put your iPhone into Recovery/DFU mode. When your iPhone is in Recovery/DFU mode, TunesKit iOS System Recovery will prompt you to download the firmware package to factory reset your iPhone. Ensure that all the onscreen information is correct and click on the "Download" button to start downloading. Once it's done, click on the "Start Factory Reset" button to factory reset your iOS device.
Data loss is often the biggest worry when fixing a phone. To address this, TunesKit iOS System Recovery adds a built-in Backup & Restore feature. It allows you to back up your iPhone or iPad to your computer entirely for free before making any system repairs. You can also restore the data to the device in a few clicks without iTunes or iCloud.
Step 1: Download and Install TunesKit iOS System Recovery
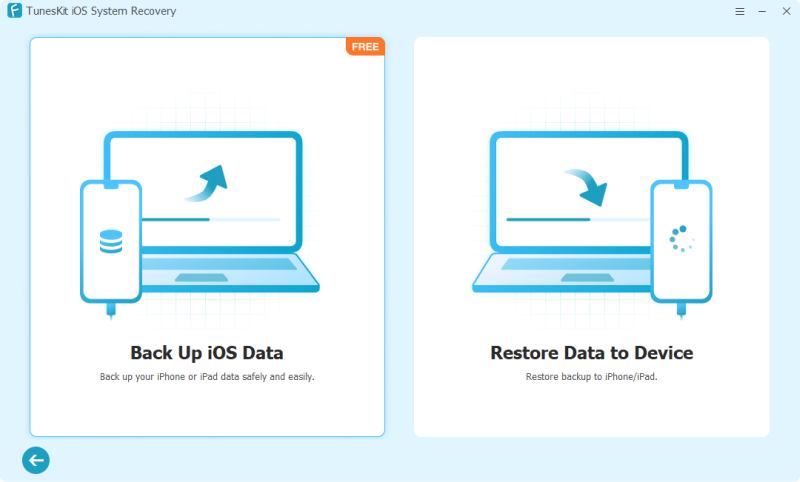
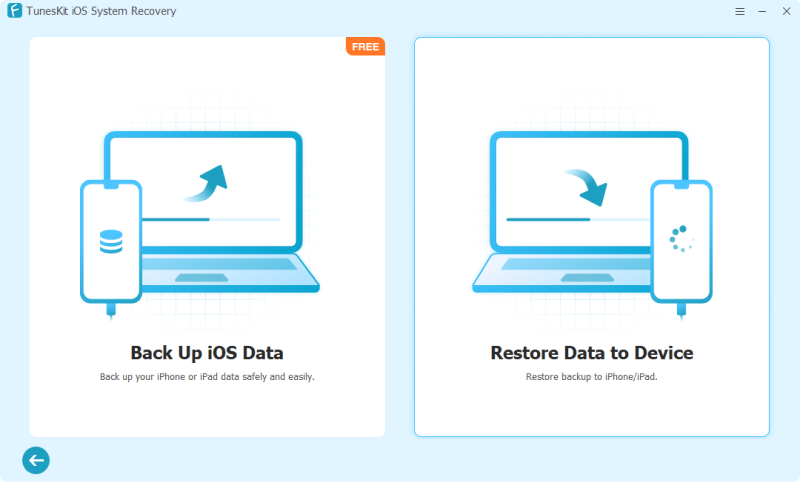
Launch TunesKit iOS System Recovery on your PC or Mac and connect your iPhone. Once the device is recognized, choose the "Backup & Restore" option on the main interface and then select "Back Up iOS Data" to proceed.
Step 2: Start to Back up
Next, choose your backup device and data backup location. If your data is large, please avoid using C drive to store your backup file. Then click the "Start Backup" button, and the program will start backing up your device data.
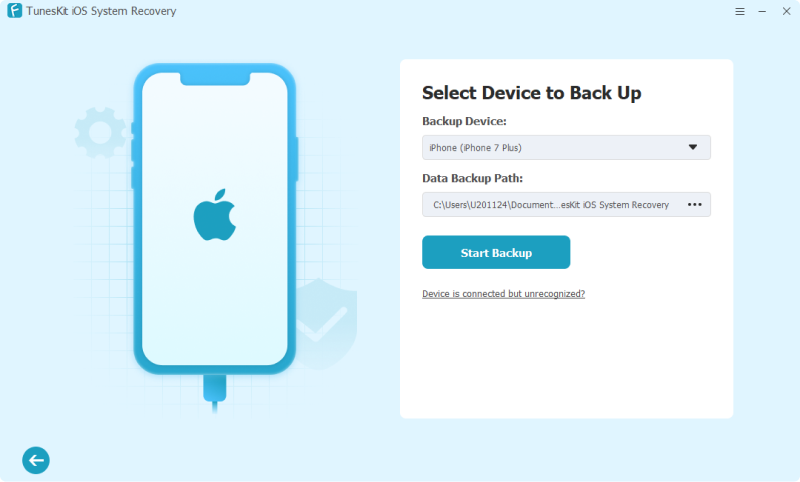
During the backup process, you'll need to enter your device backup password if you have one. Otherwise, TunesKit will create a default password such as "a" for you, and it will be removed later.
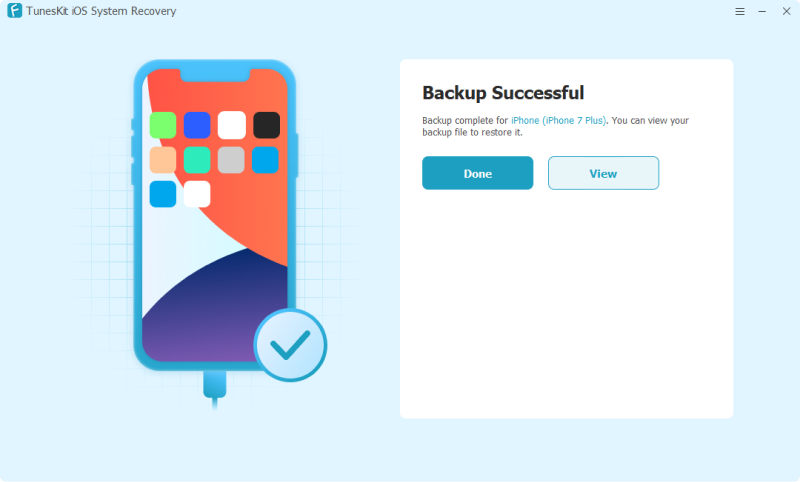
Step 3: Complete Backup
Wait a while until the backup process is done. The time depends on how large is your device data. Then you can click "Done" to back to home screen, or "View" to manage your backup file, such as open the local folder or restore it to your iPhone or iPad.
Step 1: Choose "Backup & Restore" Feature
On the main interface, please select "Backup & Restore" and then "Restore Data to Device" to restore any backup file to your iOS device.
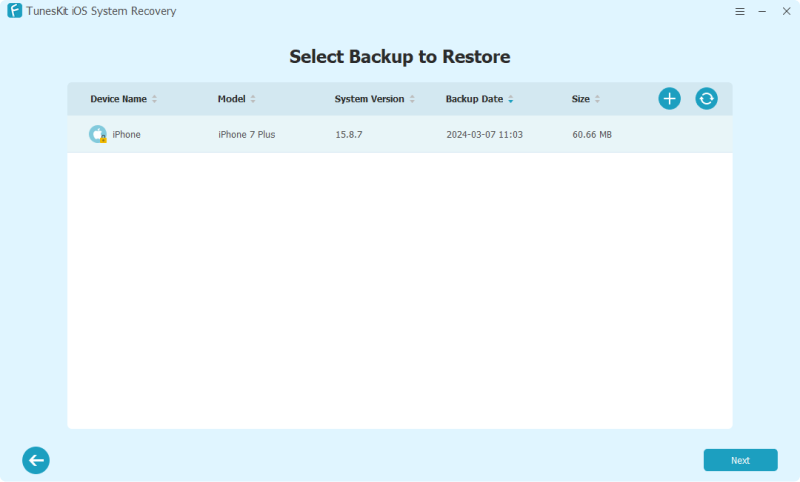
Step 2: Select Backup to Restore
Here, you'll see all the backup files you've backed up on your computer, including device name, model, iOS version, etc. You can also click the "+" button to import third-party backup files manually. Choose the recent one and click "Next" to continue.
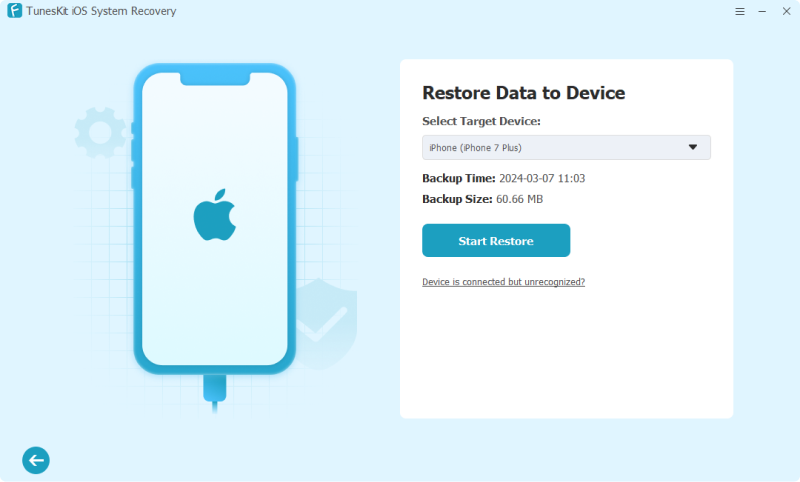
Step 3: Restore Backup Data to iPhone/iPad
Now, please select your target device for restoring. Check your device model, backup time, backup size are all correct. Then click the "Start Restore" button and the software will begin to restoring the data for you. Once the restore is complete, your device will restart and reload all the data.
Restoring data to device will overwrite the existing data on your device. Please make sure your important data is backed up in advance.
Planning to sell your iPhone or give it to someone else? Concerned about someone restoring your personal data? With TunesKit iOS System Recovery, you can completely wipe all data, making it impossible for anyone to retrieve it. Here's how to erase your device using TunesKit iOS System Recovery.
Step 1: Launch TunesKit and Connect iPhone to Computer
Launch TunesKit iOS System Recovery on your PC or Mac. Then connect your iPhone to the computer via a USB cable. After it's detected by the program, click the "More Tools" option on the main interface. Then choose "Anti-Recovery Erasure", and click the "Start Erasure" button to get started.

Step 2: Download the Firmware Package
Next, you'll be asked to download the latest firmware package. Check your device model, model number and choose the firmware version you prefer. If everything is right, click the "Download" button.

Step 3: Start the Anti-Recovery Erasure
After the firmware package is downloaded successfully, you can click the "Start Erasure" button. Then TunesKit will start to erase your device completely.

Now, wait patiently until the anti-recovery data erasure process is done. Please make sure that your device is fully charged and always keep it connected to the computer during the process.
Excited to try the new features as soon as the latest iOS Beta is released? With TunesKit iOS System Recovery, it's easier than ever! TunesKit makes it simple to explore the newest iOS features without a developer account. Follow the steps below!
Step 1: Launch TunesKit and Connect iPhone to Computer
Download and launch TunesKit iOS System Recovery on your computer. Use an original USB cable to connect your iPhone to the computer. Once TunesKit detected your device, please click the "More Tools" on the main interface, and then choose the "Explore iOS Beta Features" module.

Step 2: Download the Upgrade Firmware Package
Next, TunesKit will download the upgrade firmware package. Before that, please confirm the related information such as device model, current iOS version and firmware version. If there are nothing wrong, click the "Download" button.

Step 3: Start to Upgrade
After the upgrade firmware is downloaded successfully, click the "Start Upgrade" button, and TunesKit will help you update to the latest iOS Beta version.

Now wait patiently until the device update is completed. Once it's done, your iPhone will restart automatically. Enter your passcode to access it and start enjoying the latest iOS features.
iTunes is a handy tool for managing your Apple devices, including iPhones, iPads, and iPods. It lets you sync your media library, back up your device, update software, and transfer files between your computer and device.
Having trouble with iTunes connection or sync errors? No worries! TunesKit iOS System Recovery can fix over 200 types of iTunes errors on both Windows and Mac. Here are the quick steps.
Step 1: Choose iTunes Repair
Download and launch TunesKit iOS System Recovery on your Windows computer. Choose the "iTunes Repair" option on the main interface.

You are not necessarily required to connect your iPhone to the computer. It will not affect the result.
Step 2: Start to Repair
TunesKit program will start to detect your iTunes component status. If your iTunes shows an error message, you can click the "Repair" button to proceed.

Then TunesKit iOS System Recovery will help you fix the iTunes error immediately. Wait for a few minutes, and your iTunes problem will be solved easily.

Step 1: Choose Repair Sync Errors
Launch TunesKit iOS System Recovery on your macOS computer, and click the "Repair Sync Errors" module on the main interface to get started.

Step 2: Start to Repair
Next, click the "Repair" button and TunesKit will start to resolve the sync errors for you. Wait a while until the sync errors are repaired successfully.