


How to Fix Auto-Rotate Not Working on iOS 27?
When you turn your iPhone to watch a video or view a photo, but the screen stubbornly refuses to switch to landscape mode. It's quite irritating. Many iPhone users have reported that their screen won't rotate when turning the device sideways.
In this guide, we'll walk you through several proven solutions to fix auto-rotate not working on iOS 27 — from checking the Rotation Lock and restarting your device, to updating your system and resetting key settings. By the end, your screen should rotate smoothly again just like it's supposed to.

Why Is My iPhone Auto Rotate Not Working?
If your iPhone auto-rotate is not working, it usually means a setting or sensor issue is preventing the screen from adjusting when you turn your device. Here are the most common reasons:
- 01 Rotation Lock is enabled — This is the top cause. If the Rotation Lock icon is turned on in Control Center, your screen will stay fixed in portrait mode.
- 02 App limitations — Some apps (like the Home Screen, certain games, or camera modes) don't support rotation.
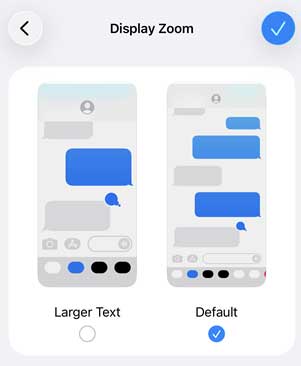
- 03 Display Zoom is on — If Display Zoom is enabled under Settings > Display & Brightness > Display Zoom, it can block rotation on some models.
- 04 Software glitch — Temporary iOS bugs may cause rotation sensors to stop responding properly.
- 05 Hardware issue — The gyroscope or accelerometer (which detects movement) might be malfunctioning.

How to Fix Auto-Rotate Not Working on iOS 27?
Now that you know the possible reasons why auto-rotate is not working on iOS 27, let's move on to the practical solutions. Follow the methods below to fix the issue and get your iPhone screen rotation working properly again.
Fix 1. Turn Off Portrait Orientation Lock
The most common reason your iPhone screen does not rotate is that Portrait Orientation Lock is enabled. When this feature is turned on, your iPhone stays in portrait mode even when you hold it horizontally.
To disable Portrait Orientation Lock:
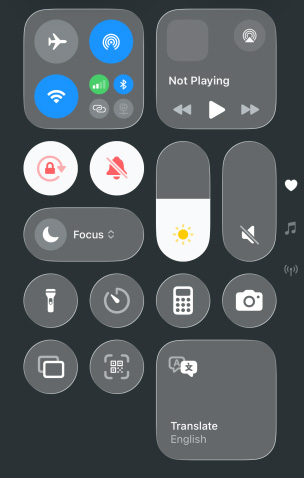
- Step 1. Swipe down from the top-right corner of your screen to open Control Center.
- Step 2. Find the icon showing a padlock with a circular arrow around it.
- Step 3. If the icon is highlighted, tap it to turn off the lock.
- Step 4. A message saying "Portrait Orientation Lock: Off" may appear at the top of your screen.
After disabling the lock, open an app that supports landscape mode, such as Safari, Photos, or YouTube, and turn your iPhone sideways to test the rotation.
Fix 2. Test Screen Rotation in Another App
Before troubleshooting further, check whether the problem happens in every app or only one specific app. Not all apps support landscape mode. Some applications are designed to stay in portrait orientation, and certain screens may not rotate depending on your iPhone model and settings.
Try rotating your iPhone in apps that normally support landscape mode, such as:
- Safari
- Photos (while viewing an image)
- YouTube videos
- Calculator (on supported iPhone models)

If rotation works in other apps, the issue is likely caused by the app itself rather than your iPhone.
Fix 3. Restart Your iPhone
A temporary software glitch may prevent the rotation feature from working correctly. Restarting your iPhone can refresh system processes and fix minor issues.
To restart your iPhone:
- Step 1. Press and hold the Side button and either Volume button until the power-off slider appears.
- Step 2. Drag the slider to turn off your iPhone. Wait a few seconds.
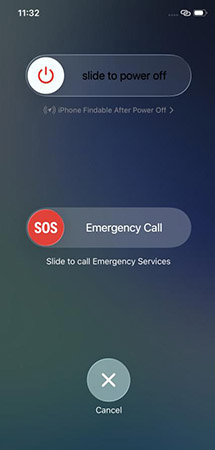
- Step 3. Press and hold the Side button again until the Apple logo appears.
Once your iPhone turns back on, check whether the screen rotates normally.
Fix 4. Verify Display Zoom Settings
If you are using the "Display Zoom" feature to make text and icons larger, this can sometimes disable landscape mode on the Home Screen and in certain apps.
To check your Display Zoom settings:
- Step 1. Open Settings app on your iPhone.
- Step 2. Tap Display & Brightness. Select Display Zoom.
- Step 3. If it is set to Larger Text, switch to Default.
- Step 4. Follow the instructions to apply the change. After your iPhone restarts, test the auto-rotate feature again.
Fix 5. Update iOS and Apps
Outdated software is one of the most common reasons why iOS 27 auto-rotate is not working. Regular updates often include bug fixes that can restore proper screen rotation.
Update iOS:
- Step 1. Open Settings app on your iPhone.
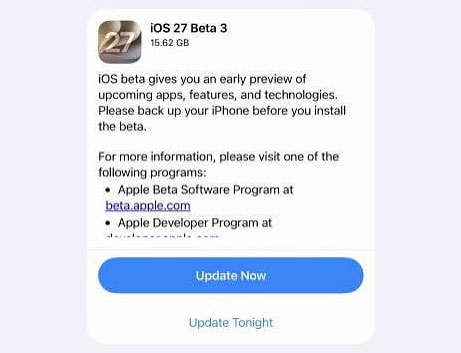
- Step 2. Go to General > Software Update.
- Step 3. Tap the Update Now button to download and install any available update.
Update Apps:
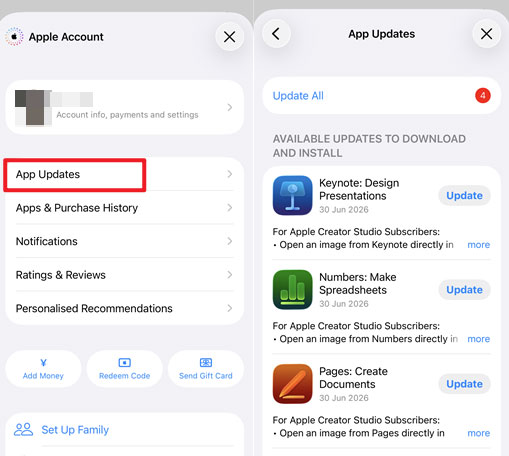
- Step 1. Open the App Store on your iPhone.
- Step 2. Tap your profile picture from the top-right corner.
- Step 3. Tap the App Updates option, and select the Update All. After updating, restart your iPhone and check if auto-rotate works again.
Fix 6. Check Your iPhone Motion Sensors
Auto-rotate depends on your iPhone's built-in motion sensors, including the accelerometer and gyroscope. If these sensors are not working correctly, your screen may fail to rotate.
Try the following checks:
- Step 1. Open the Measure app and use the Level feature to see if your iPhone detects movement properly.
- Step 2. Open the Compass app and check whether the sensor responds normally.
- Step 3. Remove any thick case or accessory that may interfere with device movement.

If motion detection appears abnormal across multiple apps, the issue may be related to the hardware sensors.
Fix 7. Reset All Settings
If none of the previous steps have worked, the issue may be a corrupted setting. You can reset all system settings without losing your personal data like photos, apps, or messages. However, this will reset all your preferences for Wi-Fi, Bluetooth, notifications, and more, so use this as a later option.
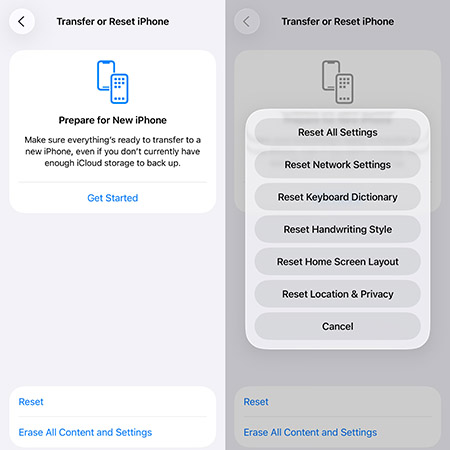
- Step 1. Go to Settings > General > Transfer or Reset iPhone > Reset.
- Step 2. From the menu, tap Reset All Settings. You will need to enter your passcode to confirm.
[No Data Loss] One-click to Fix Auto-Rotate Not Working on iOS 27
While the methods above solve most common cases, what happens when the auto-rotate not working on iOS 27 problem is deeper than a simple setting? Persistent issues, especially after a major iOS update, often point to a more complex software glitch or a corrupted file within the operating system itself.
Before you consider a full factory reset, which erases all your personal data, a dedicated system repair tool is often the best next step. TunesKit iOS System Recovery is a professional tool designed to fix over 150 different iOS system issues, including iPhone screen won't rotate, this iPhone encountered an issue while starting, and iPad screen issue, without causing any data loss. It works by safely reinstalling the iOS 27 firmware to repair the underlying problem.
Fix iOS 27 Auto-Rotate Not Working with TunesKit
Easily repair system glitches and restore normal screen rotation on your iPhone without data loss in just a few clicks.
 600,000+ Downloads
If you have exhausted all other options, here is how to use TunesKit's Standard Repair to fix the issue.
Step 1Connect Your iPhone
Download and install TunesKit iOS System Recovery onto your Windows or Mac computer, and launch it. Connect your iPhone to the computer using an Apple USB cable. Once the program detects your device, select the "iOS System Repair" module and click the "Start" button to begin.

Step 2 Select Standard Repair Mode
You will be presented with two options: Standard Repair and Deep Repair. It is crucial to select Standard Repair first. This mode resolves most common system issues (like auto-rotate failing) and, most importantly, it does not erase any of your data. (Deep Repair is only for very severe issues and will erase your device).

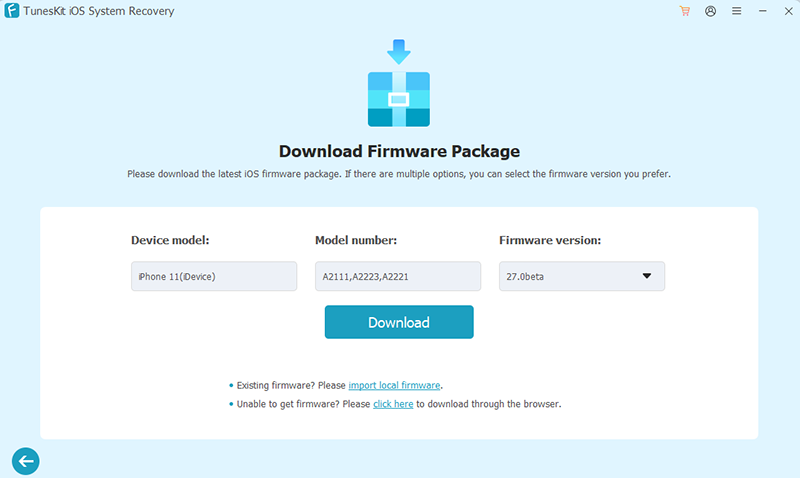
Step 3 Download the Firmware Package
The software will automatically detect your iPhone model and the latest iOS 27 firmware. Confirm that the information is correct, and then click the "Download" button. The program will download the necessary firmware file to repair your phone.
Step 4Start the Repair Process
Once the firmware has been downloaded and verified, you will see a "Start Standard Repair" button. Click it to begin the system repair. Ensure your iPhone remains connected to the computer throughout this entire process.
The repair may take several minutes. Once it is finished, your iPhone will restart automatically, and the TunesKit software will show a "Repair Completed" message. You can then disconnect your iPhone and test the auto-rotate function, which should now be working correctly.

Conclusion
This guide explains how to fix auto-rotate not working on iOS 27. You can try the above methods one by one. For more persistent software glitches, you can use TunesKit iOS System Recovery. This professional tool can fix over 150 different system issues, using a Standard Repair mode that specifically resolves problems like failed auto-rotation without erasing any of your personal data. Try it now by clicking the download button.


