


How to Fix Mac Says "Please Unlock iPhone" Though It's Unlocked
- Disconnect the iPhone from your Mac. Unlock it with the device passcode, keep the screen awake, and reconnect it using a data-capable USB cable.
- Click Allow on the Mac if prompted, tap Trust on the iPhone, and enter the iPhone passcode.
- Then open Photos, select the iPhone under Devices, and wait for the import screen to load.
- Apple's current photo-import process requires the Mac to approve the accessory and the iPhone to trust the computer when those prompts appear.
Does the Photos app on your Mac keep displaying "Please Unlock iPhone" even though your iPhone is already unlocked? In most cases, the screen passcode is not the real problem. The Mac may not have completed the USB authorization process, the Trust This Computer permission may be damaged, or the cable may support charging but not data transfer. The following solutions focus on restoring the connection without erasing your iPhone or deleting any photos.

- Why Does Photos Say "Please Unlock iPhone" When It Is Already Unlocked?
- Identify the Problem Before You Start
-
How to Fix "Please Unlock iPhone" on Mac
- Fix 1. Disconnect, Unlock, and Reconnect the iPhone
- Fix 2. Click Allow on the Mac and Trust on the iPhone
- Fix 3. Reset Location & Privacy to Restore the Trust Prompt
- Fix 4. Check Wired Accessories on the iPhone
- Fix 5. Check the USB Cable, Port, Adapter, and Connector
- Fix 6. Restart and Update the iPhone and Mac
- Fix 7. Check Whether Finder Recognizes the iPhone
- Fix 8. Check iCloud Photos and Optimize iPhone Storage
- Fix 9. Reset Network Settings or Test Another Mac
- What If Image Capture Also Says "Please Unlock iPhone"?
- Alternative Ways to Transfer iPhone Photos to a Mac
- FAQs About the "Please Unlock iPhone" Photos Error
- Conclusion
Why Does Photos Say "Please Unlock iPhone" When It Is Already Unlocked?
The message can remain on the Mac when the iPhone screen is unlocked but the computer has not received permission to access its data. Common causes include:
- The iPhone was connected before it was unlocked;
- The Allow accessory to connect prompt was dismissed on the Mac;
- Don't Trust was previously selected on the iPhone;
- The Trust This Computer alert did not appear;
- The USB cable supports charging but not data transfer;
- The USB port, adapter, hub, or iPhone connector is not working correctly;
- Wired accessory access is restricted;
- The iPhone appears in Finder but not in Photos;
- macOS or iOS needs to be updated;
- Original photos are stored only in iCloud because Optimize iPhone Storage is enabled.
The correct fix depends on where the connection fails.
Identify the Problem Before You Start
| What you see | Likely cause | Start with |
|---|---|---|
| The iPhone charges but does not appear in Finder | Cable, port, accessory permission, or USB recognition | Fix 1, Fix 2, Fix 4, and Fix 5 |
| The iPhone appears in Finder but not in Photos | Photos app or import-session issue | Fix 6 and Fix 7 |
| Photos keeps saying "Please Unlock iPhone" | Trust or USB authorization problem | Fix 1, Fix 2, and Fix 3 |
| Trust This Computer does not appear | Saved trust record or permission issue | Fix 3 |
| Only some photos are available | iCloud Photos and Optimize Storage | Fix 8 |
| Image Capture shows the same message | System-level USB authorization issue | Use the Image Capture section |
| AirDrop works but USB import does not | Cable, port, Trust, or accessory permission | Fix 2, Fix 4, and Fix 5 |
How to Fix "Please Unlock iPhone" on Mac
The error is usually caused by an incomplete Trust connection, restricted USB access, a faulty cable, or outdated software. Try the following fixes in order, starting with reconnecting the unlocked iPhone and approving all required permission prompts.
Fix 1. Disconnect, Unlock, and Reconnect the iPhone
The order in which you connect the device can matter. If the iPhone was locked when the cable was connected, the Mac might not establish a complete data connection.
- Step 1. Disconnect the USB cable from the iPhone.
- Step 2. Unlock the iPhone using its device passcode.
- Step 3. Keep the iPhone on the Home Screen.
- Step 4. Reconnect it directly to the Mac.
- Step 5. Keep the screen awake until the iPhone appears in Finder and Photos.
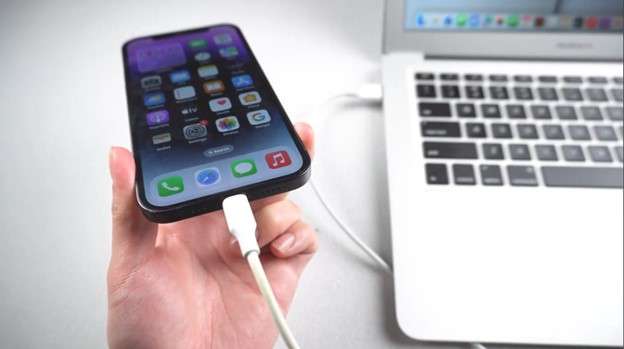
Apple recommends disconnecting an unrecognized accessory, unlocking the iPhone, and then reconnecting it. By default, an iPhone must be unlocked before it can communicate with a computer or other wired accessory. If this resolves the error, open Photos and select the iPhone from the sidebar.
Fix 2. Click Allow on the Mac and Trust on the iPhone
Two separate authorization prompts may appear when you connect an iPhone to a Mac:
- 1. Allow accessory to connect? on the Mac;
- 2. Trust This Computer? on the iPhone.
Both permissions may be required.
 View Also: How to Bypass Trust This Computer on iPhone?
How to Approve the Connection
- Step 1. Connect the unlocked iPhone to the Mac. If the Mac displays an accessory alert, click Allow.
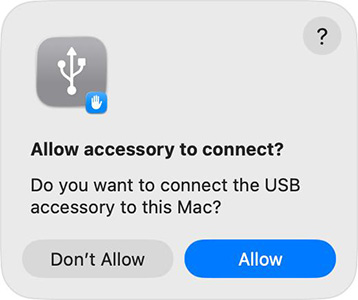
- Step 2. Check the iPhone for a Trust This Computer? alert.
- Step 3. Tap Trust. Enter the iPhone passcode.

- Step 4. Open the Photos app on the Mac. Select the iPhone under Devices.
Do not click Don't Allow on the Mac or Don't Trust on the iPhone. If either option was selected accidentally, disconnect the cable and reconnect it. Apple's device-recognition guidance specifically instructs users to approve the accessory on the Mac and trust the computer on the iPhone.
What If the Allow Prompt Does Not Appear?
The Mac may already remember the accessory, or its accessory setting may approve connections automatically. Continue to check Finder and Photos. When using an Apple silicon Mac laptop, you can also review:
Apple menu > System Settings > Privacy & Security > Allow accessories to connect
The available options may include:
- Always Ask;
- Ask for New Accessories;
- Automatically Allow When Unlocked;
- Always Allow.
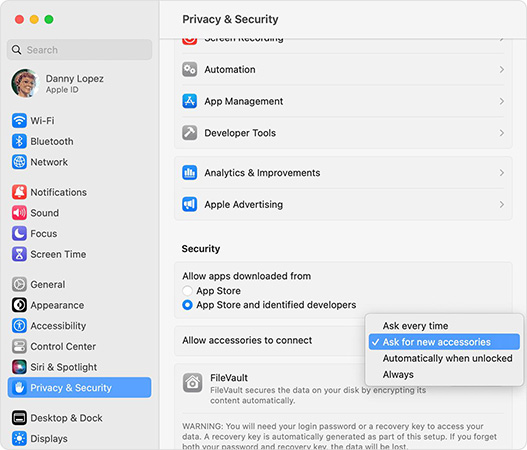
Apple silicon Mac laptops can require approval before a new or unknown USB accessory connects.
Fix 3. Reset Location & Privacy to Restore the Trust Prompt
If Trust This Computer? never appears, or you previously tapped Don't Trust, reset the saved trust permissions on the iPhone. This does not erase photos, messages, apps, or other personal data. However, apps may ask for location, camera, microphone, photo, or other privacy permissions again afterward.
How to Reset the Trust Relationship
- Step 1. Disconnect the iPhone from the Mac. On the iPhone, open Settings.
- Step 2. Go to General > Transfer or Reset iPhone > Reset.
- Step 3. Tap Reset Location & Privacy. Enter the iPhone passcode and confirm the reset.
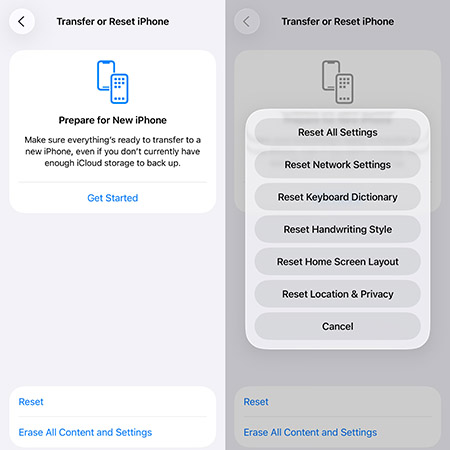
- Step 4. Unlock the iPhone and reconnect it to the Mac. Click Allow on the Mac if prompted.
- Step 5. Tap Trust on the iPhone and enter the passcode.
Resetting Location & Privacy clears the computer trust records. The next time the iPhone connects to a previously trusted computer, the Trust This Computer alert should appear again.
Fix 4. Check Wired Accessories on the iPhone
The Wired Accessories setting controls when an iPhone can communicate with USB, Thunderbolt, and other wired devices. To check it:
- Step 1. Open Settings on the iPhone. Tap Privacy & Security.
- Step 2. Scroll to the Security section.
- Step 3. Tap Wired Accessories.
On an iPhone With USB-C
Available choices may include:
- Always Ask
- Ask for New Accessories
- Automatically Allow When Unlocked
- Always Allow
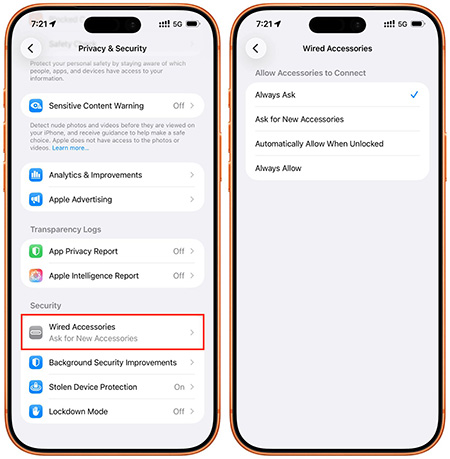
For troubleshooting, select Automatically Allow When Unlocked, reconnect the unlocked iPhone, and approve any prompts that appear.
On an iPhone With Lightning
The available choices may include:
- Automatically Allow When Unlocked
- Always Allow
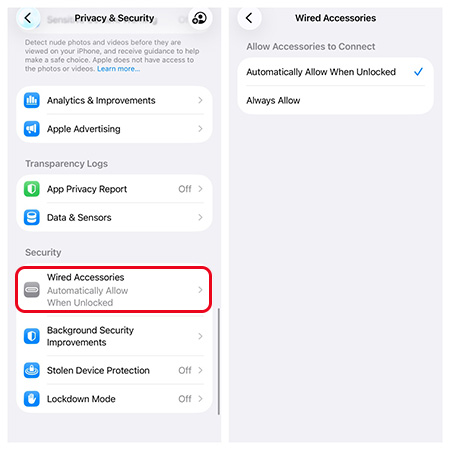
Apple lists Automatically Allow When Unlocked as the default setting. If the accessory is not recognized, Apple recommends disconnecting it, unlocking the device, and connecting it again. If the Wired Accessories setting is controlled by an employer or school, the device may be supervised through mobile device management. Contact the administrator before changing managed settings.
Fix 5. Check the USB Cable, Port, Adapter, and Connector
An iPhone can charge through a cable that cannot reliably transfer data. This can make the connection look successful while Finder and Photos cannot access the device.
Test the Cable
You should use one of the following cables:
- The cable supplied with the device;
- An Apple cable;
- A certified USB-C or Lightning data cable;
- A cable that you have successfully used for syncing or file transfer.
Avoid using a charge-only cable.
Test the Mac Connection
You should try the following:
- 1. Connect the cable directly to the Mac;
- 2. Avoid USB hubs, docks, monitors, and adapters temporarily;
- 3. Try another USB or Thunderbolt port;
- 4. Disconnect other unnecessary USB devices;
- 5. Test another compatible cable.
Check the iPhone Connector
You should inspect the USB-C or Lightning port for:
- Dust;
- Lint;
- Moisture;
- A loose connection;
- Bent or damaged contacts.
Do not insert metal tools or apply liquid cleaner inside the connector. Apple recommends checking the cable, USB port, and charging port when a computer does not recognize an iPhone. The cable must support both charging and data transfer.
Fix 6. Restart and Update the iPhone and Mac
A temporary Photos, USB, or device-service problem can prevent the Mac from completing the import connection.
How to Restart the iPhone
- Step 1. Go to Settings > General > Shut Down.
- Step 2. Turn the iPhone off, wait about 30 seconds, and turn it back on.
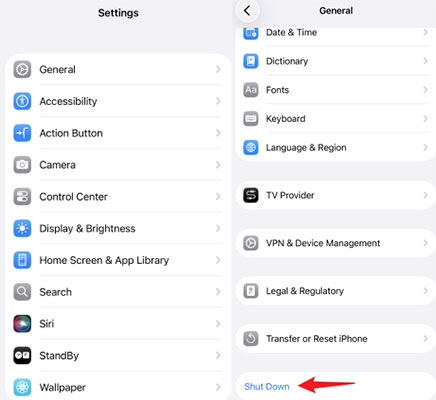
How to Restart the Mac
- Open the Apple menu and choose Restart

After both devices restart, you should:
- 1. Unlock the iPhone;
- 2. Connect it directly to the Mac;
- 3. Approve the Allow and Trust prompts;
- 4. Open Photos again.
How to Update the iPhone
- Step 1. Go to Settings > General > Software Update.
- Step 2. Tap Update Now to install the latest compatible iOS update.
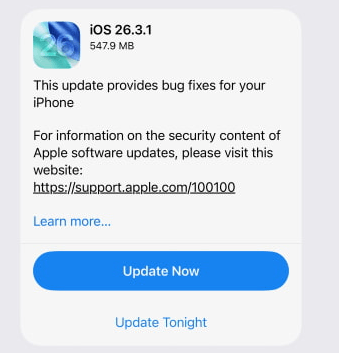
View Also: iPhone Software Update Failed? Fix It!
How to Update the Mac
- Step 1. Go to Apple menu > System Settings > General > Software Update.
- Step 2. Install the latest compatible macOS update.

Apple includes restarting both devices and installing current software among its recommended steps when an iPhone is not recognized by a computer.
Fix 7. Check Whether Finder Recognizes the iPhone
Finder can help determine whether the problem affects the entire USB connection or only the Photos app.
How to Check the iPhone in Finder
- Step 1. Connect and unlock the iPhone. Open Finder.
- Step 2. Look under Locations in the sidebar. Select the iPhone.
- Step 3. Click Trust in Finder if requested. Tap Trust on the iPhone and enter the device passcode.
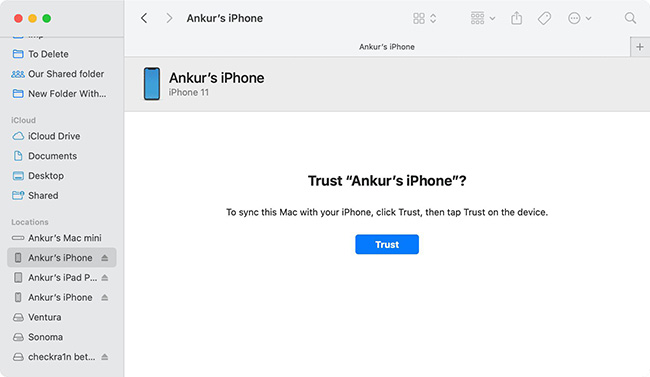
If Finder does not show the iPhone, the problem is probably related to:
- Accessory permission;
- Trust authorization;
- Cable or port;
- USB recognition;
- System software;
- Hardware.
Return to Fixes 1 through 6.
If Finder shows the iPhone but photos does not,**** the system-level connection is working, so try refreshing Photos:
- Step 1. Quit Photos completely. Disconnect and reconnect the unlocked iPhone.
- Step 2. Open Photos again. Wait for the iPhone to appear under Devices.
- Step 3. Select the device and allow time for thumbnails to load.
You can also restart the Mac and test a different Photos library while holding the Option key as Photos opens. Do not delete or replace the original library during testing. Apple's Finder procedures also require the Mac and iPhone to trust each other before the computer can access the device.
Fix 8. Check iCloud Photos and Optimize iPhone Storage
If the iPhone appears in Photos but some pictures or videos are missing, the unlock message may not be the only issue. When iCloud Photos and Optimize iPhone Storage are enabled, full-resolution originals can remain in iCloud while smaller versions are stored on the iPhone. Some items may therefore be unavailable for direct USB import to a Mac that is not using iCloud Photos.
How to Check the iPhone Settings
- Step 1. Go to Settings > [Your Name] > iCloud > Photos.
- Step 2. Check if these features are enabled: Sync this iPhone, Optimize iPhone Storage, Download and Keep Originals.

Option 1. Use iCloud Photos on the Mac
- Step 1. Open Photos on the Mac. Choose Photos > Settings.
- Step 2. Open the iCloud tab. Turn on iCloud Photos.
- Step 3. Sign in with the same Apple Account and allow the library to synchronize.
Option 2. Download Originals to the iPhone
When the iPhone has enough free storage, select Download and Keep Originals and keep the device connected to Wi-Fi and power while the original files download. Do not immediately turn off iCloud Photos as a general fix. Turning off synchronization can create additional decisions about downloading or removing local copies.
Option 3. Download From iCloud Instead
You can download photos through:
- Photos on a Mac using iCloud Photos;
- iCloud.com;
- Another device signed in to the same Apple Account.
Fix 9. Reset Network Settings or Test Another Mac
Use this only after the earlier permission and connection fixes fail. Apple lists Reset Network Settings as a later step when Trust This Computer alerts continue to malfunction. It resets saved Wi-Fi networks and passwords, cellular settings, VPN settings, and APN settings.
How to Reset Network Settings
- Step 1. Open Settings on the iPhone.
- Step 2. Go to General > Transfer or Reset iPhone > Reset
- Step 3. Tap Reset Network Settings. Enter the passcode and confirm.
- Step 4. Reconnect to Wi-Fi afterward. Unlock the iPhone and connect it to the Mac again.
Because this reset removes saved network information, try Reset Location & Privacy first.
Test Another Mac
Connect the unlocked iPhone to another trusted Mac using the same cable.
- If the iPhone works on another Mac, the original Mac likely has a software, port, permission, or Photos-library problem.
- If it fails on both Macs, test another cable and inspect the iPhone connector.
- If no computer recognizes the iPhone, contact Apple Support or an authorized service provider.
What If Image Capture Also Says "Please Unlock iPhone"?
Image Capture uses the same underlying iPhone-to-Mac authorization process. If both Photos and Image Capture ask you to unlock the device, the problem is more likely related to Trust, USB permission, the cable, or system recognition than to the Photos app alone. Try these steps in order:
- 1. Quit Photos and Image Capture;
- 2. Disconnect the iPhone;
- 3. Unlock the iPhone;
- 4. Reconnect it directly to the Mac;
- 5. Click Allow on the Mac;
- 6. Tap Trust on the iPhone;
- 7. Reset Location & Privacy if the Trust prompt is missing;
- 8. Check Wired Accessories;
- 9. Try another cable and port;
- 10. Restart and update both devices.
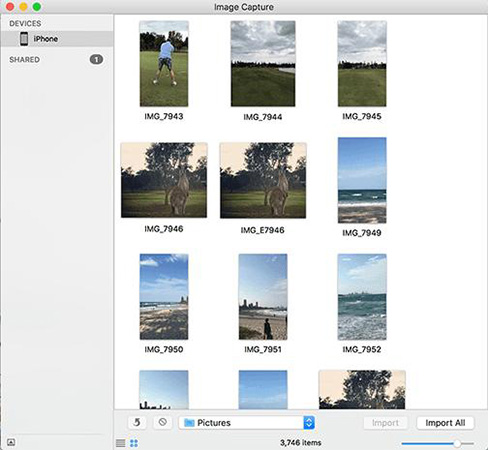
Then open Applications > Image Capture. Select the iPhone under Devices and choose an import destination. Apple's Image Capture guide requires the device to be connected by cable and turned on before it can be selected for importing.
Alternative Ways to Transfer iPhone Photos to a Mac
When USB importing is still unavailable, use one of the following alternatives while you continue troubleshooting.
Option 1. Use AirDrop
AirDrop is suitable for transferring a selected number of photos or videos.
- Step 1. Turn on Wi-Fi and Bluetooth on both devices. Open Photos on the iPhone.
- Step 2. Select the photos or videos. Tap Share > AirDrop.
- Step 3. Select the Mac.
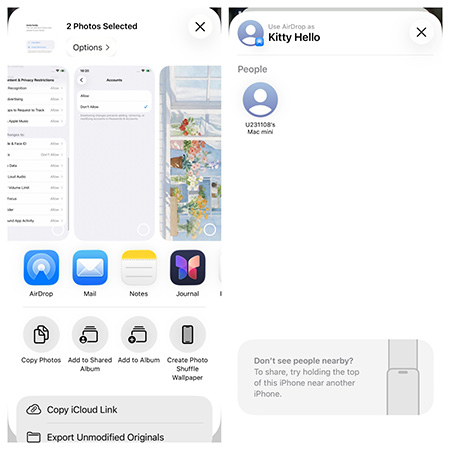
- Step 4. Accept the transfer on the Mac if requested. The files normally appear in the Downloads folder.
Option 2. Use iCloud Photos
Enable iCloud Photos on the iPhone and Mac to synchronize the library wirelessly. This is often the simplest option when the original images are already stored in iCloud because Optimize iPhone Storage is enabled.
Option 3. Download From iCloud.com
Sign in to iCloud.com from a trusted browser, open Photos, select the required items, and download them to the Mac.
Option 4. Use Image Capture
If Finder recognizes the iPhone and Image Capture works, it can import photos directly into a selected folder without adding them to a Photos library.
FAQs About the "Please Unlock iPhone" Photos Error
-
Will Reset Location & Privacy delete my photos?
No. It resets saved privacy permissions and computer trust relationships. Apps may ask for access to location, photos, the camera, the microphone, and other data again.
-
Why are only some iPhone photos available to import?
If iCloud Photos and Optimize iPhone Storage are enabled, some full-resolution originals may be stored in iCloud rather than locally on the iPhone. Enable iCloud Photos on the Mac, download originals to the iPhone, or retrieve the files from iCloud.
-
Can I import photos without unlocking the iPhone?
Normally, the iPhone must be unlocked before it can establish a new data connection with a computer or wired accessory. Apple requires users to unlock the device and approve the connection when necessary.
Conclusion
When Photos says "Please Unlock iPhone" even though the device is already unlocked, start by rebuilding the authorization process. If the message remains, reset Location & Privacy, review Wired Accessories, test another data cable and port, update both devices, and check whether Finder recognizes the iPhone. When only some photos are missing, check iCloud Photos and Optimize iPhone Storage instead of disabling iCloud synchronization immediately.
Most importantly, do not erase the iPhone or remove its screen passcode to solve a normal photo-import authorization error. The goal is to restore the Mac's permission to access the already-unlocked device without risking the photos you are trying to transfer.
Unlock iPhone or iPad passcode in seconds. Remove Activation Lock and Apple ID without password. Bypass MDM & remove MDM profile with no data loss
 600,000+ Downloads