How to Bypass Trust This Computer on iPhone? All You Need to Know Here!
Usually, when you try to restore, update, or back up your iPhone using iTunes on a computer, you'll be prompted with a message asking you to "Trust This Computer." However, if something goes wrong with your device—for example, if the screen is broken or it gets stuck on the "Trust This Computer" screen—tapping the prompt can become difficult.
In such cases, you might be wondering how to bypass the "Trust This Computer" on your iPhone. Keep reading to find out possible solutions and alternative ways to resolve the issue.

How to Bypass Trust This Computer on iPhone?
First of all, what you are most concerned about is whether it is possible to bypass the 'Trust This Computer' prompt on an iPhone. Obviously, this is impossible because tapping the 'Trust This Computer' button is a necessary step for the subsequent procedures. Therefore, if you want to bypass or manually confirm the 'Trust This Computer' prompt, it is recommended that you first resolve the issue on your iPhone.
In other words, if your iPhone screen is broken, you should repair it first before attempting to proceed. However, in some cases, it may still be possible to trust the computer even with a broken iPhone screen, depending on the extent of the damage and available tools.
Tip: Trust a Computer on an iPhone with a Broken Screen
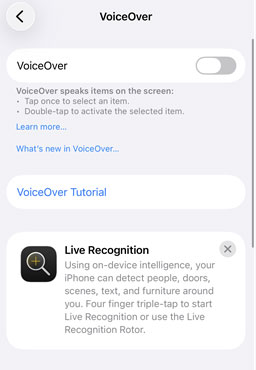
If your iPhone screen is damaged but the device still responds to touch, you may be able to use VoiceOver to approve the "Trust This Computer" prompt without relying on visual navigation.
- Step 1. Activate Siri by holding the Home button (on older iPhones), pressing and holding the Side button (on newer iPhones), or saying "Hey Siri" if it is enabled. Then say: "Turn on VoiceOver."
- Step 2. Connect your iPhone to your computer using a working USB cable. Open iTunes on Windows, or Finder on macOS Catalina and later.
- Step 3. Unlock your iPhone. When the "Trust This Computer" prompt appears, use VoiceOver gestures to navigate to the Trust button and double-tap to select it.
If successful, the computer will be trusted, allowing you to back up your iPhone or transfer data. Please note that this method only works if the screen still responds to touch and Siri/VoiceOver can be activated.
How to Fix Trust This Computer Issues on iPhone?
If your iPhone is stuck on the "Trust This Computer" screen, or you're unable to tap the "Trust" button due to a broken screen, then a professional third-party tool like TunesKit iOS System Recovery is a solution you shouldn't overlook.
Why choose this software? Because you can only tap the "Trust This Computer" option after the underlying iOS issues are resolved. TunesKit iOS System Recovery is capable of fixing over 150 types of iOS system issues, including iPhone frozen screens, devices stuck in recovery mode or Apple logo loops, iTunes connection errors, and more.
Key Features of TunesKit iOS System Recovery
Fix more than 150 iOS issuses including iPhone trust this computer keeps popping up, iPhone green screen, iPhone stuck on Apple Logo, etc., without causing any data loss.
Please try the 4 simple steps to fix iPhone stuck on trust this computer screen and click trust this computer option with ease.
Step 1Connect iPhone to the computer
Launch TunesKit iOS System Recovery and use a USB cable to connect your iPhone to the computer. Press on the iOS System Repair and Start option.

Step 2Choose a repair mode
Select the Standard Repair button. This mode can fix "Trust This Computer" keeps popping up issue without data loss.

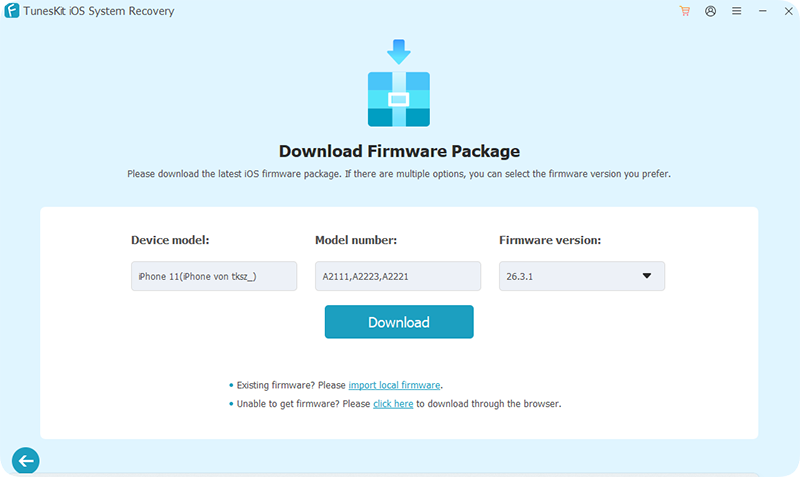
Step 3Download the firmware package
Tap on the Download option if the device info is totally right. Correct it otherwise. Then the program will start to download and verify the latest iOS firmware package matched with your device.
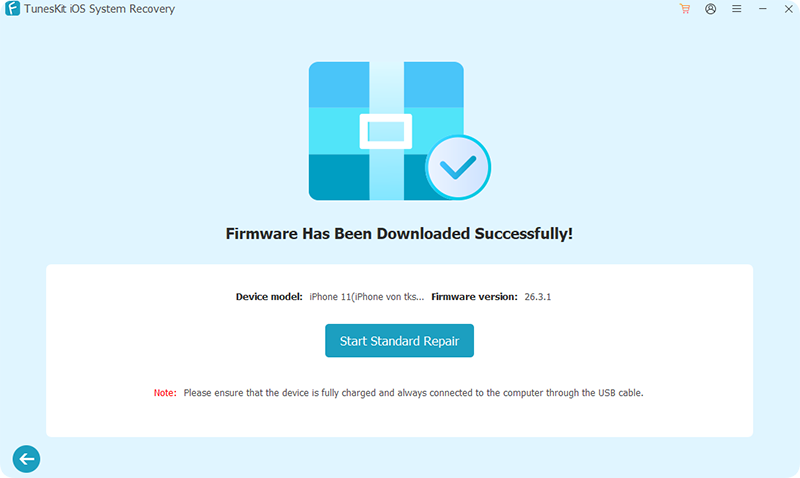
Step 4Fix iPhone trust this computer issue
When it finishes the downloading, just hit on the Start Standard Repair button to begin the iOS fixing. It takes a while to complete. You need to make sure that your iPhone is connected to the computer during the process to avoid any problems that may occur unexpectedly.
How to Trust Computer on a Disabled iPhone?
Trusting a computer on a disabled iPhone is not possible through normal means because the device needs to be unlocked first to show the "Trust This Computer" prompt. When an iPhone is disabled, the screen is locked due to too many incorrect passcode attempts, and you can't interact with it—meaning you can't tap "Trust," enter a passcode, or allow data access.
However, depending on your situation, there are a few workarounds or options you can use:
Method 1: Using Recovery Mode
If you're locked out of your iPhone and can't tap "Trust This Computer," using Recovery Mode is a reliable way to reset the device and re-establish a connection with your computer. This method is officially recommended by Apple—but keep in mind that it will erase all data on your device.
- This method does not preserve any data unless you have a backup.
- You'll need a working computer with iTunes (or Finder on macOS Catalina and later).
- Your iPhone's physical buttons must be functional.
- It may take a few attempts to successfully enter Recovery Mode—be patient.
- Step 1. Use a USB cable to connect your iPhone to your computer. Open iTunes (or Finder on macOS Catalina and later).
- Step 2. Follow the appropriate button combination for your device model while the phone is connected:
iPhone 8/8 Plus or iPhone X and newer
Press and release the Volume Up button, then press and release the Volume Down button. Next, press and hold the Side button until the recovery mode screen appears.
iPhone 7 or 7 Plus
Press and hold both the Volume Down and Side button at the same time until the recovery mode screen appears.
iPhone 6s, 6s Plus, or earlier
Press and hold both the Home button and the Side (or Top) button together until the recovery mode screen appears.

Step 3: On your computer, a prompt will appear in iTunes/Finder. Choose "Restore." This will erase the device and install the latest version of iOS. Wait for the process to finish.

✅ After the Restore
Once the restoration is complete, your iPhone will restart. You can now set it up as a new device. During the setup process, when you reconnect it to the computer, you'll see the "Trust This Computer" prompt—at this point, you'll be able to tap "Trust" and proceed normally.
Method 2: Using Find My iPhone
Find My iPhone was originally designed to help users locate lost or stolen iOS devices. It also includes the ability to remotely erase all content and settings. What many users don't realize is that this feature can also be used to remotely reset a disabled iPhone, allowing you to set it up again and re-establish trust with a computer.
To use Find My iPhone to reset a disabled device, ensure the following conditions are met:
- The disabled iPhone is linked to your Apple Account.
- Find My iPhone is enabled on the device.
- The iPhone is connected to the internet (Wi-Fi or cellular).
- You know the Apple Account credentials (password and, if required, security question answers).
- Step 1. Go to iCloud.com in a web browser and sign in with the Apple Account associated with the disabled iPhone.
- Step 2. Once logged in, select "Find iPhone" from the main iCloud dashboard. This feature lets you locate any device linked to your Apple Account—even if it's disabled.
- Step 3. At the top of the screen, click "All Devices," then select the disabled iPhone from the dropdown list. Make sure you choose the correct device if multiple ones are listed.
- Step 4. In the device info window, click "Erase This Device." This will begin the process of remotely wiping your iPhone. A confirmation prompt will appear.

- Step 5. Click "Erase" again and enter your Apple Account password. You may also be prompted to answer your security questions to confirm your identity. Once confirmed, the erase process will begin.
- Step 6. After the device is fully erased, it will restart and display the initial setup screen. Follow the setup instructions to create a new passcode and sign in again with your Apple Account. When prompted, tap "Trust" to re-establish the connection with your computer.
![]() Note
Note
This method removes all data on the iPhone. Make sure you have a backup if you want to restore any content after the reset.
More About Trust This Computer on iPhone
Do you desire to know more things about trust this computer on iPhone? Well, the following 4 most frequently asked questions you may need to understand.
-
What does trust this computer mean?
"Trust This Computer" is a security feature on Apple devices. When you first connect your iPhone, iPad, or iPod to a computer via USB, a prompt will appear on the screen asking, "Trust this computer?" This prompt allows users to decide whether to allow the computer to access data on the device.
If you click "Trust," your iPhone will establish a pairing relationship with the computer, allowing it to access the device's content via iTunes or Finder, such as photos, videos, contacts, messages, backup data, and more. -
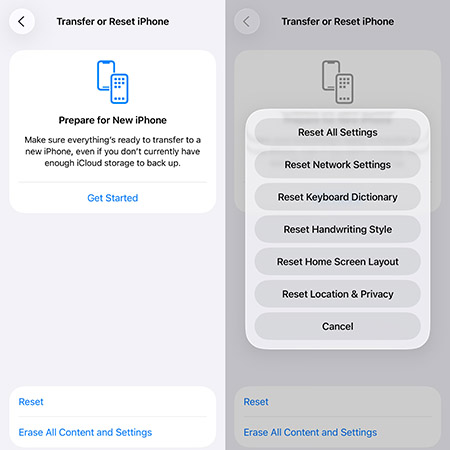
How to reset trust settings on iPhone?
If you want to reset the trusted device on your iPhone, then you could follow the steps listed below.
Steps: Head to iPhone's Settings > General > Transfer or Reset iPhone > Reset > Reset Location & Privacy.
-
What happens if I tap "Don't Trust"?
If you tap "Don't Trust", the computer will not be allowed to access your iPhone's data. You won't be able to back up, sync, or transfer files until you choose "Trust" next time.
-
Why does my iPhone keep asking to trust the same computer?
This can happen if you reset your location & privacy settings, the computer's Apple Mobile Device drivers are outdated or corrupted, and there are iTunes or USB connection issues. You can try reconnecting, updating iTunes, or restarting both your iPhone and computer.
Video Guide: How to Bypass Trust This Computer on iPhone
Still feeling confused about this problem? Here is a short video about how to bypass trust this computer on iPhone. Click and watch it to know more about this iOS trouble.
Summary
Because of the security requirement, Apple always offers the safest experience for users, though it may bring inconvenience sometimes. Bypass trust this computer iPhone is always a hot topic among iOS users. Hope that this post can help you with your trouble. If there are still problems with your iPhone/iPad/iPod touch, you can download TunesKit iOS System Recovery and fix the issues.
