How to Record Google Hangout Video and Audio
As one of the communication software products, Google Hangouts is not as popular as Skype, FaceTime or Facebook video call. And that is mostly because Google Hangouts aimed at enterprise communication, for example, video interviews or video conference. And these two happen to be the "most-record-needed" types of video calls. If you are the meeting organizer, keeping a footage record of the session can help you better compare the performances of different candidates. Or make sure no important information will be missed during the meeting. Also, the video call can be shared to those who can't make it to the meeting.
As Google Hangouts is a part of G suit, Google offers G suit subscriber a direct way to record Hangouts video calls. Otherwise, you will need a screen recorder to do that. Besides Android and iOS platforms, Google Hangouts is available on any computer as it has a Chrome extension and a web version. So today we will talk about how to record Google Hangout on the computer. We will show you how to record Hangout audio only and both video and audio. You can go directly to the guide you need.
1. How to Record Google Hangout Video and Audio
What we are going to use with the recording is TunesKit Screen Recorder. TunesKit has 3 recording modes: video only, audio only, video and audio simultaneously. More importantly, it can record both system audio and microphone sound, which makes it perfect for recording conference calls.
TunesKit Screen Recorder
- Caputure any videos play on your desktop, such as video calls, Twitch game video, and live streams
- Record screen video and audio separately or simultaneously
- Work well as a screenshot tool, output high resolution recordings
- Convert recorded video to any format without watermark
Step 1 Adjust Recording Settings
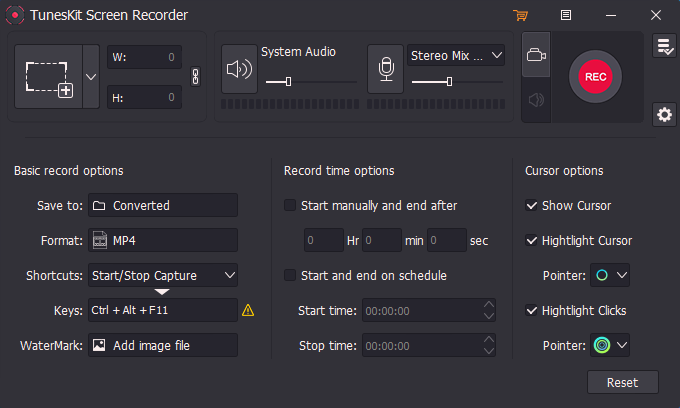
First of all, click the "Cog" icon at the lower right corner of the interface to open the "Setting" panel. In this panel, you can adjust the recording settings. For example, change the output folder, output format or device, personalize keyboard shortcuts, add image watermarks, make a scheduled recording by setting the start and stop capturing time or change the cursor and click effects, etc. As for the output format and device setting, you can click the Format panel and choose a suitable format or device. TunesKit Screen Recorder now supports numerous video formats such as MP4, M4V, MKV, MOV, AVI, 4K Video, HD formats, etc.
Step 2 Select Recording Mode and Customize Recording Size
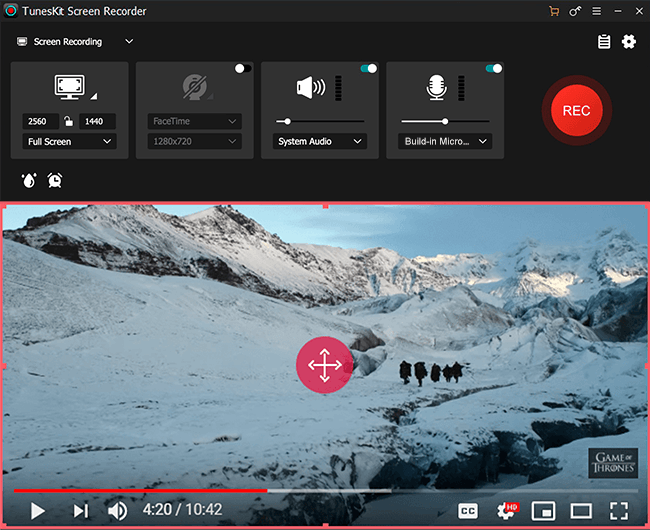
On the main interface, there are 3 modules. The one on the left is to customize the recording size and area. The middle one is the audio settings and the right one is to choose recording mode. To record both video and audio, you need to click the "camera" icon and make sure both system audio and mic sound recording feature is enabled. After that, go to the first module to customize an area for recording. Click the "+" button, a recording window will pop up. Then you can either adjust the recording size manually or click the "down arrow" icon to select a resolution from the drop-down list.
Step 3 Start to Record the Game

When you finish all the settings, go to the third module on the right hand and click the red "REC" button to start playing your target video after a 3-second countdown. Use the toolbar to help you with the recording. Click the Pause button to stop the process temporarily or cut the recording and then continue recording by clicking the Scissors icon. To stop the recording completely, just click the Stop button. You can also set the hotkeys for these buttons.
2. How to Record Google Hangout Audio
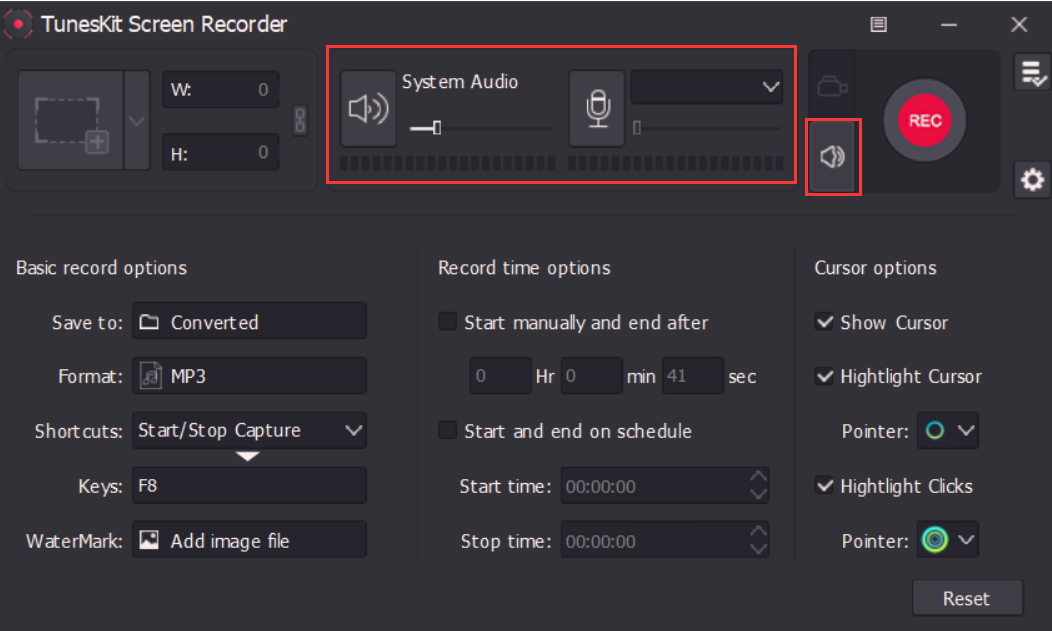
If you are expecting a voice call, you can record only the streaming audio. You need to switch the recording mode to "audio only" in step 2. Click the "sound" icon at the right and make sure both system audio and mic sound recording feature is enabled. To test your mic and sound system before the meeting, you can try recording before the meeting. Set up the recording earlier before the meeting can also help you record the whole meeting without any mistake. TunesKit also provides a built-in video cutter for you to cut out the unwanted part after recording.