How to Fix Face ID Not Working Move iPhone Lower
Staring at your screen while your device refuses to unlock is a uniquely modern annoyance. Many users find themselves caught in a frustrating loop when trying to quickly access their apps, authorize payments, or simply check messages. If you keep seeing the frustrating alert Face ID not working move iPhone a little lower, you are certainly not alone .
This specific error often points to a minor sensor alignment issue or environmental factor rather than a complete hardware failure. Fortunately, getting your biometric security back on track is usually a straightforward process.

- Why Does Face ID Keep Saying Move iPhone Lower?
- 9 Methods To Fix Face ID Not Working Move iPhone A Litter Lower
- Method 1: Clean the TrueDepth Camera Area
- Method 2: Optimize Your Distance and Lighting
- Method 3: Reset Face ID and Force Restart
- Method 4: Remove the Screen Protector
- Method 5: Adjust Face Coverings
- Method 6: Update Your iOS Firmware
- Method 7: Reset All iPhone Settings
- Method 8: Repair Deep iOS System GlitchesHOT
- Method 9. Contact Apple Support
- Conclusion
Why Does Face ID Keep Saying Move iPhone Lower?
If your iPhone keeps telling you "Move iPhone Lower" when using Face ID, it usually means the camera isn't getting a good angle of your face. Here are the most common reasons.
- 01 iPhone Position Is Too High: Face ID (using the TrueDepth camera) works best when your face is centered. If the phone is above eye level, it will ask you to lower it.
- 02 Face Not Fully in Frame: If your chin or lower face isn't visible, Face ID can't complete the scan.
- 03 Obstructions (Glasses, Masks, Hands): Anything blocking your face can interfere. Masks, sunglasses, or even your hand can cause misalignment prompts.
- 04 Face ID Not Properly Set Up: If your original scan wasn't ideal, it may struggle to recognize you.
- 05 Camera or Sensor Issues: Smudges or hardware problems can affect detection.
- 06 Software Glitches: Sometimes, Face ID issues happen due to iOS bugs—especially if your software is outdated or temporarily glitching.
![]() Quick Tip
Quick Tip
If it only happens in certain positions (like lying down), that's normal—Face ID prefers a more direct, upright angle.
9 Methods To Fix Face ID Not Working Move iPhone A Litter Lower
Let's walk through the most effective troubleshooting methods to get your biometric security functioning smoothly again.
Method 1: Clean the TrueDepth Camera Area
The TrueDepth camera sits right at the top of your screen, making it incredibly susceptible to smudges, makeup, and natural skin oils. Even a microscopic layer of grime can scatter the infrared dots Face ID uses to map your face. A perfectly clean lens is the foundation of reliable facial recognition.
- Step 1. Grab a clean, dry microfiber cloth.
- Step 2. Gently wipe the entire top notch or Dynamic Island area of your iPhone.

Method 2: Optimize Your Distance and Lighting
Face ID operates within a specific focal range and relies heavily on infrared light projection. If you hold the phone too close to your face, the camera simply cannot capture your full profile, triggering the prompt to move the device lower or further away. Furthermore, strong, direct sunlight can temporarily blind the infrared sensors, making authentication impossible.
- Step 1. Hold your iPhone at a comfortable arm's length, ideally 10 to 20 inches from your face.

- Step 2. Ensure you are looking directly at the screen, rather than peering down at an extreme angle.
- Step 3. If you are outdoors in sunlight, turn your body so the sun is not shining directly into the front-facing camera lens.
Method 3. Reset Face ID and Force Restart
Sometimes the system's mapping cache gets corrupted over time, leading to constant recognition errors. Resetting your Face ID profile forces the TrueDepth camera to recalibrate and create a fresh, accurate map of your features. Combining this recalibration with a force restart clears out any lingering temporary software bugs in the background.
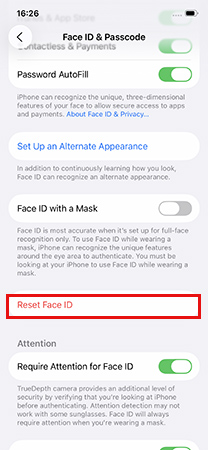
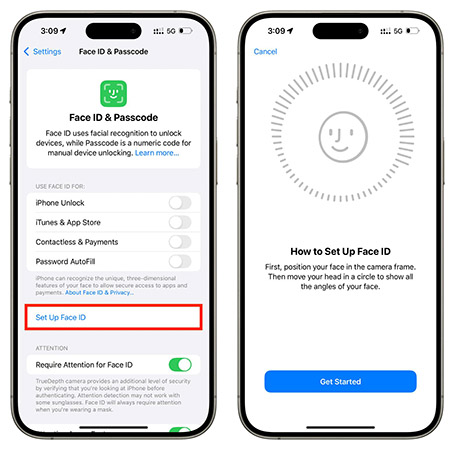
- Step 1. Open your Settings app, tap on "Face ID & Passcode," enter your device passcode, and select "Reset Face ID."
- Step 2. Quickly press and release the Volume Up button, then the Volume Down button, and finally press and hold the Side button until the Apple logo appears to force restart the device.

- Step 3. Once the iPhone reboots, navigate back into your Settings and tap "Set Up Face ID" to scan your face again.
Method 4: Remove the Screen Protector
A screen protector can sometimes block or interfere with the front camera, especially if it's misaligned, too thick, or covering the sensor area. This may cause Face ID errors like "Move iPhone Lower."
- Step 1. Remove the screen protector from your iPhone.
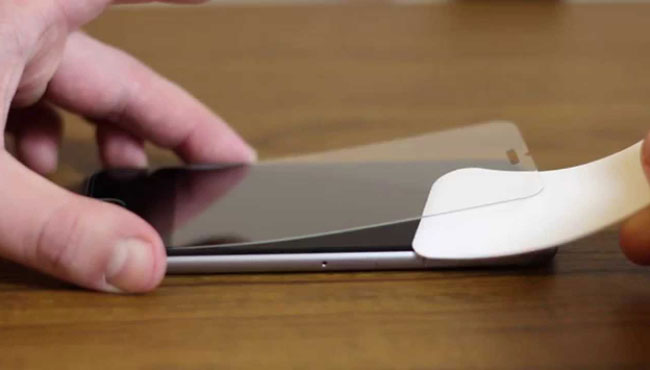
- Step 2. Gently clean the front camera area to remove dust or smudges.
- Step 3. Try using Face ID again to see if the issue is resolved.
- Step 4. If Face ID works normally, consider replacing the protector with a better-fitting or thinner one.
Method 5: Adjust Face Coverings
Accessories like masks, glasses, or hats can interfere with Face ID by blocking or altering key facial features. Since Face ID relies on a detailed 3D scan of your face, significant obstructions may trigger errors such as "Move iPhone a litter Lower."
- Step 1. Remove or adjust any face coverings, such as masks, glasses, or hats.
- Step 2. Ensure your eyes, nose, and mouth are clearly visible to the camera.

- Step 3. Try using Face ID again to check if the issue is resolved.
Method 6: Update Your iOS Firmware
Keeping your iOS up to date helps prevent bugs and system issues, including Face ID errors like "Move iPhone Lower." Apple regularly releases updates that improve performance and fix known problems.
- Step 1. Open Settings and go to General → Software Update. Your device will check for available updates.
- Step 2. If an update is available, tap Update Now to begin the installation.
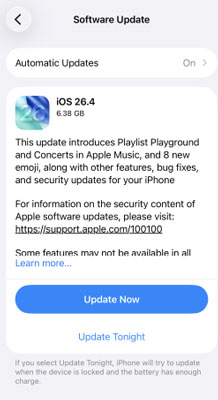
- Step 3. Make sure your iPhone has enough battery and a stable internet connection during the update process.
Method 7: Reset All iPhone Settings
System conflicts on your iPhone can sometimes cause Face ID to malfunction. These issues are often difficult to identify manually. Resetting all settings can help by restoring system defaults without deleting your personal data.
- Step 1. Open Settings, go to General, then tap Transfer or Reset iPhone → Reset.
- Step 2. Select Reset All Settings and enter your passcode to confirm.
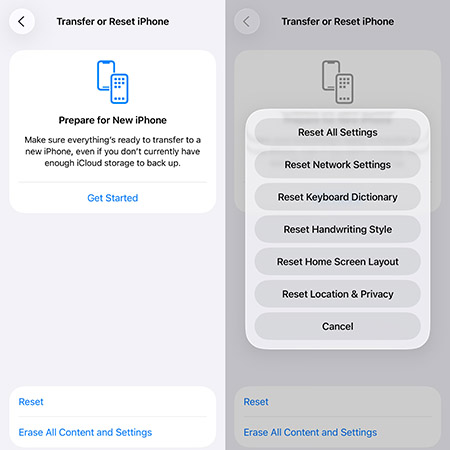
- Step 3. Tap Reset All Settings again and wait for your iPhone to complete the process.
Method 8. Repair Deep iOS System Glitches
If basic troubleshooting completely fails to resolve the alignment prompt, a deeper iOS system bug might be directly interfering with the biometric authentication protocols. Standard reboots and software updates occasionally fail to overwrite corrupted system files that govern hardware sensors.
Using a dedicated repair tool like TunesKit iOS System Recovery can fix these core system issues without causing any data loss. It can also fix other iOS issues like 4G not working on iPhone, FaceTime stuck on connecting, and iPhone keeps switching to silent issues, etc. Apart from the powerful repair feature, this software can downgrade iOS without iTunes. And you can explore the latest iOS beta version without developer account.
Fix Face ID Not Working? Lower Your iPhone & Repair iOS Easily
Use TunesKit iOS System Recovery to quickly fix Face ID issues without data loss—no technical skills required.
Step 1 Connect Your iPhone
Download and install TunesKit iOS System Recovery on your computer, then launch the program. Connect your iPhone to the computer using a USB cable and select iOS System Repair. And click the Start button to continue.

Step 2 Select a Repair Type
Choose Standard Repair mode to fix system issues without erasing data. Follow the on-screen instructions to put your device into Recovery Mode or DFU Mode if required.

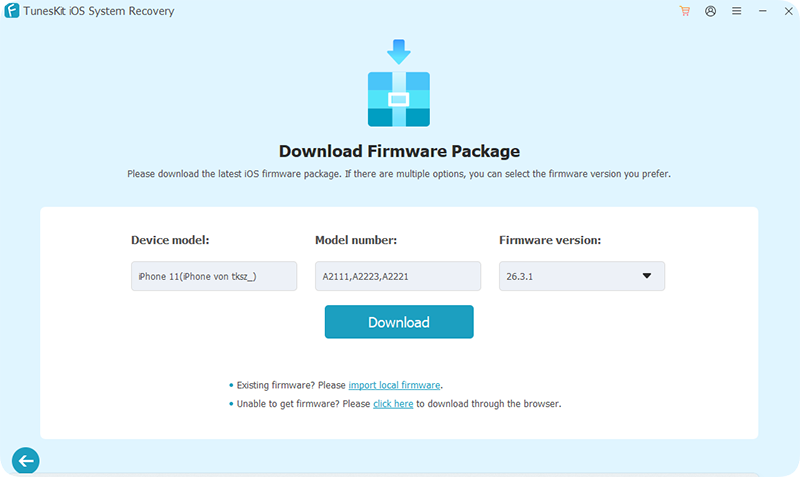
Step 3 Download the Firmware Package
Download the matching firmware package provided by the tool. Wait paitently for the process to complete.
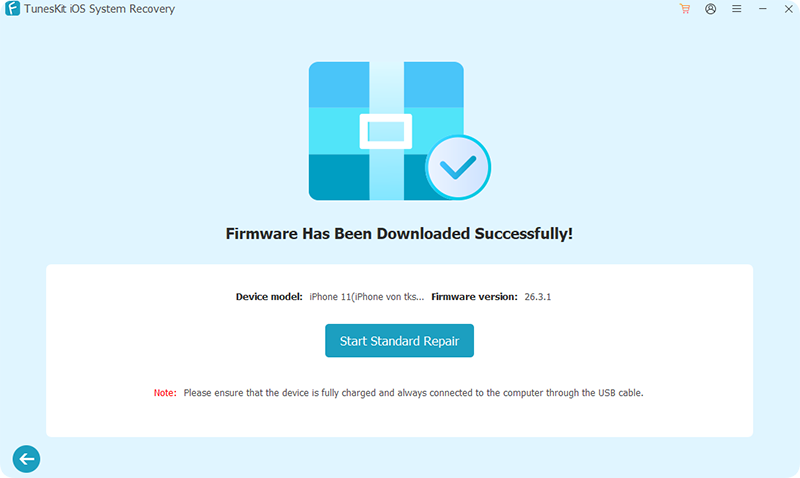
Step 4 Start to Repair
Click Start Standard Repair to start fixing iOS bugs and glitches. Once the process is complete, your iPhone will restart automatically—check if Face ID is working normally again.
![]() Tip
Tip
If standard repair doesn't resolve the issue, you can try Deep Repair, but note that it may erase your data.
Method 9: Contact Apple Support
If none of the previous methods resolve the "Face ID Move iPhone a little lower" issue, it may be caused by a hardware problem or a more complex system fault. In such cases, professional assistance from Apple is the most reliable solution.
- Step 1. Visit the official Apple Support website or open the Support app on your iPhone. Select your device and choose the issue related to Face ID.
- Step 2. Follow the on-screen instructions to describe the problem. Choose a support option, such as live chat, phone call, or scheduling a repair.
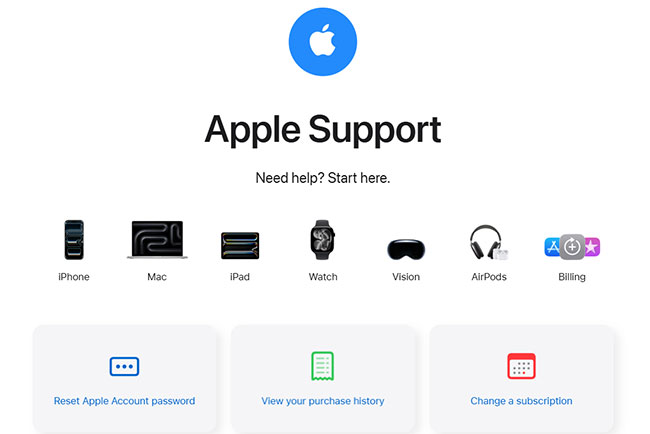
- Step 3. Provide the required details and follow the technician's guidance to diagnose and fix the issue.
Conclusion
In conclusion, the Face ID not working move iPhone a little lower issue can stem from simple factors like positioning or accessories, as well as deeper iOS glitches. While basic troubleshooting methods often resolve the problem, more persistent issues may require a dedicated fix. In such cases, TunesKit iOS System Recovery stands out as an effective solution to repair iOS bugs and restore Face ID functionality without hassle.
