Fix "The iPhone Could Not Be Restored the Device Cannot Be Found" Error? 8 Ways
iTunes is commonly used to update, back up, and restore iPhones. However, the restore process does not always go smoothly. When trying to restore your device, you may encounter the error "The iPhone could not be restored. The device cannot be found." This usually means iTunes or your computer is having trouble detecting the iPhone properly. Fortunately, there are several ways to resolve the issue. In this guide, we’ll walk you through 8 effective solutions to fix the error and restore your iPhone successfully.

- Video Guide: How to Fix 'iPhone Could Not Be Restored' Error
- Why Does iTunes Say My iPhone Cannot Be Found?
-
Top 8 Ways to Fix iPhone Could Not be Restored
- Fix 1: Check the USB Cable and Port
- Fix 2: Trust the Computer and Reconnect Your iPhone
- Fix 3: Restart Your iPhone and Computer
- Fix 4: Update Apple Devices, iTunes, macOS, or Windows
- Fix 5: Check the Apple Mobile Device Driver on Windows
- Fix 6: Check Security Software or Try Another Computer
- Fix 7: Use iOS System Recovery Tool [Quick & Free] HOT
- Fix 8: Update or Restore the iPhone in Recovery Mode
- Wrapping up
Video Guide: How to Fix 'iPhone Could Not Be Restored' Error
Watch the video below for step-by-step instructions on how to fix the iPhone could not be restored error and get your device working properly again.
Why Does iTunes Say My iPhone Cannot Be Found?
If iTunes says your iPhone cannot be found, the issue is usually related to the connection, software, permissions, or drivers. Here are the most common causes:
- 1. Faulty USB Connection: A damaged USB cable, faulty USB port, or unstable USB hub can prevent iTunes from detecting your iPhone. Connecting the device directly to another USB port may help.
- 2. Software Glitches: An outdated version of iTunes, a temporary iOS bug, or a system error can interrupt communication between your iPhone and computer, causing the restore process to fail.
- 3. Device Not Trusted: If you have not tapped Trust when the "Trust This Computer" prompt appears, your computer may not have permission to access the iPhone properly.
- 4. Driver Issues on Windows: Missing, outdated, or corrupted Apple Mobile Device USB drivers can stop Windows and iTunes from recognizing the connected iPhone.
- 5. Security Software Interference: Antivirus programs, firewalls, or other security tools may block the connection between iTunes and your iPhone.
Identifying the possible cause can make troubleshooting much easier. The solutions below will walk you through the most effective ways to fix the problem.
Top 8 Ways to Fix iPhone Could Not be Restored
Knowing the possible reasons why your iPhone could not be restored, you can try the below methods to fix this issue.
Fix 1: Check the USB Cable and Port
A poor physical connection is one of the most common reasons why your computer cannot find your iPhone during a restore. Even if the iPhone appears to be charging, the cable may not be transferring data properly. A damaged cable, unstable USB port, or USB hub can also interrupt communication between the iPhone and the computer and cause the restore process to fail.
Before changing any software settings, make sure the connection itself is stable.
- Step 1. Disconnect your iPhone from the computer.
- Step 2. Check the USB cable for visible damage and, if possible, try another Apple-certified or high-quality data cable.
- Step 3. Connect the iPhone directly to a USB port on the computer instead of using a USB hub, keyboard, or docking station.
- Step 4. If the device is still not detected, try another USB port and reconnect your iPhone.
- Step 5. Open Finder, Apple Devices, or iTunes again and check whether your iPhone appears.

Fix 2: Trust the Computer and Reconnect Your iPhone
Your computer needs permission to communicate with your iPhone. When you connect the device for the first time, iOS normally displays a "Trust This Computer?" message. If you choose "Don't Trust," dismiss the prompt, or the trust settings become corrupted, your computer may fail to access the iPhone properly.
Re-establishing this permission can therefore fix the "device cannot be found" error.
- Step 1. Disconnect your iPhone from the computer.
- Step 2. Unlock the iPhone and reconnect it using a USB cable.
- Step 3. If the "Trust This Computer?" message appears, tap Trust.

Step 4. Enter your iPhone passcode if prompted.
Step 5. Open Finder, Apple Devices, or iTunes and check whether the device is recognized.
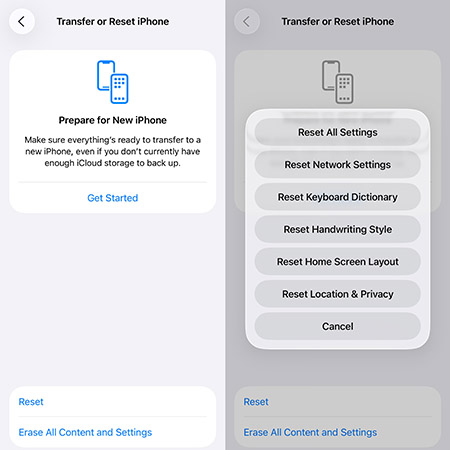
If the Trust prompt does not appear, go to Settings > General > Transfer or Reset iPhone > Reset > Reset Location & Privacy, then reconnect the iPhone and tap Trust again.
Fix 3: Restart Your iPhone and Computer
Temporary system glitches can interrupt the connection between your iPhone and computer. For example, iOS services responsible for USB communication may stop responding, or Windows/macOS may fail to load the required device processes correctly.
Restarting both devices refreshes these services and often clears minor connection problems without affecting your data.
- Step 1. Disconnect the iPhone from the computer.
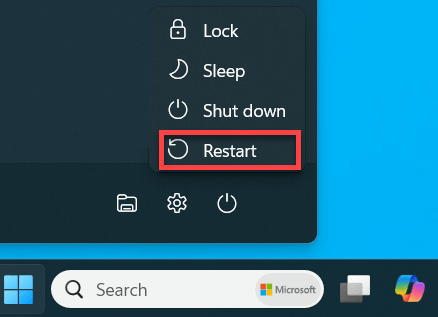
- Step 2. Restart your computer:
- On Windows: Click Start > Power > Restart.
- On Mac: Click the Apple menu > Restart, then click Restart again if prompted.
Wait until the computer has fully restarted before continuing.
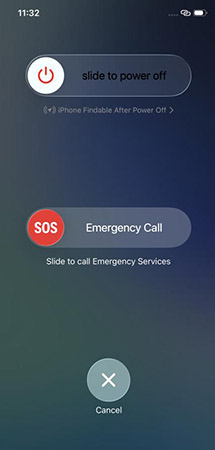
Step 3. Restart your iPhone.
For iPhone X and later, press and hold the Side button and either Volume button, drag the power-off slider, then turn the device back on.
For older iPhone models, use the corresponding Power or Side button to shut down and restart the device.
Step 4. After both devices have restarted, reconnect the iPhone.
Step 5. Open Finder, Apple Devices, or iTunes and try the restore again.
Fix 4: Update Apple Devices, iTunes, macOS, or Windows
Outdated software can cause compatibility problems between your iPhone and computer. Newer versions of iOS may require updated Apple device components, drivers, or system services before the computer can communicate with the iPhone correctly.
For this reason, keeping both the computer and Apple device-management software up to date is an important troubleshooting step.
- Step 1. On Windows, open the Microsoft Store and check for updates to the Apple Devices app or iTunes.
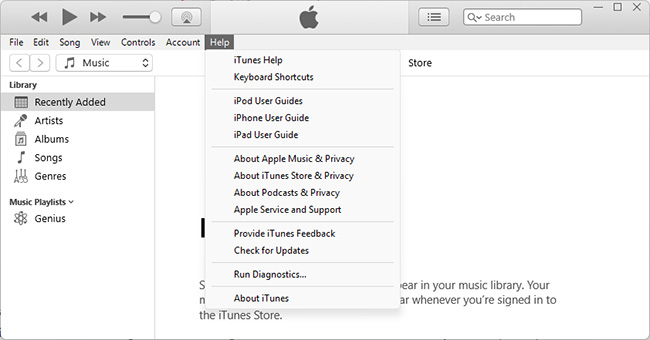
- Step 2. If you downloaded iTunes directly from Apple, open iTunes and select Help > Check for Updates.
Step 3. Install any available Windows updates from Settings > Windows Update.
Step 4. On Mac, go to System Settings > General > Software Update and install any available macOS updates.

Step 5. Restart the computer after the updates are installed.
Step 6. Reconnect your iPhone and try restoring it again.
Fix 5: Check the Apple Mobile Device Driver on Windows
On Windows, the Apple Mobile Device USB driver helps the system recognize an iPhone connected through USB. If the driver is missing, outdated, disabled, or corrupted, Apple Devices or iTunes may fail to detect the iPhone even when the cable connection is working normally.
Checking the driver can help determine whether the error is caused by Windows rather than the iPhone itself.
- Step 1. Connect your iPhone to the Windows computer.
- Step 2. Press Win + R to open the Run dialog.
- Step 3. Type devmgmt.msc and press Enter.
- Step 4. Expand Universal Serial Bus controllers, Portable Devices, or a similar device category.
- Step 5. Locate Apple Mobile Device USB Driver or your connected iPhone.
- Step 6. Right-click it and select Update driver if the option is available.

Step 7. If the driver shows an error symbol, uninstall it, disconnect the iPhone, restart the computer, and reconnect the device so Windows can reinstall the driver.
Fix 6: Check Security Software or Try Another Computer
Some antivirus programs, firewalls, VPN tools, and security utilities can interfere with communication between Apple software and your iPhone. This is more likely if the iPhone connects normally but disappears during an update or restore.
Trying another computer can also help you determine whether the problem is caused by the original computer or by the iPhone itself.
- Step 1. Temporarily close third-party antivirus, firewall, VPN, or security software.
- Step 2. Reconnect your iPhone and open Finder, Apple Devices, or iTunes.
- Step 3. Try the restore again.
- Step 4. Re-enable your security software after testing.
- Step 5. If the error continues, connect the iPhone to another trusted computer using a different USB cable if possible.
- Step 6. If the second computer detects the iPhone correctly, the problem is likely related to software, drivers, or USB hardware on the original computer.

Fix 7: Use iOS System Recovery Tool [Quick & Free]
If mentioning any iTunes errors, an iOS repair tool will be advised. The software is extremely suitable for eradicating "the iPhone could not be restored the device cannot be found" error. Here, pick up the outstanding TunesKit iOS System Recovery software.
It includes a built-in iTunes Repair feature for Windows and Repair Sync Errors for Mac. This feature can detect and repair more than 200 types of iTunes errors, including iTunes 4010, iTunes error 11, and iTunes error 0x80090302, etc. More importantly, the iTunes Repair feature is available for free, so you can use it to troubleshoot iTunes-related problems without purchasing the full iOS system repair function.
Free iTunes Repair with TunesKit
Quickly detect and fix iTunes restore, update, backup, and sync errors for free—ideal when your iPhone cannot be found or restored.
 600,000+ Downloads
A step-by-step guide on how to use TunesKit to fix iPhone could be restored the device cannot be found.
Step 1. Connect your iPhone to Computer
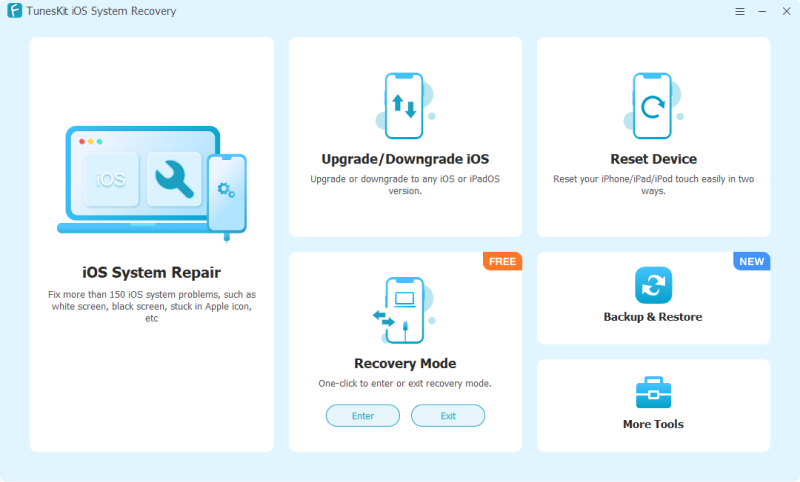
First, launch the Windows or Mac version of the program on your computer. Then, by a USB cable, connect the iPhone to the computer. On Windows, go to More Tools > iTunes Repair. On Mac, select Repair Sync Errors from the main interface.
Step 2. Start to repair iTunes
Let TunesKit automatically check iTunes and its related components for errors. If a problem is detected, click Repair to start fixing the iTunes error.

Step 3. Successfully repair iTunes
Wait until the repair is complete. On Windows, click Restart if prompted; on Mac, click Done. Reopen iTunes, reconnect your iPhone, and try the restore process again.

Fix 8: Update or Restore the iPhone in Recovery Mode
If the regular troubleshooting methods do not work, putting your iPhone into recovery mode gives Finder, Apple Devices, or iTunes another way to reinstall iOS and repair software-related problems.
When your computer detects an iPhone in recovery mode, you will normally be given two options: Update and Restore. It is best to try Update first because it attempts to reinstall iOS while keeping your personal data intact. If the update cannot be completed or the same error appears again, you can then choose Restore. Keep in mind that restoring the iPhone erases its data and settings.
Step 1. Connect your iPhone to the computer and open Finder, Apple Devices, or iTunes.
Step 2. Put your iPhone into recovery mode.
- For iPhone 8 or later, quickly press and release Volume Up, quickly press and release Volume Down, then press and hold the Side button until the recovery mode screen appears.
- For iPhone 7 or 7 Plus, simply press and hold the Side button and Volume Down button until the iPhone recovery mode screen appears.
- For iPhone 6s or earlier, press and hold the Home button and Side/Top button until the recovery mode screen appears.
Step 3. Wait for Finder, Apple Devices, or iTunes to detect the iPhone in recovery mode.
Step 4. When prompted with the Update or Restore options, select Update first. Your computer will attempt to download and reinstall iOS without erasing your data.
Step 5. Keep the iPhone connected while the update is downloaded and installed. If the download takes too long and the iPhone exits recovery mode, let the download finish, then put the iPhone into recovery mode again.
Step 6. If Update fails to fix the problem, repeat the process and choose Restore instead.
Step 7. Wait for the restore process to finish. Since Restore erases the iPhone, you can set up the device afterward and recover your data from an available iCloud or computer backup.

Wrapping up
To sum up, we have introduced the reasons and 8 ways to "the iPhone could not be restored the device cannot be found" error. Through these methods, you will find that the error is not hard to be fixed, especially by TunesKit iOS System Recovery. It can fix this issue without losing data. Just simple steps, your device can back to normal. Click the download button below to give it a shot.