How to Fix Trusted Devices List is Not Available 2026
"I can't see my trusted devices in Settings both on my iPhone and iPad. How should I deal with this?"
Managing your Apple ecosystem relies on the "Trusted Devices" list within your Apple Account settings. But many users encounter a frustrating glitch where this list fails to load, showing the "Trusted Devices List is Not Available" error instead. This issue can prevent you from verifying your identity, managing security, or removing old devices from your account.
If you've encountered this issue and are wondering why it happens or how to fix it, you're in the right place! In this post, we'll explain why the trusted devices list might not be available and guide you through the steps to fix it.

Part 1. Why Is the Trusted Devices List Not Available on iPhone
There are several reasons why your Trusted Device List not available. It could be due to issues like iCloud sync problems, outdated software, network connectivity issues, Apple Account glitches, security settings, recent device changes, or even ongoing account verification.
Thankfully, by following the below solutions, you can often resolve these issues and regain access to your Trusted Devices list. However, if problems persist, seeking help from Apple Support is recommended to ensure your devices and account are correctly configured.
How to Fix Trusted Devices List Is Not Available
In this part, we'll introduce 7 effective ways to fix the Trusted Device List not available issue. Just follow and take a quick fix!
Fix 1. Verify Apple System Status
Before changing any settings, you should ensure that the problem isn't universal. Apple's servers occasionally undergo maintenance, which can temporarily disable Apple Account management features. You can go to the Appel System Status website to check it.

Fix 2. Check and Switch Network Connection
A poor network connection can prevent your device from syncing properly, which may cause the Trusted Devices List is not available. To resolve this, ensure your device is connected to a stable Wi-Fi or cellular network.
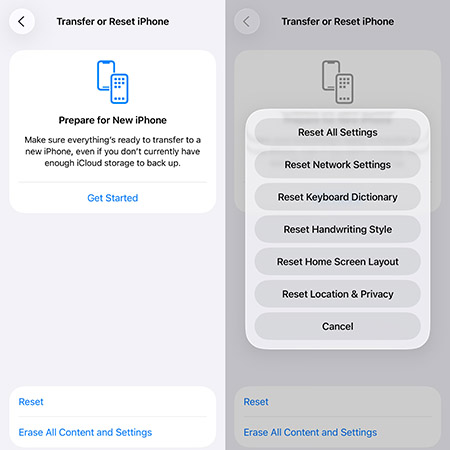
If the issue persists, try switching to a different network, or you can also reset your network settings. Here is the steps to reset your network on iPhone.
- Step 1. Go to Settings > General > Transfer or Reset iPhone.
- Step 2. Select Reset > Reset Network Settings. This will remove any saved Wi-Fi networks and passwords, so make sure you have them handy before doing this.
Fix 3. Force Restart Your Device
A simple restart can often clear out temporary glitches in the system memory that prevent the Settings app from loading data correctly. This process does not delete any personal data but forces the OS to reinitialize its background processes. Many users find that the trusted devices list reappears immediately after a fresh reboot.
- For iPhone 8 or later: Quickly press and release the Volume Up button. Quickly press and release the Volume Down button. Press and hold the Side button. Keep holding until the Apple logo appears, then release.
- For iPhone 7 & 7 Plus: Press and hold the Volume Down button + Power (Side) button at the same time. Hold both buttons until the Apple logo appears. Release both buttons.
- For iPhone 6s, 6, SE or earlier: Press and hold the Home button + Power (Top/Side) button. Keep holding until you see the Apple logo. Release both buttons

Fix 4. Sign Out and Re-sign In Your Apple Account With Password
Issues with your Apple Account can also cause your Trusted Device List not available. A quick solution is to sign out of your Apple Account and then sign back in. This can help refresh your Apple Account connection and restore your trusted devices.
- Step 1. Go to Settings > [Your Name] > Sign Out.
- Step 2. Select Sign Out But Don't Erase. Then, follow the on-screen prompts to sign out of your Apple Account completely.
- Step 3. Go back to Settings and sign in of your Apple Account.

However, if you find Apple Account greyed out on iPhone or iPad or can't sign out Apple Account, check the Fix 5 below as a quick solution for this problem.
Fix 5. Sign Out of Apple Account Without Password Verification
What if you can't sign out of Apple Account because you've forgotten your password , purchased a second-hand device, or prompted with "Sign Out Is Not Available Due to Restrictions"? Don't worry - there's a one-click solution!
You can use TunesKit iPhone Unlocker to remove your Apple Account without needing the password. TunesKit iPhone Unlocker is an easy-to-use tool designed to fix issues like unlocking locked screens, removing Apple Accounts, bypassing MDM (Mobile Device Management), and more. Plus, it works on both Mac and Windows. With its glanceable interface, you can quickly solve the issue with no expert skills.
Why Choose TunesKit iPhone Unlocker?
Quickly remove Apple Account to fix trusted device list not available issue when you can't sign out Apple Account because you're restricted.
Let's take a look at how to log out of Apple Account without password via TunesKit Apple Account remover:
Step 1Connect Your Device to Computer
First, connect your device to your computer with a USB cable. Open TunesKit iPhone Unlocker and select Unlock Apple ID. Then click the Start button.

Step 2Check Your Device Status
- Find My is turned off: The unlocking process works on all iOS versions, and your data will not be affected.
- Find My is turned on: This feature is only available for devices running iOS 11.4 or later, and it requires both a screen passcode and two-factor authentication to be enabled.

Step 3Download Firmware Package
After the confirmation, click on the Download button to download the correct firmware package.

Step 4Remove Apple Account from Your Device
After the firmware has been downloaded, click the Unlock button. The tool will automatically remove the Apple Account from your device to fix the Trusted Devices List is not available issue, no password needed. You can now set up your device as new and sign into your Apple Account again.

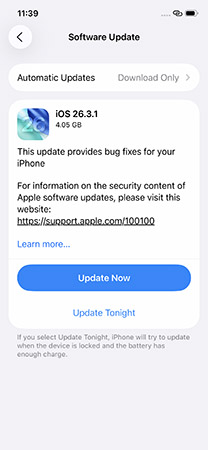
Fix 6. Update iOS Version
If your iPhone runs on an outdated version, it can be the cause of various iOS issues, including the "Trusted Devices List is Not Available" error. Therefore, it is recommended to ensure that your iPhone is always running on the latest iOS version.
- Step 1. Go to Settings > General > Software Update.
- Step 2. If an update is available, simply tap Update Now.
Fix 7. Reset All Settings on iPhone
As a last resort, you can reset all settings on your device. This will return your iPhone or iPad to its default configuration, potentially solving any underlying software issues that are causing the error.
- Step 1. Go to Settings > General > Transfer or Reset iPhone.
- Step 2. Tap Reset > Reset All Settings. This will not erase your data, but it will reset system settings like Wi-Fi passwords, wallpaper, and privacy settings.
FAQs on iOS Trusted Devices List
-
What Happens If Trusted Devices List Is Not Available?
If you can't access your Trusted Devices List, here's what might happen:
1. Device Management Issues: You won't be able to manage your devices that are linked to your Apple Account. This means you can't add or remove trusted devices from your account.
2. Verification Difficulties: The Trusted Devices List is essential for Two-Factor Authentication (2FA). Without it, you may have trouble verifying your identity when trying to access sensitive Apple services or make changes to your account. -
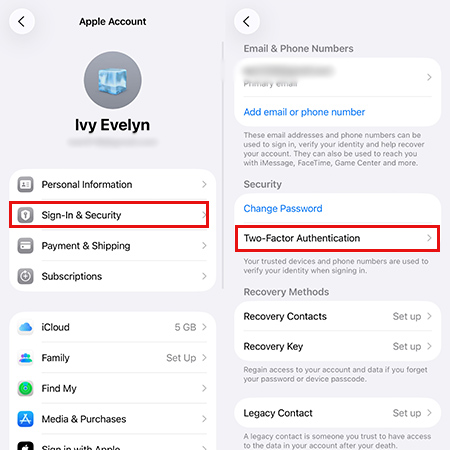
How to Add an iOS Device As a Trusted Device?
If you want to add a new device to your trusted devices list, follow these steps:
Step 1. Sign in with your Apple Account on the device you want to add. You might be prompted to enter the device passcode during the setup.
Step 2. Go to Settings and click [Your Profile] at the top of the screen.
Step 3. Tap Sign-In & Security > Turn On Two-Factor Authentication. Then, follow the onscreen instructions to finish the setup.
Once the 2FA is enabled, your the new iOS device will be listed as a trusted device.
Part 4. Conclusion
It's important to resolve the "Trusted Devices List is not available" issue quickly, as it affects device management and Two-Factor Authentication. We've shared several solutions, and hopefully, one of them works for you. If you're still having trouble with your Apple Account or device management, TunesKit iPhone Unlocker is a reliable tool to remove your Apple Account and fix security issues.
