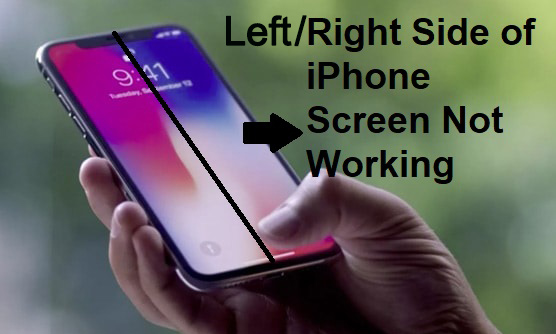
[Top 10] Fix Left/Right Side of iPhone Screen Not Working
"The right side of my iPhone screen suddenly stopped working. The left side still responds normally, but I can't tap or swipe anything on the right side. I didn't drop my phone or expose it to moisture. How can I fix this?" mr_yeo from Apple Community
It can be frustrating when one side of your iPhone screen stops responding. Whether the left or right side is not working, the issue can make your iPhone difficult to use. Fortunately, this problem is often caused by software glitches or screen issues that can be fixed. In this guide, we'll explain why part of your iPhone screen is unresponsive and how to fix it quickly.
- Why Is the Left or Right Side of My iPhone Screen Not Working?
- How to Fix Left/Right Side of iPhone Screen Not Working
- Solution 1: Remove the Protector
- Solution 2: Clean the Screen
- Solution 3: Shut Down Unresponsive Apps
- Solution 4: Force Reboot iPhone
- Solution 5: Reset All Settings
- Solution 6: Update iOS with iTunes or Finder
- Solution 7: Repair Deep System Errors With a Dedicated Recovery Tool HOT
- Solution 8: Perform a Complete Factory Reset
- Solution 9: Restore the Firmware via DFU Mode
- Solution 10: Seek Professional Hardware Repair
- Video Tutorial: How to Fix the Unresponsive Right Side of iPhone Screen
- Conclusion
Why Is the Left or Right Side of My iPhone Screen Not Working?
In most cases, one side of an iPhone screen stops responding due to software glitches, screen damage, or internal hardware issues. Below are the most common real-world causes.
- 01 Touchscreen & Digitizer Damage: A drop or impact can damage the internal digitizer—the layer responsible for processing touch. Even without visible cracks, this cause part of the screen to become unresponsive.
- 02 Software Glitches: Temporary iOS bugs, system freezes, or app crashes can sometimes cause the screen to ignore touch inputs. These are often fixed with a simple restart.
- 03 Loose Internal Connections: Inside your device, flex cables connect the screen to the logic board. If these become loose or damaged due to a heavy impact, touch sensitivity may fail in specific vertical strips.
- 04 Environmental Factors: Moisture from liquid exposure can corrode internal sensors over time. Additionally, a misaligned screen protector or a tight case can interfere with the capacitive touch sensors near the edges.
How to Fix Left/Right Side of iPhone Screen Not Working
Solution 1: Remove the Protector
Tempered glass protectors are great for preventing scratches, but over time they can lift, warp, or develop micro-cracks. When a section detaches from the glass, it creates a physical barrier that blocks touch signals, resulting in dead zones.
If you suspect this is the culprit, simply peel the protector off and test the screen again.

Solution 2: Clean the Screen
Everyday use leads to a buildup of natural oils, dust, and microscopic debris along the borders of your phone case. This thick layer of residue can easily disrupt the capacitive touch sensors beneath the glass.
To ensure the physical display is completely clear of interference, take the following actions:
- Step 1. Take your iPhone out of its protective case.
- Step 2. Wipe the entire display firmly with a slightly damp, lint-free microfiber cloth.

Solution 3: Shut Down Unresponsive Apps
Sometimes a specific app glitches, causing the user interface to freeze in a localized area. This makes it seem like the edge of your screen has completely stopped working. Force closing the problematic app will immediately refresh the system's interface and clear the error.
Here is how to clear out an unresponsive application.
- Step 1. Double-tap the Home button or swipe up on your iPhone to bring up a list of recently used apps.
- Step 2. Swipe left or right until you find the suspected frozen app.
- Step 3. Once the app is located, simply swipe up on its preview screen to close it completely.

Solution 4: Force Reboot iPhone
Many temporary software glitches can be resolved with a simple force restart. This process clears the system's temporary memory cache and forcefully restarts all background processes. It is entirely safe and will not delete your personal data.
The exact button combination required to execute a hard reboot depends entirely on which iPhone model you own.
- For iPhone 8 or later: Press and release the Volume Up and Volume Down button successively. Then keep holding the Side button until the Apple logo appears.
- For iPhone 7: Keep holding the Volume Down and Side (or Top) buttons concurrently until the Apple logo appears.
- For iPhone 6 or earlier: Keep holding the Side (or Top) button and Home button until the Apple logo appears.

Solution 5: Reset All Settings
If a restart fails, returning your system configurations to their default state is the next logical step. Resetting all settings eliminates hidden software conflicts that might cause display unresponsiveness. This safely clears customized network preferences and display configurations without deleting your personal media.
Here is how to properly execute this reset on modern iOS versions.
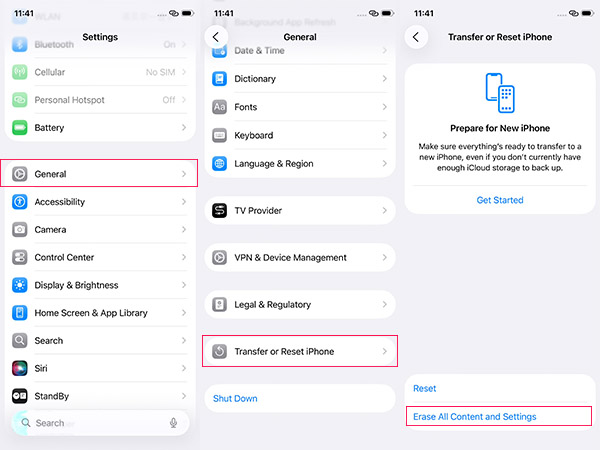
- Step 1. Open the Settings app and navigate to General, then scroll to the bottom and tap on Transfer or Reset iPhone.
- Step 2. Tap on Reset at the bottom of the screen, then choose Reset All Settings from the pop-up menu.
- Step 3. Enter your device passcode to confirm your identity and initiate the system reset.

Solution 6: Update iOS with iTunes or Finder
If a software bug is causing specific sectors of your screen to freeze, a fresh iOS update can recalibrate the display's sensitivity. Performing a wired update through a computer ensures the firmware package is verified before installation. This fixes deep-seated system errors that a standard wireless update might miss.
- Step 1. Connect your iPhone to your computer using a certified USB cable.
- Step 2. If you are using a Windows PC or an older Mac, launch iTunes; if you are using a Mac with macOS Catalina or later, simply open a Finder window.
- Step 3. Locate and select your device icon in iTunes or Finder.
- Step 4. Click the Summary (or General) > Check for Update and follow the instruction to finish the installation.

Solution 7: Repair Deep System Errors With a Dedicated Recovery Tool
If standard updates fail, your core operating system might contain deeply corrupted files. Instead of immediately wiping the device clean, utilizing a professional iOS repair tool offers a much safer middle ground.
Programs like TunesKit iOS System Recovery effectively rebuild the iOS firmware from the ground up without erasing your personal data.
Beyond just fixing localized touch screen failures, this software is engineered to resolve over 150 different system problems. It safely tackles severe software crashes like the black screen of death, persistent boot loops, and critical iOS update failures across iPhones, iPads, and iPod Touches.
Why Choose TunesKit iOS System Recovery?
Provides the highest success rate for severe software glitches like unresponsive touch screen while keeping your photos, messages, and apps completely intact. Easy to use due to a user-friendly interface.
Want to know whether it is useful? The best way is to download it to have a try by yourself. Follow the 3-step guide below.
- Step 1. Launch TunesKit on your computer. Connect the iPhone to it and select iOS System Repair > Start.
- Step 2. Choose the Standard Repair to fix the iPhone one side of the screen unresponsive issue without data loss.
- Step 3. Click Download to download a firmware package, and then click Repair to start the repair process.

Solution 8: Perform a Complete Factory Reset
At this stage, your absolute last basic software option is to completely wipe the device. This drastic measure obliterates any hidden software corruption causing the localized display failure.
Because this process permanently erases everything, creating a comprehensive backup is mandatory before proceeding.
- Step 1. Open the Settings app, tap on General, and scroll down to select Transfer or Reset iPhone.
- Step 2. Tap on Erase All Content and Settings at the bottom of the screen, then tap Continue.
- Step 3. Follow the on-screen prompts to confirm your passcode, upload a final iCloud backup if prompted, and authorize the complete system erasure.
Solution 9: Restore the Firmware via DFU Mode
DFU (Device Firmware Update) mode is the absolute final software-level troubleshooting step. This low-level diagnostic state bypasses the active operating system entirely to rewrite every single line of code. It successfully eradicates the deepest firmware corruptions that cause touch screen failures.
This process completely wipes your device, so secure a full system backup beforehand.
- Step 1. Connect your iPhone to a computer using a certified USB cable and open either iTunes (for Windows and older Macs) or Finder (for modern Macs).
- Step 2. Execute the specific DFU button combination for your exact iPhone model. If done correctly, your iPhone display will remain completely black.

- Step 3. When your computer detects an iPhone in recovery mode, click the Restore button.
Solution 10: Seek Professional Hardware Repair
If all software troubleshooting fails, you are likely dealing with a physical hardware failure like a damaged digitizer. These internal components can break from minor drops, making the display edges permanently unresponsive to software fixes.
To confirm a hardware issue, rotate your phone into landscape mode. If the dead zone stays in the exact same physical spot on the glass, the screen must be replaced.
- Step 1. Check your AppleCare+ coverage status online for potential repair discounts.
- Step 2. Schedule a diagnostic appointment at an Apple Store Genius Bar.
- Step 3. Visit an Apple Authorized Service Provider for a professional repair.

Video Tutorial: How to Fix the Unresponsive Right Side of iPhone Screen
HHere is a video tutorial that visually guides you through fixing an unresponsive iPhone screen step by step.
Conclusion
Regardless of which iPhone model you own, following this escalating troubleshooting path should help you isolate and resolve your display issues. Keep in mind that advanced methods like Factory reset, DFU restores will completely erase your device, so securing a full backup is mandatory.
If you want to safely repair deep system errors without risking your personal photos or messages, utilizing a dedicated tool like TunesKit iOS System Recovery is your most reliable option.
