


How to Fix iTunes Error 0xE80000A on iPhone: 6 Ways
Seeing iPhone error 0xE80000A when connecting your iPhone to a computer can prevent iTunes from recognizing or communicating with your device. This error may be related to connection problems, outdated software, corrupted iTunes files, or trust settings between your iPhone and computer.
Fortunately, there are several practical ways to resolve the issue. In this guide, we'll show you 6 effective solutions to fix iTunes error 0xE80000A and get your iPhone connected properly again.

Why Does iPhone Error 0xE80000A Occur?
Before trying the fixes, it helps to understand what may cause iPhone error 0xE80000A. This error usually appears when iTunes cannot communicate properly with your iPhone. Common causes include:
- 01 A faulty or uncertified USB cable: If you are using a damaged, loose, or non-certified Lightning/USB cable, the connection between your iPhone and computer may become unstable. As a result, iTunes may fail to detect or connect to the device properly.
- 02 Outdated iOS or iTunes software: An outdated version of iOS or iTunes may lead to compatibility problems during the connection process. Keeping both your iPhone and iTunes up to date can help prevent this error.
- 03 Antivirus or security software interference: Sometimes, antivirus programs or firewall settings on your computer may mistakenly block the connection between iTunes and your iPhone, which can trigger error 0xE80000A.
- 04 Trust or permission issues: If you tapped Don't Trust on your iPhone, or if the trust relationship between the iPhone and computer is corrupted, iTunes may not be able to establish a proper connection.
- 05 Corrupted iTunes components or Apple services: If some iTunes files or Apple-related background services on your computer are not working correctly, they may also cause iPhone error 0xE80000A.
Top 6 Ways to Fix iPhone Error 0xE80000A
Once you know the possible causes of iTunes error 0xE80000A, try the following solutions in order. Start with basic connection checks before moving on to software-related fixes.
Fix 1. Check the USB Cable and Connection
A poor USB connection is one of the easiest things to rule out when iTunes cannot communicate with your iPhone.
First, disconnect your iPhone and inspect both the cable and charging port. Make sure there is no visible damage or debris.
Then try the following:
- Use another USB cable that supports both charging and data transfer.
- Connect the iPhone directly to another USB port on the computer.
- Avoid using a USB hub or adapter if possible.
- Try connecting the iPhone to another computer to determine whether the problem is device- or computer-related.

After reconnecting your iPhone, unlock it and check whether iTunes or Apple Devices recognizes it normally.
Fix 2. Reset the "Trust This Computer" Permission
If your computer does not have permission to access your iPhone, the connection may fail and trigger error 0xE80000A.
Reconnect your unlocked iPhone and look for the Trust This Computer? message. Tap Trust and enter your iPhone passcode when prompted.
If the Trust alert does not appear, reset the permission:
- Step 1. Open Settings > General > Transfer or Reset iPhone.
- Step 2. Tap Reset.
- Step 3. Select Reset Location & Privacy.
- Step 4. Reconnect your iPhone to the computer.
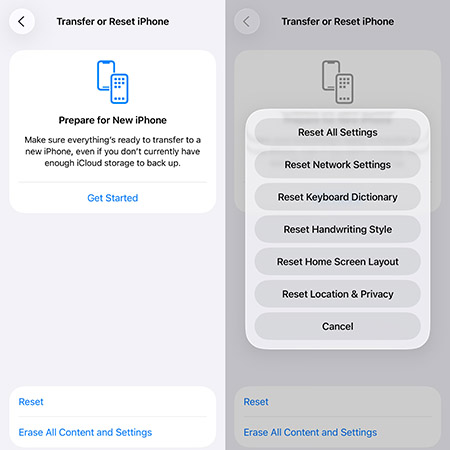
When the Trust This Computer? alert appears again, tap Trust.

Fix 3. Update iOS, Windows, and Apple Software
Compatibility problems between outdated software versions may interfere with the connection between your iPhone and computer. Thus, try to updatey your device to the latest version.
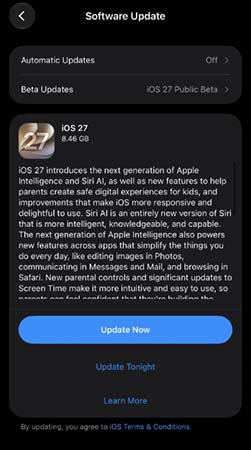
Update Your iPhone
Go to: Settings > General > Software Update, if there is an available update, just tap the Update Now button to install the latest available iOS version.
Update Your Windows PC
Open Settings > Windows Update, click the Check for updates option to download and install any available updates.

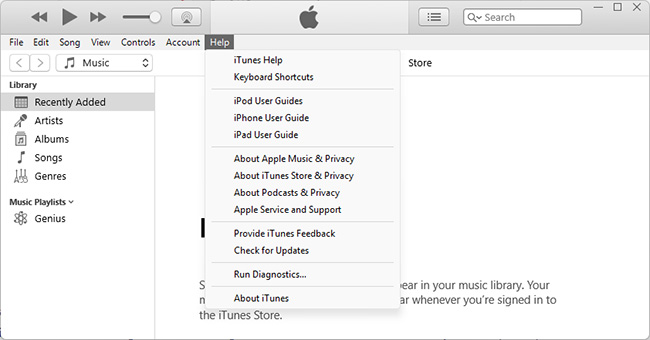
You should also update Apple Devices or iTunes to the latest available version. On newer Windows PCs, Apple Devices is commonly used for managing an iPhone, while some older setups may still use iTunes.
After updating, restart both your iPhone and computer and reconnect the device.
Fix 4. Check Antivirus, Firewall, or VPN Software
Third-party security software can sometimes interfere with communication between your iPhone and iTunes.
If iTunes error 0xE80000A appeared after installing or updating antivirus, firewall, VPN, or other security software, check its settings first.
You can temporarily disable the relevant third-party security software and reconnect your iPhone to test the connection.

If the error disappears, you'd better turn the security software back on and adjust its settings instead of leaving your computer unprotected.
Fix 5. Repair iTunes for Free with TunesKit iOS System Recovery
When you read here, and the issue still exists, it means that your iPhone suffers a software issue. Here, I recommend TunesKit iOS System Recovery to you. TunesKit iOS System Recovery is a powerful and one-stop iOS fixing tool that can help you solve common iOS issues like iPhone stuck on setting up Apple ID, iMessage not showing Contact names, or Google Maps not working. What's more, TunesKit iOS system Recovery can ensure casing no data loss in the fixing.
Fix iTunes Error 0xE80000A for Free
Use TunesKit iOS System Recovery’s free iTunes Repair feature to detect and fix common iTunes errors and connection issues without reinstalling iTunes.
 600,000+ Downloads
Here is the step-by-step guide to fix iTunes error 0xE80000A using TunesKit iOS System Recovery.
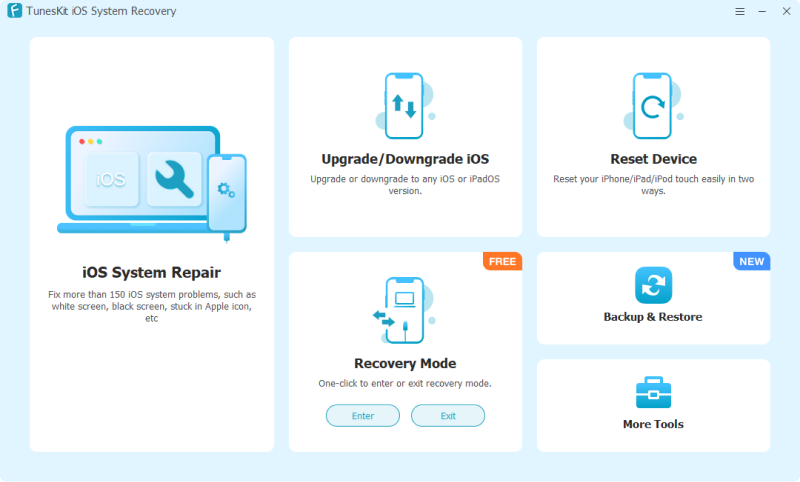
Step 1. Connect iPhone to PC
Install and open TunesKit iOS System Recovery on your Windows computer. From the main interface, select the More Tools option, then select the iTunes Repair feature.
Step 2. Scan for iTunes Problems
Click the Repair button, and let TunesKit check iTunes and related Apple components for possible problems.
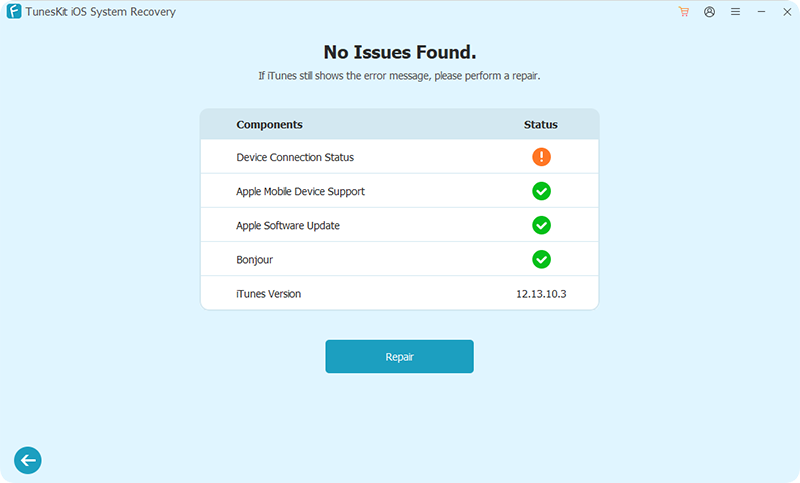
Step 3. Repair iTunes
TunesKit will automatically repair the detected iTunes issues. Once the process finishes, restart iTunes and reconnect your iPhone to see whether 0xE80000A has disappeared.

Fix 6. Reinstall Apple Devices/iTunes
If the previous solutions do not work, damaged Apple software components on your Windows PC may be preventing the iPhone from connecting correctly.
If you use Apple Devices, update or reinstall the app and then reconnect your iPhone.
If your computer still relies on iTunes, reinstalling iTunes may help replace corrupted program components.

Before reinstalling, close iTunes or Apple Devices and disconnect your iPhone. After reinstalling the latest version, restart the computer and connect your iPhone again.
If your iPhone is still not recognized after checking the cable, permissions, software, and security settings, try another computer or contact Apple Support for further diagnosis.
FAQs About iTunes Error 0xE80000A
-
What does iTunes error 0xE80000A mean?
iTunes error 0xE80000A usually means that iTunes cannot properly communicate with your iPhone or iPad. The cause may be a USB connection problem, trust permission issue, outdated software, security software interference, or damaged iTunes components.
-
Will fixing error 0xE80000A erase my iPhone data?
Most basic fixes, such as changing the cable, updating software, resetting trust permissions, or repairing iTunes, do not erase your iPhone data. Restoring the iPhone, however, can erase the device, so back it up first.
-
Can I fix iTunes error 0xE80000A without reinstalling iTunes?
Yes. You can first try updating iTunes or repairing its components. TunesKit iOS System Recovery also includes a free iTunes Repair feature that can detect and repair common iTunes problems without immediately reinstalling the program.
The Bottom Line
iTunes error 0xE80000A is usually related to connection problems, trust settings, outdated software, security interference, or damaged iTunes components. Start with the basic fixes above before trying more advanced solutions.
If the problem is caused by iTunes itself, TunesKit iOS System Recovery offers a free iTunes Repair feature that can detect and fix common iTunes errors without reinstalling the program. It can also help repair various iOS system issues.