Top 4 Ways to Open a Password-Protected Word Document
We have all faced that moment of sudden frustration: you double-click an urgent file, ready to work, only to be greeted by a small, unyielding dialog box demanding a code you don't have. While password protection is an excellent feature for securing sensitive data, it becomes a significant hurdle when passwords are lost, forgotten, or simply never communicated.
If you are currently staring at a locked screen and wondering how to open a password protected word document, you are not alone. This situation is one of the most common support tickets in office environments. Fortunately, regaining access is often possible, now let's continue reading to learn how to open a password protected Word document in easy ways.
Part 1. 4 Ways to Open a Password-Protected World Document
Forgot the password to a Word document you need to open? Don't worry — there are several practical ways to regain access, whether the file is lightly protected or secured with a stronger password. Below are four effective methods you can try, ranging from built-in Word options to professional recovery tool and online services. Choose the one that best fits your situation.
Method 1: Removing a Known Password
If you know the password but are tired of entering it every time you access the file, removing it is a straightforward process. This is the cleanest way to return the document to a standard "open" state.
Step 1. Open the document using the current password.
Step 2. Navigate to the File tab in the top left corner and select Info.
Step 3. Click on the Protect Document box, then select Encrypt with Password from the drop-down menu.
Step 4. Clear the password field so it is completely blank, and click OK. The document is now unlocked for future use.

Method 2: Using VBA Code to Find Password
If your Word document has a password that's three characters or fewer, you can use a VBA macro to attempt recovery. Follow these steps:
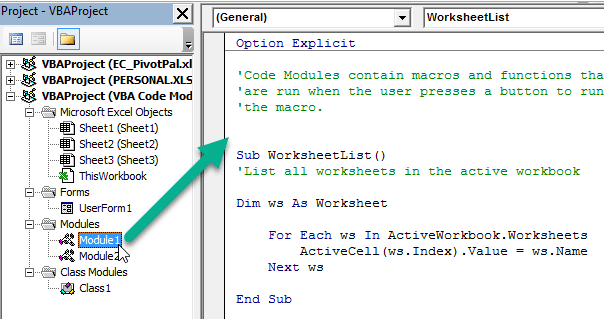
Step 1: Open Microsoft Word and press ALT + F11 to launch the VBA editor.
Step 2: Go to the Insert menu and select Module to create a new code module.
Step 3: Copy and paste the following VBA script exactly into the module window:
Sub test()
Dim i As Long
i = 0
Dim FileName As String
Application.FileDialog(msoFileDialogOpen).Show
FileName = Application.FileDialog(msoFileDialogOpen).SelectedItems(1)
ScreenUpdating = False
Line2: On Error GoTo Line1
Documents.Open FileName, , True, , i & ""
MsgBox "Password is " & i
Application.ScreenUpdating = True
Exit Sub
Line1: i = i + 1
Resume Line2
ScreenUpdating = True
End Sub
Step 4: Press F5 to execute the macro.
Step 5: When prompted, navigate to and select your password-protected Word document, then click Open.
Method 3: Using TunesKit File Password Recovery
If you can't remember your Word document opening password, or if your Word document opening password is longer than three characters, then a professional password recovery software, TunesKit File Password Recovery, will come in handy. It supports 6 file types: PDF, Excel, Word, PowerPoint, ZIP, and RAR. Also, it recovers both open passwords (to access files) and permission passwords (restrictions on editing/copying/printing) for Office and PDF files.
The recovery process does not damage or modify the original files, and it automatically saves your recovery progress, so you don’t have to start over if you stop. The clean, intuitive design that allows beginners and professionals to restore access in just a few clicks.
Your Smart Solution for Password-Protected Word Documents
TunesKit File Password Recovery helps you quickly and securely regain access to your password-protected Word files with multiple recovery modes and fast performance.
Follow these steps to utilize TunesKit File Password Recovery to find your Word document's opening password.
Step 1Select the File Type
Download and install TunesKit File Password Recovery on your computer, and launch it. Click on the Excel/Word/PPT tab.

Step 2Start to Recover Word Document Password
Then select the Recover Office Password option. Drag and drop your locked Word document into the left of the software window, or click the Add button to browse for it manually.

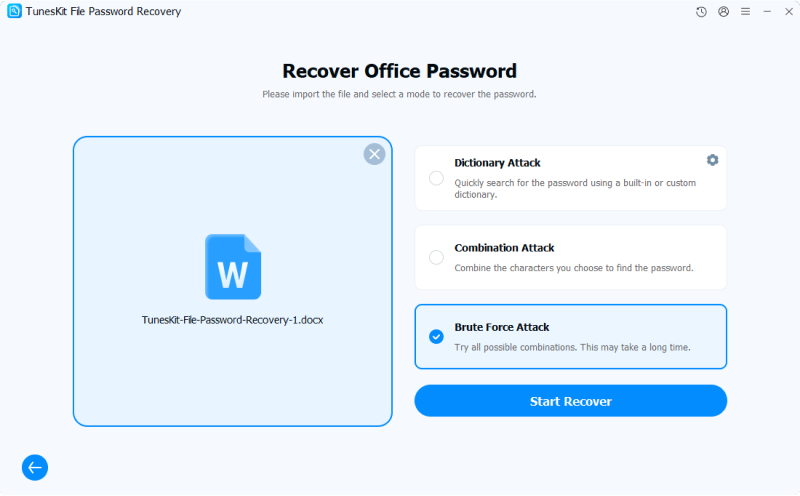
Step 3Select your Attack Mode
Select your "Attack Mode" from the list on the right side of the interface. This is the most critical step, as choosing the right mode can save you hours of waiting.
- Dictionary Attack: Best if you use common words. It scans through a built-in dictionary or custom dictionary.
- Combination Attack: Use this if you remember parts of the password (e.g., you know it ends in "2023" or starts with your name). You can configure the specific characters the tool should focus on.
- Brute Force Attack: The "nuclear option." It tries every possible combination of letters, numbers, and symbols. This takes the longest but is the most thorough.
Step 4Recovery and Opening Your Password-Protected Word Document
Click the Start Recover button in the bottom right corner. The software will begin testing passwords against your file's lock. You will see a progress bar indicating the speed and number of passwords tested.
Wait for the "Success" window. Once the software finds the correct string, it will display the password in a popup window.
Click the Copy button next to the displayed password. Go back to your locked Word document, double-click to open it, and paste the recovered password into the prompt to unlock your file.

Removing Editing Restrictions (Optional)
If your file opens without a password but prevents you from typing or editing, you do not need the long recovery process above.
Step 1. Select the Remove Office Restriction mode in the main menu instead of "Recover Password."
Step 2. Import your file and click Start Remove. The software will instantly strip the editing restrictions, usually in a matter of seconds, without needing to guess a password.

Method 4: Using Online Tool
You can also try an online tool. However, keep in mind that using online services requires you to upload your personal or sensitive document to their servers, which may pose privacy risks. In addition, most free online tools can only handle weakly protected Word files. If you're concerned about data security or your document uses a strong password, it’s better to use one of the offline methods mentioned earlier.
Below are the steps for using an online service to attempt password recovery:
Step 1: Go to the official LostMyPass website and select MS Office Word from the FILE TYPE menu.
Step 2: Check the box to agree to the Terms and Conditions.
Step 3: Upload your Word document by dragging it onto the page or clicking the upload button.
Step 4: The tool will start the recovery process automatically once the file is uploaded.

After some time, the service will display the recovered password (if successful), and you can use it to open your protected Word document.
Part 2. FAQs about Opening a Password-Protected Word Document
-
Q1: Can I open a Word document without the password?
You must know the correct password to open a document protected with an "Open Password." Without it, Word will not allow access. If you are the owner, you can try checking backups, previous versions, or contacting anyone who might have set the password.
-
Q2: What's the difference between an "Open Password" and a "Modify Password?"
Open Password: Required to access the document at all.
Modify Password: The document can be opened, but editing requires the password. -
Q3: Can Microsoft help me recover a Word document password?
Microsoft does not provide password-recovery services for Word documents because the encryption is designed to protect users' privacy. However, you can use a reliable password recovery tool called TunesKit File Password Recovery to find your password quickly and safely.
Part 3. Conclusion
Regaining access to a password-protected Word document doesn’t have to be difficult. With features like multiple recovery modes, fast performance, and secure local processing, TunesKit File Password Recovery offers an efficient and reliable solution for users who need to unlock their own files quickly and safely.
