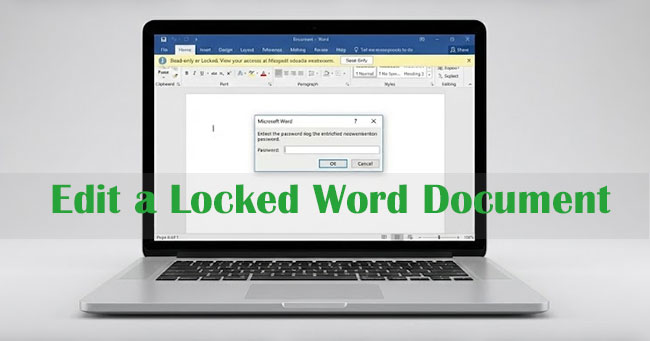
How to Edit a Locked Word Document
Encountering a Microsoft Word file that you cannot change is one of the most frustrating workflow interruptions. Whether you are dealing with a restricted form, a "read-only" final draft, or a password-protected file you have inherited from a colleague, the inability to make necessary changes can bring your progress to a grinding halt.
Fortunately, you do not have to retype the entire content from scratch. In this guide, we will walk you through exactly how to edit a locked word document on both Windows and Mac using several proven, hassle-free methods.
Part 1. Why Can't I Edit a Locked Word Document?
Before diving into the fixes, it is critical to understand that not all "locked" documents are the same. Microsoft Word generally employs two distinct types of protection. The method you choose depends entirely on which lock you are facing.
1. The "Read-Only" Restriction (Editing Restriction)
In this scenario, you can open the file and read the content perfectly fine. However, you cannot delete text, change formatting, or add new content. The editing tools in the ribbon are likely greyed out. This is often called "Restrict Editing."
2. The "Password to Open" (Encryption)
This is the stricter security measure. When you double-click the file, a popup immediately demands a password. You cannot view the contents at all without it.
Part 2. How to Edit a Locked/Protected Word Document?
The approach to unlocking your document depends entirely on the type of lock you are facing. We have divided this into two main scenarios: when you are completely locked out of the file, and when you can view it but not touch it.
Scenario A: You Can't Open the File (Forgot the Password)
This is the most secure form of protection: Encryption. When you double-click your Word document, a popup immediately demands a password. Without it, the file's contents remain completely scrambled and inaccessible.
In this case, you need a reliable third-party tool to recover your password quickly. Continue reading.
Use TunesKit File Password Recovery to Recover the Open Password
When you need to break through encryption without damaging your data, TunesKit File Password Recovery is a professional solution designed for this exact purpose. Unlike online converters that require you to upload sensitive files to unknown servers, TunesKit processes everything securely on your local machine.
It utilizes four distinct "attack types" to intelligently calculate your password based on whatever clues you might remember—or brute force it if you remember nothing at all. Also, if you forgot Excel password, it can recover your Excel password quickly. Sounds wonderful, right? Let's explore what eles it offers.
Edit Locked Word Files Easily with TunesKit
TunesKit File Password Recovery helps you unlock and edit protected Word documents on Windows & Mac quickly and securely.
Here's how to recover an open password of Word document using TunesKit File Password Recovery.
Step 1Select the Recover Mode
Download, install, and launch this software. In the main interface, you will see options for different file types. Select the "Excel/Word/PPT" tab. On the next page, just click the Recover Office Password button.

Step 2Import Your Locked Word Document
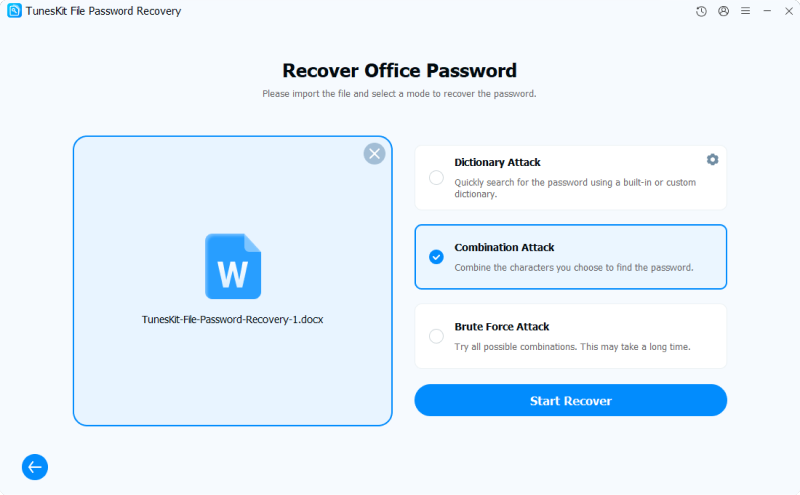
2.1 Click the "Add" (plus sign) button or drag and drop your locked Word (.docx or .doc) file into the program window. Then select the mode that best fits your situation to speed up the process.
- Dictionary Attack: Quickest method. It scans a built-in dictionary of common passwords. Use this if you think the password is a standard word like "password123".
- Combination Attack: Best if you remember parts of the password. You can configure settings (e.g., "I know it is 6 characters long and ends with '2025'").
- Brute Force Attack: The "last resort" method. It tries every possible combination of letters, numbers, and symbols. This takes the longest time but is thorough if you have absolutely no idea what the password is.
2.2 Once you've confirmed the attack mode, click the "Start Recover" button. The software will begin testing passwords. A progress bar will show the status. Once the password is found, it will be displayed in a popup window.
Step 3Unlock Your Word Document
Click the Copy icon next to the displayed password, open your Word document normally, and paste the recovered password when prompted.

Scenario B: You Can Open, But Can't Edit (Restricted)
You can open the document and read every word, but the moment you try to fix a typo or add a paragraph, nothing happens. The toolbar at the top is likely greyed out, or you may be restricted to filling in specific form fields.
This is known as an Editing Restriction. It is less about encryption and more about permissions. While annoying, it is generally easier to bypass than a full encryption password. Here is how to edit a protected word document facing this specific type of lock.
Method 1: Use TunesKit File Password Recovery to Remove Edit Restrictions
If you have multiple restricted files or need to preserve the document's formatting perfectly (including tables, headers, and specific layout settings), using professional software is the safest bet.
While TunesKit File Password Recovery is powerful for recovering lost passwords, it also features a specialized "Remove Restriction" mode. This function is distinct because it detects the "Read-Only" script within the file and strips it away in seconds, creating a clean, editable copy.
Step 1. Open this software on your computer. On the main interface, select Excel/Word/PPT tab, then click the Remove Office Restriction option.
Step 2. Click the "Add" button to locate your read-only Word document, or drag and drop it into the main window. Once the file is loaded, simply click the Start Remove button. The process is nearly instantaneous. The software will process the file and save a new version to your designated output folder.

Step 3. Navigate to the output folder and open the new file. You will find that all editing restrictions have been removed, and the formatting remains identical to the original.

Method 2: Create a Blank Document
If you don't have access to third-party software and need a quick fix, this is often the most reliable manual workaround. Instead of trying to break the lock on the original file, you simply pull the content out of it and into a new one.
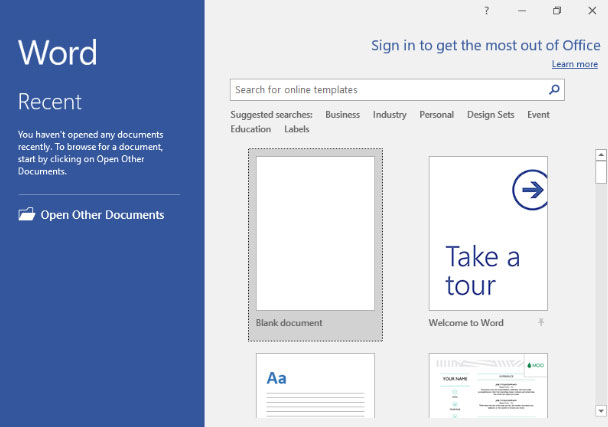
Step 1. Open Microsoft Word and create a Blank Document.
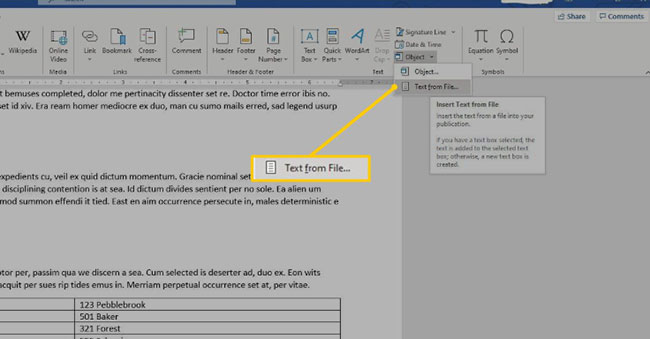
Step 2. Go to the Insert tab on the top ribbon.
Step 3. Look for the Object button (usually located in the "Text" group on the far right). Click the small arrow next to it to open the dropdown menu.
Step 4. Select Text from File....
Step 5. In the window that appears, locate and select your locked Word document, then click Insert.
Step 6. Word will extract the text from the protected file and paste it into your new blank document. Since this is a fresh file, it has no restrictions. You can now edit and save it as usual.
![]() Note
Note
This method is excellent for text-heavy documents but may occasionally disrupt complex formatting or floating images.
Method 3: Use Google Docs to Bypass
Google Docs does not always respect the "Restrict Editing" protocols native to Microsoft Word. This makes it a great tool for removing protection.
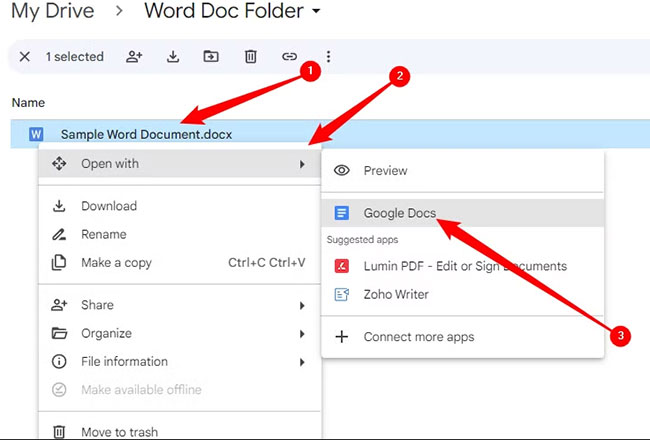
Step 1. Open your browser and log into Google Drive.
Step 2. Upload your locked Word file.
Step 3. Double-click the file to preview it, then select Open with Google Docs at the top of the screen.
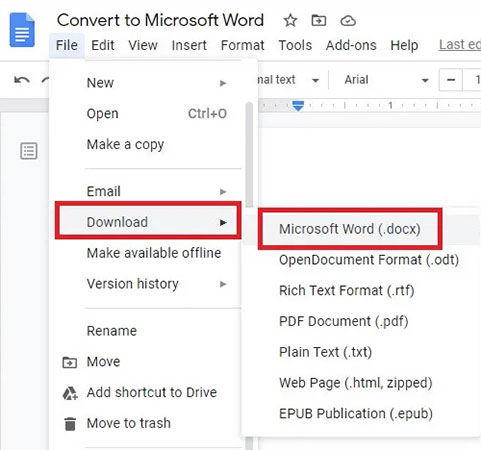
Step 4. Once the file loads in the Google Docs editor, try typing. In most cases, the text is now editable.
Step 5. To return to Word, go to File > Download > Microsoft Word (.docx).
Method 4: Save as Web Page
Changing the file structure to HTML can sometimes strip away the scripts that enforce protection.
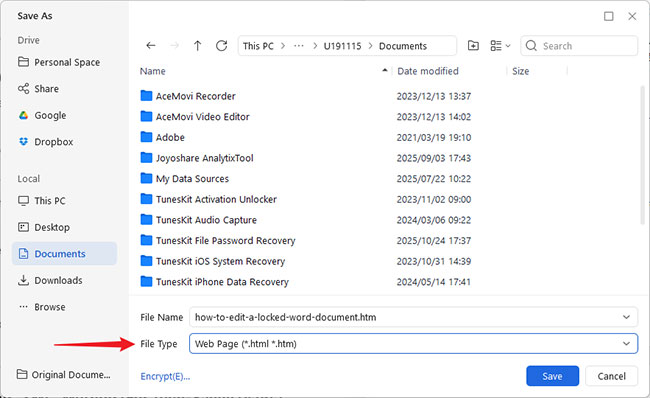
Step 1. Open your locked document.
Step 2. Go to File > Save As.
Step 3. Change the file type from Word Document to Web Page (*.htm; *.html). Save it to your desktop.
Step 4. Close Word completely..
Step 5. Right-click the HTML file you just made, choose Open with, and select Microsoft Word.
Step 6. Once opened, the protection is often gone. Use Save As to convert it back to a .docx file.
Part 3. Conclusion
In conclusion, understanding how to edit a protected Word document can save time and avoid frustration when access is restricted. If you've lost or forgotten the password, TunesKit File Password Recovery stands out with its fast recovery speed, high success rate, and support for multiple unlocking methods, making it easy to regain access and edit your Word files safely and efficiently.
