How to Burn YouTube Music to CD: Step-by-Step Guide
YouTube Music is a popular streaming service offering everything from music videos to exclusive non-label tracks found nowhere else. With helpful features like lyric search and location-based playlists, it attracts millions of daily users. Its distinct advantage lies in its vast collection of unique content that other mainstream platforms often lack.
If you find special tracks on YouTube that you want to keep forever, burning them to a CD is a great solution. While moving streaming content to a physical disc can be tricky, this post provides a simple guide. We will show you how to download and burn YouTube music to CD easily.

Part 1. The Crucial Decision—Audio CD vs. MP3 CD
Before you burn a single file, you must choose the right format. Choosing the wrong one is the #1 reason burned CDs fail to play in car stereos.
1. Audio CD (The Universal Choice)
- Compatibility: Plays in 100% of CD players, including vintage car stereos and home Hi-Fi systems.
- Capacity: Limited by time (usually 74 or 80 minutes).
- Best For: Creating a standard album or a high-quality mix for an older car.
2. Data / MP3 CD (The Modern Choice)
- Compatibility: Only plays in players that specifically support MP3s (usually marked with an "MP3" or "WMA" logo on the faceplate).
- Capacity: Limited by data size (700MB). This can hold 100 to 150 songs.
- Best For: Long road trips if your car stereo supports it.
Part 2. How to Record YouTube Music for CD Burning
At present, streaming music services only support the online and offline listening, which means that you can only stream music from the platform itself including YouTube. You can download songs from YouTube for listening in the offline mode, but all the downloaded songs are cache files not viewable on other places. Thus, you cannot apply YouTube songs to other places.
However, there is a good method for you to download YouTube music to MP3 or other audio formats for listening anywhere. With the help of a third-party tool like TunesKit Audio Capture, you can achieve it. TunesKit Audio Capture can help you download and convert music from YouTube to several popular audio formats without subscribing to membership plans on YouTube.
Key Features of TunesKit Audio Capture
Record and download Tidal music in simple clicks. Record high-quality audio on Win/Mac from any source without losing any audio quality.
TunesKit software can help you download any track you want, then you can burn YouTube music tracks to CD or DVD. Before the burning, you need to make a preparation of your burning. After you have all things on your computer, you can follow the below tutorial to download YouTube playlist to CD.
Gather your materials and tools before burning YouTube songs to CD:
- Make sure that your computer has a disc drive for burning discs;
- Prepare a blank or DVD for burning YouTube music multiple time;
- Download and install TunesKit YouTube Music Downloader to your computer;
- The CD burner like iTunes or Windows Media Player is available on your computer.
How to download YouTube music to CD via TunesKit Audio Capture
Step 1Set up TunesKit on the PC
First, you need to fire up TunesKit Audio Capture on your computer, and then you will see the interface of TunesKit where there are lots of programs listed. If there is no browser for you to navigate to YouTube website, you could drag and drop the browser to TunesKit or click the + icon to select the browser. And you don't need to open the browser at once.

Step 2Adjust the audio parameters
Then, you need to configure the output audio parameters. There are multiple formats like MP3, AAC, WAV, FLAC, M4A, and M4B for you to choose from, but you could go to set the audio format by clicking the Format icon. Otherwise, you could continue to adjust the value of the bit rate, sample rate, and audio channel for better output audio quality.

Step 3Record songs from YouTube
Next, click on the Start button and TunesKit Audio Capture will launch the browser automatically. You could choose one music video or several music videos from YouTube and then TunesKit will begin record audio from YouTube when you play the songs. And you could stop YouTube music songs download by clicking on the Stop button as you like.

Step 4Save the recorded YouTube songs
Finally, you could go to edit these downloaded YouTube music files by clicking the Edit button at the rear of each track to open the service of audio customization. With the service, you could trim and merge all YouTube music tracks and edit the ID3 tags and other audio information. Then save all your edited music tracks to your computer after customization.

Part 3. How to Burn YouTube Playlist to CD
After you have downloaded your favorite songs from YouTube to your computer using TunesKit software, you can begin to copy YouTube songs to CD. There are two common ways for you to transfer YouTube songs to CD or DVD. Here's how to:
Method 1. How to Burn YouTube Music to CD on Mac
On macOS, the functionality is built directly into the Music app (formerly iTunes).
1. Open the Music app and go to File > Import to bring your converted YouTube MP3s into the library. Select the songs, right-click, and choose Add to Playlist > New Playlist.
2. Insert a blank CD-R. Select your new playlist in the sidebar and go to File > Burn Playlist to Disc.
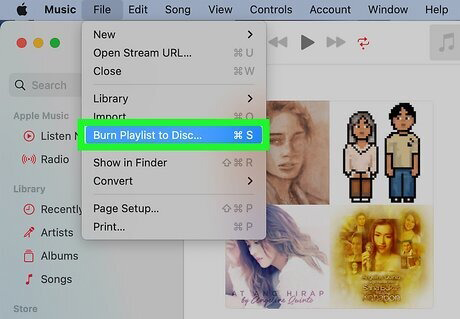
3. Select Audio CD. You can adjust the "Gap Between Songs" (usually 2 seconds) or use "Sound Check" to normalize volume levels so one song isn't louder than another. Click Burn.

Method 2. How to Burn YouTube Music to CD on Windows
Windows still includes one of the best tools for burning audio discs: Windows Media Player Legacy.
1. Insert a blank CD or DVD into the disc drive of your computer.
2. Search for Windows Media Player in your Start menu. (Note: Do not use the new Media Player app).
3. Click the Burn tab in the top-right corner. Select the small options button in the Burn tab and select Audio CD (for universal compatibility) or Data CD (for more songs). Drag and drop your converted MP3 files from your folder into the Burn List area on the right side of the player.
4. Arrage the song order by dragging tracks up or down in the list. When ready, click Start Burn and the disc will eject automatically when finished.

That's all there is to it. You've now burned YouTube songs into a CD or DVD. Then you can listen to YouTube music in the car or at home with ease.
Part 4. Troubleshooting Common Issues
The CD skips or won't play in my car
- Burn Speed: Burning at maximum speed can cause errors. Try burning again at a lower speed (e.g., 4x or 8x).
- Disc Type: Ensure you used a CD-R, not a CD-RW or DVD-R. Most CD players cannot read DVDs.
- Labeling: Do not put thick stickers on the CD face; this can unbalance the disc in the drive.
The text/song titles aren't showing on my car radio
Standard Audio CDs do not inherently store song titles like MP3s do. However, you can try enabling CD-Text in your burning software settings. Note that your car stereo must also support CD-Text to display the information.
The audio quality sounds low
This usually happens during the download phase.
- If using a converter, ensure the output is set to 320kbps MP3 or AAC.
- If recording, ensure your system volume is high (but not maxed out to avoid clipping) and that you are recording the system audio directly, not via a microphone.
Final Thoughts
By following this guide, you can successfully bridge the gap between modern streaming convenience and the reliability of physical media. If you want to easily download YouTube music and burn it to your CDs, download and try using TunesKit Audio Capture.
