[An SSL Error Has Occurred] How to Fix SSL Error on iPhone/iPad
My iPhone is displaying an alert that says, 'An SSL error has occurred and a secure connection to the server cannot be established'. Due to this error, I am unable to play media online or download anything. Do you have any solutions?
Seeing "An SSL error has occurred" on your iPhone can be frustrating, especially when you're trying to open a website or use an app that requires a secure connection. This issue usually appears when your device fails to establish a secure link with the server. It can be caused by several factors, such as incorrect network settings, outdated iOS versions, or server-related problems. In this guide, we'll explain why the SSL error occurs on iPhone or iPad and provide several proven methods to fix the problem quickly.

- What Is an SSL Error on iPhone and Why Does It Occur?
- How to Fix SSL Error on iPhone and iPad?
- Fix 1. Enable and Disable Airplane Mode
- Fix 2. Reset Network Settings
- Fix 3. Restart Your Device
- Fix 4. Set Date & Time to Automatically
- Fix 5. Clear Browser Cookies and Cache
- Fix 6. Reinstall the Problematic App
- Fix 7. Fix SSL Error via TunesKitHOT
- Fix 8. Update Your iPhone or iPad
- Fix 9. Reset All Settings on iPhone or iPad
- [Tip] How to Enable SSL on iPhone & iPad
- Conclusion
What Is an SSL Error on iPhone and Why Does It Occur?
An SSL error on an iPhone happens when your device cannot establish a secure encrypted connection with a website or server. SSL stands for Secure Sockets Layer, the technology used to protect data sent between your device and a website. Today, it's mostly replaced by Transport Layer Security (TLS), but people still commonly call it an "SSL connection."
When an SSL error appears, your Safari or another app is telling you that the connection may not be secure.
So why SSL Errors Occur on iPhone? The main reasons are listed below:
- 01 Incorrect Date and Time: SSL certificates are time-sensitive. If your iPhone's date or time is wrong, the certificate may appear invalid.
- 02 Expired or Invalid Website Certificate: Every secure website has an SSL certificate issued by a trusted authority. If the certificate has expired, is misconfigured, or belongs to a different domain. Your iPhone will block the connection.
- 03 Outdated iOS Version or System Glitch: An outdated iOS version or software bugs can sometimes cause SSL errors. If your iPhone or iPad is running an older version of iOS, it might lack updates or security patches necessary for proper SSL certificate validation.
- 04 Network Issues: Public Wi-Fi networks (airports, hotels, cafes) can cause SSL errors if they intercept connections, require login portals, or have weak security
- 05 Corrupted Browser Data: Cached files or cookies in Safari (Apple web browser) can sometimes cause certificate verification issues.
- 06 VPN or Security Apps: Using a VPN, antivirus app, or content filter can interfere with SSL verification.
How to Fix SSL Error on iPhone and iPad?
Now that we understand what an SSL error is and why it occurs, the next step is to fix it. Below are several simple methods you can try to resolve SSL errors on your iPhone or iPad.
Fix 1. Enable and Disable Airplane Mode
To fix SSL errors on iPhone or iPad, toggling Airplane Mode is proved by many users. You can enable and disable Airplane Mode, the internet connection on your device will be reconnected, so the error might be solved. Airplane Mode can be toggled via Control Center or Settings.

Fix 2. Reset Network Settings
Incorrect network settings may cause SSL errors. Resetting settings related to networks, Bluetooth, and VPN to their defaults, and will not erase the contents on your device. To do this, go to Settings > General > Transfer or Reset iPhone, then select "Reset Network Settings".

Fix 3. Restart Your Device
The next entry is a common method for iOS issues including the SSL error. Restarting your device can clear out temporary files to resolve some minor glitches. Whatever what model of iPhone or iPad you are using, it's easy to turn your device off via Settings > General > Shut Down. Wait for 30 seconds, then turn it on with the side/top button.

Fix 4. Set Date & Time to Automatically
When you are facing the SSL issue, don't forget to check for the date and time settings on your device. Launch Settings on your iPhone or iPad, tap on General option, and navigate to the "Date & Time" option. Make sure that the "Set Automatically" toggle is on.

Fix 5. Clear Browser Cookies and Cache
If the SSL error shows up when you are using Safari, you can try clearing browser cookies and cache. Here are the steps for you to finish it:
- Step 1. Open Settings on your iPhone or iPad.
- Step 2. Tap Apps, then select Safari.
- Step 3. Scroll down and tap Clear History and Website Data.
- Step 4. Choose a timeframe (e.g., Last Hour, Today, or All History) and tap the Clear History button to confirm.

Fix 6. Reinstall the Problematic App
If you see the SSL error message while using Apple Music or other specific apps, a solution is to delete and reinstall the problematic app. When the app is outdated or corrupted, it will bring unexpected issues. Delete the problematic app and reinstall it to see if the issue is solved.
- Step 1. On the Home Screen, press and hold the app icon until a menu appears.
- Step 2. Tap Remove App, then select Delete App and confirm to uninstall it.
- Step 3. Open the App Store, search for the app you removed, and tap Download or the cloud icon to reinstall it.

Fix 7. Fix SSL Error via TunesKit
If the solutions above have failed and the prompt "An SSL error has occurred" still appears, the SSL error on your iPhone or iPad might be caused by system issues. In this case, a professional system repair tool like TunesKit iOS System Recovery can get you out of the annoying error message.
TunesKit iOS System Recovery has a massive capability to repair more than 150 iOS software issues on iPhone, iPad, and iPod touch. Due to its intuitive interface, you are enabled to fix the iPad stuck on connect to iTunes, update failure, device stuck on Recovery Mode, etc. It is an all-in-one tool for you to solve software problems only with a few clicks.
Fix SSL Errors on iPhone/iPad with TunesKit
Quickly resolve SSL errors and other iOS system issues without data loss using TunesKit's one-click recovery tool.
Follow the steps to fix the SSL errors on your device:
Step 1Connect Your Device to Computer
First of all, you need to launch TunesKit iOS System Recovery on your computer. After that, connect your device to the computer, choose iOS System Repair, and click the Start button to begin.

Step 2Select Repair Mode
You need to select the repair mode, it's advisable to choose the Standard Repair to fix the problem without data loss. The Deep Repair will reset your device to the factory settings and all data will be erased.

Step 3Download Firmware Package
After your enter the firmware packge download page, you can see your device's information. After checking it, click the Download button.

Step 4Start to Fix SSL Errors
When the package download process is done, click on the Repair button, this software will automatically fix your iOS system, and the SSL errors on your iPhone or iPad will be solved.

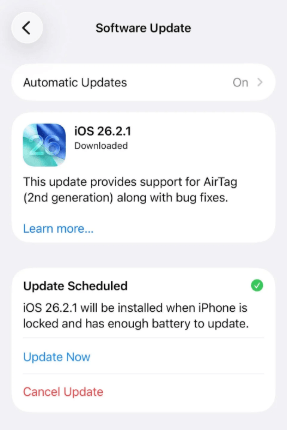
Fix 8. Update Your iPhone or iPad
Sometimes, SSL errors occur because your iPhone or iPad is running an outdated version of iOS that no longer supports the latest security protocols used by websites and email servers. Updating your device ensures that all system components are current, which often resolves SSL connection issues. Here's how to update your device:
- Step 1. Open Settings and go to General.
- Step 2. Tap Software Update, your device will automatically check for any available iOS updates.
- Step 3. If an update is available, tap Update Now button. Make sure your device is connected to a stable Wi-Fi network and has sufficient battery or is plugged in to complete the update smoothly.
Fix 9. Reset All Settings on iPhone or iPad
If the previous solutions don't resolve the SSL error, resetting all settings on your device may help fix underlying network or system configuration issues. This process restores system settings such as Wi-Fi, network configurations, and privacy preferences to their default state, but it does not erase your personal data.
- Step 1. Open Settings on your iPhone or iPad and tap General.
- Step 2. Scroll down and select Transfer or Reset iPhone (or Transfer or Reset iPad).
- Step 3. Tap Reset, then choose Reset All Settings. Enter your passcode if prompted and follow the on-screen instructions to complete the process.

After the reset is finished, reconnect to your Wi-Fi network and check if the SSL error has been resolved.
[Tip] How to Enable SSL on iPhone and iPad?
Enabling SSL on your iPhone or iPad ensures that your email communications are encrypted and secure. While most modern email accounts enable SSL automatically, you may need to turn it on manually for certain accounts or custom servers. Here's a simple guide to make sure your incoming and outgoing mail is protected.
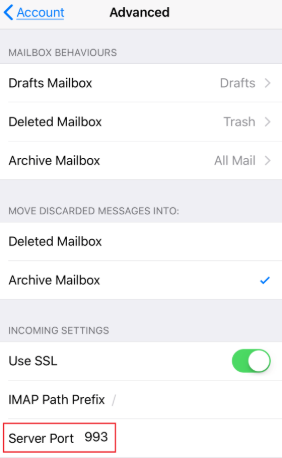
For Incoming Mail Server (IMAP/POP3):
- Step 1. Open Settings → Apps → Mail → Accounts.
- Step 2. Select the email account you want to secure.
- Step 3. Tap Account → Advanced.
- Step 4. Toggle "Use SSL" on.
- Step 5. Verify the port number, for IMAP, the server port is 993; for POP3, the server port is 995.
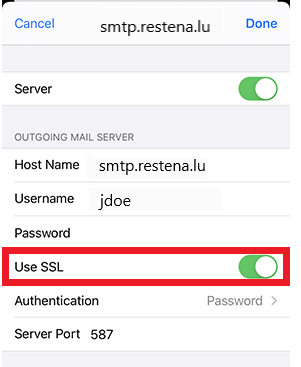
For Outgoing Mail Server (SMTP):
- Step 1. Go to Settings → Apps → Mail → Accounts → [Your Account] → SMTP.
- Step 2. Tap the primary server under Server List.
- Step 3. Toggle "Use SSL" on.
- Step 4. Set the port number to 465 (or 587 if using TLS).
- Step 5. Save the settings.
![]() Tip
Tip
Most modern email accounts (Gmail, iCloud, Outlook) automatically use SSL. Manual adjustment is usually only needed for older or custom email servers.
Conclusion
Try any of the methods outlined in this article, then you can overcome the SSL error on iPhone/iPad successfully. If you encounter other iOS issues, you can also take the assistance of TunesKit iOS System Recovery to regain seamless functionality on your device.
