


Why Is My iPad Not Receiving Emails? 9 Fixes
If your iPad is not receiving emails, it can quickly become frustrating—especially when important messages arrive on your phone or computer but never appear in the Mail app. The problem may be caused by network issues, incorrect account settings, disabled mail fetching, or a temporary iPadOS glitch.
In this guide, we'll explain why your iPad may stop getting emails and walk you through the most 9 effective ways to fix it.
- Why Am I Not Receiving Emails on My iPad?
-
9 Ways to Fix Not Receiving Emails on iPad
- Method 1. Check the Internet Connection
- Method 2. Refresh the Mail Inbox Manually
- Method 3. Check Fetch New Data and Push Settings
- Method 4. Make Sure Mail Is Enabled for Your Account
- Method 5. Fix iPadOS Issues with TunesKit iOS System Recovery HOT
- Method 6. Restart Your iPad
- Method 7. Remove and Re-add the Email Account
- Method 8. Reset Network Settings
- Method 9. Contact Your Email Provider
- FAQs About iPad Not Receiving Emails
- Conclusion
Why Am I Not Receiving Emails on My iPad?
If your iPad is not receiving emails, the problem usually comes from your internet connection, Mail settings, account configuration, or the email provider itself. Here are the most common causes:
- 01 Unstable internet connection: The Mail app needs a working Wi-Fi or cellular connection to download new messages.
- 02 Mail Fetch or Push is disabled: If your iPad is not set to fetch or push new data, emails may not appear until you refresh the inbox manually.
- 03 Incorrect email account settings: An outdated password, incorrect server settings, or authentication error can stop your account from syncing.
- 04 Mail syncing is off: If Mail is disabled for a specific account in Settings, new messages will not appear on your iPad.
- 05 Email provider or server outage: Gmail, Outlook, Yahoo, iCloud Mail, or your workplace email server may temporarily experience service issues.
- 06 Temporary Mail app or iPadOS glitch: Software bugs can occasionally cause the Mail app to stop refreshing or syncing new emails.
Once you identify the likely cause, you can use the fixes below to get your iPad receiving emails normally again.
 Further Reading: Fixed: iPhone Cannot Get Mail
9 Ways to Fix Not Receiving Emails on iPad
If your iPad is not receiving emails, start with basic network and Mail settings before removing your account or resetting anything. The following methods cover the most common causes, from connection problems to incorrect Fetch settings and account errors.
Method 1. Check the Internet Connection
Apple Mail needs an active internet connection to download new messages. If websites and other online apps also fail to load, fix the connection first.
- Step 1. Open Safari on your iPad and visit any website to check whether the internet is working.
- Step 2. If the page doesn't load, open Settings > WLAN.
- Step 3. Make sure Wi-Fi is turned on and your iPad is connected to the correct network.
- Step 4. If necessary, disconnect from the current Wi-Fi network and reconnect, or try another available network.
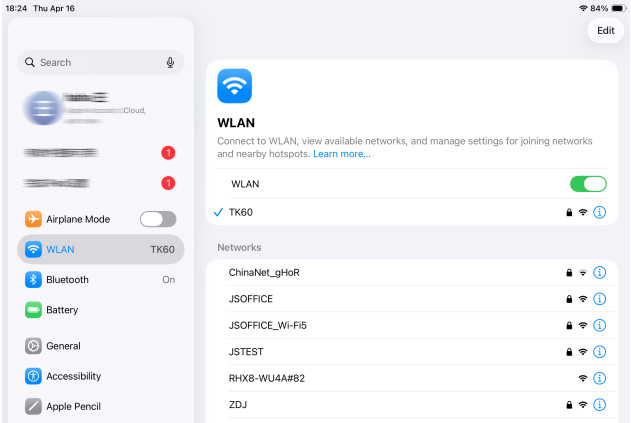
For cellular iPad models, you can also go to Settings > Cellular and make sure Cellular Data is enabled. Once the connection works, reopen Mail and check your inbox again.
Method 2. Refresh the Mail Inbox Manually
Sometimes Mail is connected properly but hasn't checked for new messages recently. A manual refresh can immediately trigger another sync.
- Step 1. Open the Mail app.
- Step 2. Select the inbox where emails are missing.
- Step 3. Swipe down from the top of the message list.
- Step 4. Release your finger when the loading indicator appears.
- Step 5. Wait several seconds to see whether new messages appear.
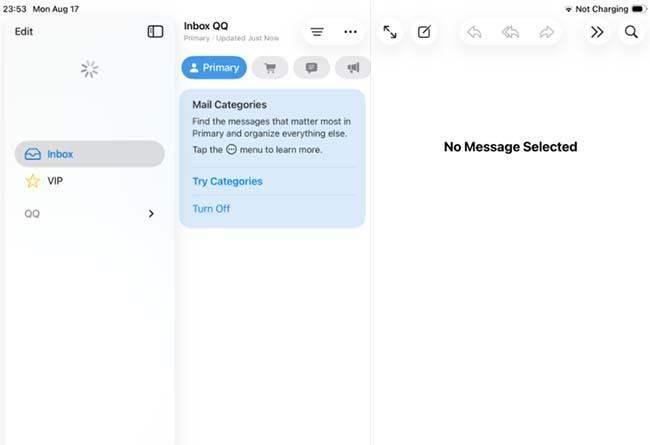
If emails arrive after refreshing manually but don't arrive automatically, simply check the Fetch and Push settings on your iPad in the next method.
Method 3. Check Fetch New Data and Push Settings
Incorrect Fetch settings are one of the most important things to check when an iPad is not receiving new emails automatically. Apple notes that accounts that don't support Push use Fetch instead.
- Step 1. Open Settings app on your iPad.
- Step 2. Go to Apps > Mail > Mail Accounts.
- Step 3. Tap Fetch New Data.
- Step 4. If your email account supports Push, make sure Push is enabled.
- Step 5. Under the Fetch section, choose how frequently your iPad should check for new mail.
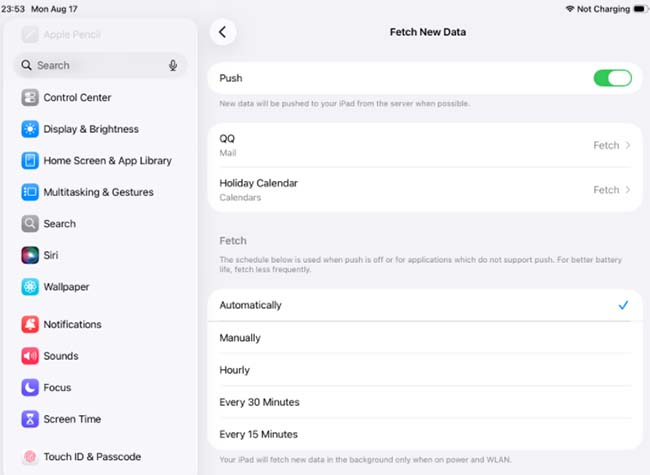
You can choose a timed schedule if you want Mail to check more frequently. Apple explains that the default Automatically option may fetch data in the background when the iPad is charging and connected to Wi-Fi.
 Tip
Tip
If emails only appear after you open the Mail app, changing from Automatically to a timed Fetch schedule may help.
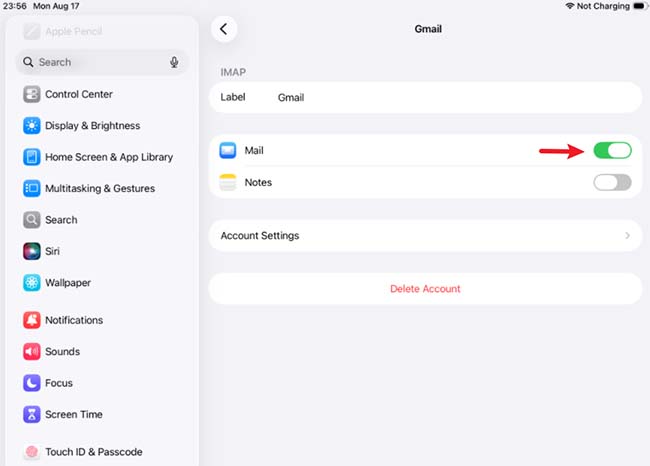
Method 4. Make Sure Mail Is Enabled for Your Account
Your email account can remain saved on the iPad while Mail syncing for that account is turned off. In that case, no new messages from the account will appear.
- Step 1. Open Settings > Apps > Mail.
- Step 2. Tap Mail Accounts.
- Step 3. Choose the account that isn't receiving emails.
- Step 4. Make sure Mail is turned on. For some iCloud configurations, you may instead see an option such as Use on this iPad. Make sure it is enabled.
- Step 5. Return to the Mail app and refresh the inbox.
Method 5. Fix iPadOS Issues with TunesKit iOS System Recovery
If your iPad is not receiving emails even though the internet connection, Mail settings, and email account are all working properly, the problem may be related to an iPadOS system glitch. This is especially worth considering if the Mail app started malfunctioning after an iPadOS update, system crash, or other unusual software issue.
In this case, TunesKit iOS System Recovery can help repair iPadOS-related problems without requiring you to troubleshoot individual system files. Its Standard Repair mode is designed to fix common iOS/iPadOS system issues like iPad stuck on Apple logo while keeping your personal data intact.
Fix iPad Not Receiving Emails Fast
Repair iPadOS glitches with TunesKit iOS System Recovery and get your emails syncing again—without losing data in Standard Repair mode.
 600,000+ Downloads
Here's a step-by-step guide to fix iPad not receiving emails using TunesKit iOS System Recovery.
Step 1. Connect iPhone to PC
Download and install TunesKit iOS System Recovery on your Windows PC or Mac. Then launch the program. Connect your iPad to the computer with a USB cable and wait for TunesKit to recognize the device. Choose iOS System Repair, and then click the Start button.
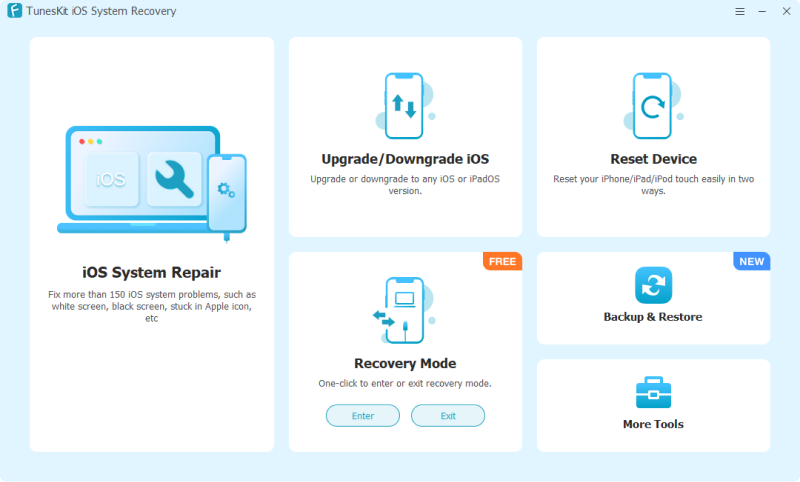
Step 2. Select A Mode
Select Standard Repair. This mode is recommended first because it does not erase your iPad data.

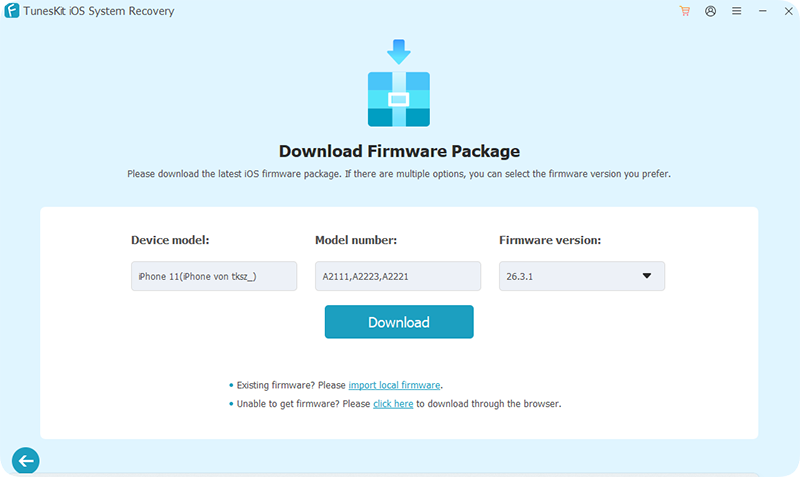
Step 3. Download Firmware Package
Confirm your iPad model and system information, then click the Download button to start downloading the matching firmware package.
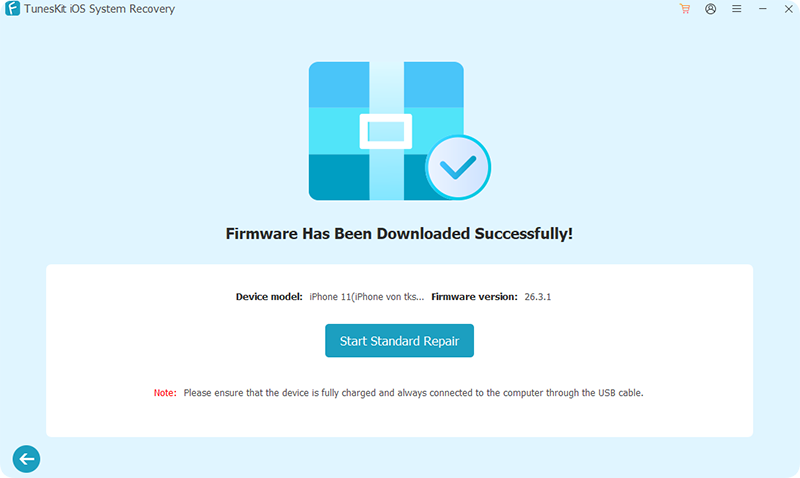
Step 4. Start to Repair
After the firmware is downloaded, click Start Standard Repair to begin fixing the iPadOS system. Keep your iPad connected until the repair is complete. Once the device restarts, open the Mail app and check whether new emails can arrive normally.
Method 6. Restart Your iPad
A temporary Mail or iPadOS process can occasionally prevent email synchronization. Restarting your iPad reloads network services and Mail-related processes without deleting your data.
For an iPad without a Home button:
- Step 1. Press and hold the Top button and either Volume button until the power-off slider appears.
- Step 2. Drag the slider to turn off your iPad.
- Step 3. Wait several seconds. Hold the Top button until the Apple logo appears.

For an iPad with a Home button:
- Step 1. Press and hold the Top button until the slider appears.
- Step 2. Drag the slider to turn off the iPad.
- Step 3. Turn it back on by holding the Top button.

Then open Mail and check for new messages again.
Method 7. Remove and Re-add the Email Account
If your account configuration has become corrupted or its authentication information is outdated, removing and adding the account again can rebuild the connection between Mail and your email provider.
Before doing this, Apple recommends confirming that your emails are stored with your provider or backed up.
- Step 1. Sign in to your email account through a browser and confirm your emails are available there.
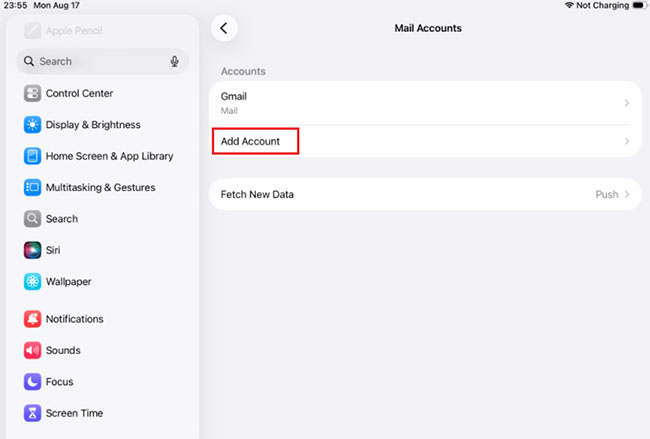
- Step 2. On your iPad, open Settings > Apps > Mail > Mail Accounts.
- Step 3. Select the problematic account. Tap Delete Account or Sign Out, depending on the account type.
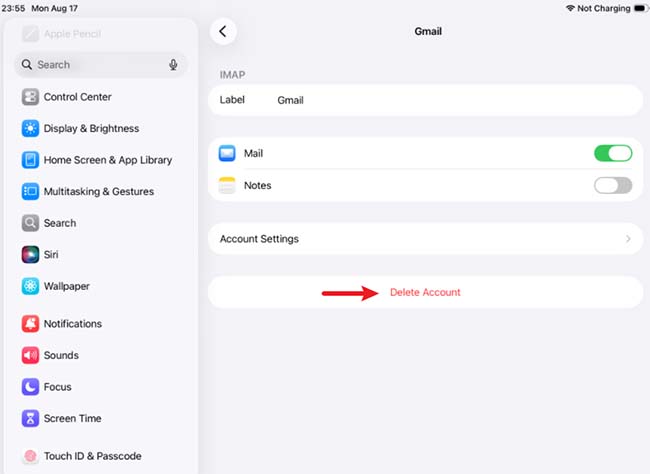
Step 4. Return to Mail Accounts and tap Add Account.
Step 5. Enter your email address and select the appropriate provider.
Step 6. Enter your password and follow the onscreen verification steps.
Step 7. Make sure Mail syncing is enabled and save the account.
Apple Mail can automatically configure common services such as iCloud, Google, Microsoft Exchange, and Yahoo.
Method 8. Reset Network Settings
If Mail still can't download emails and your iPad frequently has connectivity problems, resetting network settings can help remove corrupted Wi-Fi, VPN, cellular, or related network configurations.
Use this method only after trying the simpler network fixes above.
- Step 1. Open Settings on your iPad.
- Step 2. Tap General > Transfer or Reset iPad.
- Step 3. Tap Reset. Select Reset Network Settings.
- Step 4. Enter your iPad passcode if requested and confirm the reset.
- Step 5. Reconnect your iPad to Wi-Fi and check Mail again.
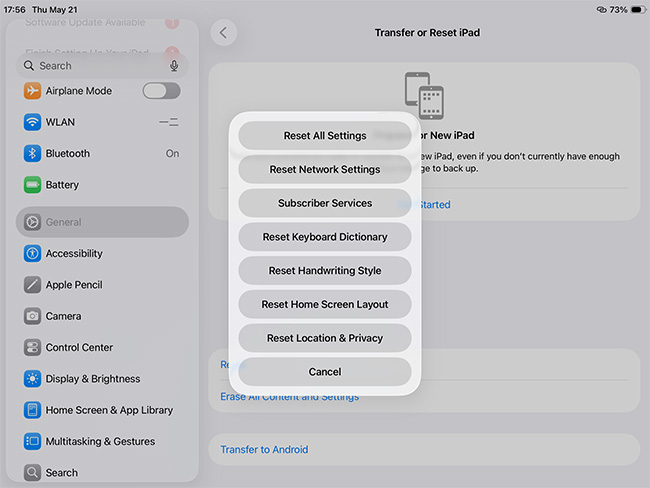
This does not erase your photos, apps, or other personal content, but it removes saved network settings, including previously used Wi-Fi networks and related network configurations. You will need to reconnect to Wi-Fi afterward.
Method 9. Contact Your Email Provider
If your iPad can access the internet and all Mail settings are correct, but one particular account still cannot receive messages, the problem may be on the provider's side. Contact your email provider or workplace administrator and ask them to check:
- Whether the mail server is experiencing an outage.
- Whether your account has been temporarily locked.
- Whether two-step verification requires additional authorization.
- Whether your incoming mail server settings are correct.
- Whether your mailbox has reached a storage or account limit.
Apple specifically recommends contacting the email provider or system administrator when account security, server configuration, or service availability prevents Mail from receiving messages.
FAQs About iPad Not Receiving Emails
-
Why can I send emails from my iPad but not receive them?
If outgoing mail works but incoming mail does not, the problem may involve your incoming mail server, Fetch settings, account authentication, or email provider. Check whether new messages appear when you sign in to your email through a web browser.
-
Why am I receiving emails on my iPhone but not my iPad?
The two devices may have different Mail settings. Compare the email account, Mail sync, and Fetch settings on both devices. Also make sure the same email account is correctly signed in on your iPad.
-
Will deleting an email account from my iPad delete my emails?
Removing an account from your iPad normally removes its locally synced mail from that device, not messages stored on the provider's server. However, confirm that your emails are available through webmail before removing the account, especially if you use a manually configured account.
Conclusion
If your iPad is not receiving emails, the issue is usually related to the network, Mail settings, account configuration, or your email provider. Work through the fixes above to identify the cause.
If the problem comes from an iPadOS glitch and basic troubleshooting doesn't help, TunesKit iOS System Recovery is worth trying. Its Standard Repair mode can fix system-related iPad issues without erasing your data, helping Mail and other apps work normally again.