How to Change a Word Document from Read-Only: The Ultimate Guide
Encountering Microsoft Word's Read-Only is a common frustration that halts productivity. You open a document to make quick edits, only to find the toolbar grayed out and the file locked. Fortunately, this is rarely a permanent error; it is usually just a security feature or file attribute that can be easily toggled off to restore access.
If you are searching for how to change a word document from read-only, this comprehensive guide covers everything you need to know. We will walk you through every method to disable read-only status, whether you use Windows or macOS device. Read on to regain control of your documents and resume editing immediately.
Part 1: Why Your Word Document is Read-Only
Before diving into the fixes, it helps to understand why the file is locked. This ensures you apply the right solution. Generally, Word documents open in read-only mode for one of four reasons:
- Protected View: The file was downloaded from the internet or an email attachment (a safety feature).
- File Properties: The file is marked as "Read-only" at the system level (Windows or Mac).
- Editing Restrictions: The author intentionally restricted editing within Word.
- Shared Network/Sync Issues: Someone else is currently editing the file, or a cloud sync (like OneDrive) is pending.
Part 2: 5 Ways to Change a Word from Read Only
To change a word document from read only, there are 5 workable solutions for users to solve it.
Method 1: Disable Protected View
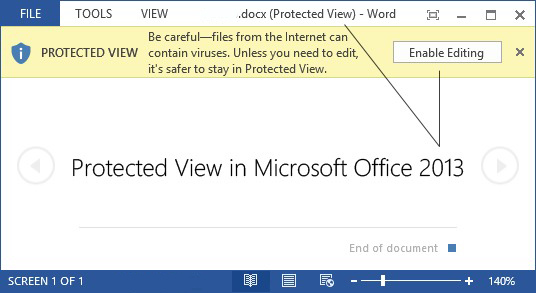
If you just downloaded a file from an email or a website, Microsoft Word opens it in Protected View to prevent potential malware from running automatically. This is the easiest scenario to resolve.
Step 1: Look at the top of your document window. You should see a yellow banner stating: "Protected View: Be careful—files from the Internet can contain viruses."
Step 2: Locate the button on the far right of this banner labeled Enable Editing.
Step 3: Click it once. The document will reload, and you should have full editing capabilities.
If the yellow bar keeps reappearing every time you open the file, you can save the document to your local hard drive (Desktop or Documents folder), which usually signals to Word that the file is safe.
Method 2: Change File Properties
If you don't see a yellow banner but still cannot type, or if you cannot save your changes to the original file, the "Read-only" attribute might be checked in the Windows file system. This often happens when files are copied from CD-ROMs, USB drives, or shared network folders.
Step 1: Close the Word document completely. You cannot change these settings while the file is open.
Step 2: Open File Explorer and navigate to the location of your document.
Step 3: Right-click on the Word file and select Properties from the context menu.
Step 4: In the General tab, look toward the bottom for the Attributes section.
Step 5: Uncheck the box next to Read-only.
Step 6: Click Apply, then click OK.

Method 3: Turn Off Restrict Editing in Word
Sometimes, a document is fully open, but specific parts of it (or the whole thing) are locked by the author using Word's internal protection tools. You might see a message saying, "This modification is not allowed because the selection is locked."
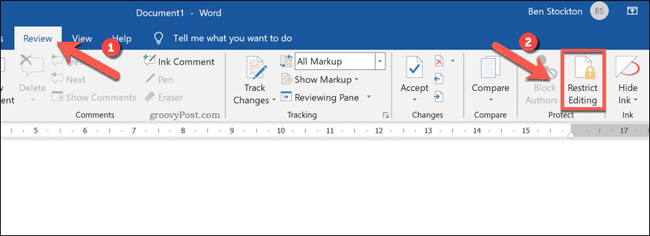
Step 1: Open the document in Word.
Step 2: Navigate to the Review tab in the top ribbon.
Step 3: Look for the Protect group (usually on the far right) and click on Restrict Editing.
Step 4: A pane will appear on the right side of your screen. Look for a button at the bottom of this pane that says Stop Protection. If the author applied a password, Word will ask for it now. If you don't have the password, skip to the "TunesKit File Password Recovery" section below.
Method 4: How to Remove Read-Only on Mac
If you are a macOS user, the logic is similar to Windows but the interface differs.
Option A: Check Finder Info
Step 1: Close the document.
Step 2: Open Finder and locate your file.
Step 3: Right-click (or Ctrl-click) the file and select Get Info.
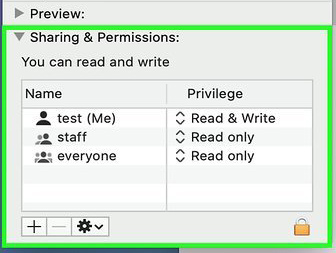
Step 4: Look at the General section. If the Locked checkbox is ticked, untick it.
Step 5: Look at the bottom under Sharing & Permissions. Ensure your user account has Read & Write privileges. If it says Read only, click the arrows to change it to Read & Write.
Method 5: Change from Read Only When You Don't Have the Password
If a document is protected with a "Restrict Editing" password (not an "Open" password that encrypts the file) and you have forgotten it, you can often bypass this by creating a new version of the file.
Save a New File to Change a Word Document
This is the safest and easiest way to remove restrictive editing permissions without hacking the file.
Step 1: Open the Read-Only document.
Step 2: Change the file name slightly (e.g., "Document_Unlocked").
Step 3: Save it to a new location.
Sometimes, simply saving a fresh copy removes the "Read-Only" status.
Save Word File as Rich Text File
If the standard "Save As" doesn't work, try changing the file format:
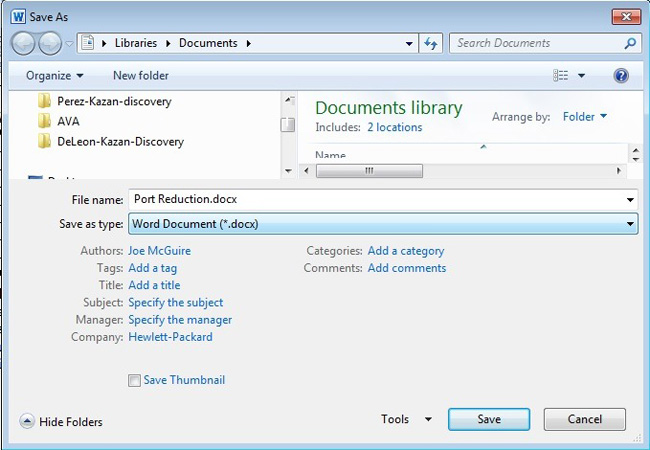
Step 1: Go to File > Save As.
Step 2: In the "Save as type" dropdown menu, select Rich Text Format (*.rtf).
Step 3: Close the document.
Step 4: Open the new RTF file. The protection features are often stripped out because RTF doesn't support the same security scripts as DOCX.
Step 5: Once open and editable, use Save As again to turn it back into a Word Document (*.docx).

Part 3: Bonus Tip. How to Remove Read-Only Password on Win/Mac
If you want to change a word document when the file is read-only password protected, removing the file password is the only solution. If you can't remember the correct password, using a third-party tool like TunesKit File Password Recovery is a smart move.
TunesKit File Password Recovery is a dedicated file unlocking tool that helps users unlock Excel/Word/PPT, PDF, and ZIP/RAR. The program allows users to remove and recover both read-only and open passwords, without encountering any hassle.
Forgot Word Password? Fast Recovery with TunesKit
TunesKit File Password Recovery enables you to smartly recover your lost encryption key or instantly remove editing restrictions using advanced attack modes that guarantee 100% data safety.
Step 1Launch the Program
Download and install TunesKit File Password on your computer. When the program is installed, launch it. Select the Excel/Word/PPT option.

Step 2Upload the File
If you just want to get the password back but not remove it, select the Recover Office Password. If you want to remove the password from the file directly, just select Remove Office Restriction. Then, drag and drop or click on the + button to upload your file to unlock it.

Step 3Remove Read-Only Password
Click on the Start Remove button to remove the read-only password of your file. When the password is removed, you will get a non-password version on your computer.

Part 4: Troubleshooting: Why Is My File Still Locked?
If you have tried the methods above and still cannot change the Word document from read-only, check these obscure system glitches:
1. The Preview Pane Glitch (Windows)
If you have the "Preview Pane" enabled in Windows File Explorer, Windows technically "opens" the file to display the preview. This can trick Word into thinking the file is already in use.
Fix: Open File Explorer, go to the View tab, and disable Preview Pane. Try opening the document again.
2. OneDrive/Dropbox Syncing
If the file is in a cloud folder, and the sync app is currently uploading or downloading it, the file may be temporarily locked.
Fix: Wait for the sync icon (usually green checks or blue arrows) to finish before opening the file.
3. Antivirus Interference
Some aggressive antivirus software will lock a file while scanning it.
Fix: Pause your antivirus temporarily to see if that resolves the issue.
Conclusion
Unlocking read-only Word documents is a vital skill that is usually just a few clicks away. Most issues resolve by simply clicking Enable Editing or adjusting File Properties. For more stubborn files, utilizing the Save As workaround allows you to save a new, editable version easily without requiring advanced technical knowledge. If you forgot the read-only password, download and try using TunesKit File Password Recovery.
