- Utility
- Multimedia
- Freeware
- Support
- Download Center

Now simply follow this complete user guide to learn how to record what you want in the different recording modes of TunesKit Screen Recorder.
Screen Recording mode is the default and most commonly used mode. Users can record the full screen, select a custom area, or create a recording area as required.
Step 1: Launch TunesKit Screen Recorder and Choose Screen Recording Mode
First of all, launch TunesKit Screen Recorder on your computer. Then you can see the main interface as below:

The default mode is screen recording mode, so a recording window will pop up when you start. If not, you can manually choose Screen Recording from the menu in the top left and then select the recording area as required.

Note: Here you can enable the audio button to capture the system audio or external sound for the recording.
Step 2: Adjust Recording Preferences & Parameters

Click on the Options button with the gear icon on the far right. In this panel, you can change the basic settings, destination folder, output format, webcam option, mouse icon, and hotkeys.

In the output format, there are over 20 V/A formats and device options to choose from. You can click on the settings icon to adjust the codec, resolution, frame rate, bit rate, and quality.
Step 3: Start to Record Video on the Screen

Now click on the REC button and get ready to start playing your target video after the 3-second countdown. You can tap the Pause, Cut, Screenshot, Auto-stop, or Minimize icon on the recording bar while in the recording. You can stop the recording by clicking on the Stop button.
Step 4: Edit and Save Screen Recordings

After that, the recorded video will then be displayed in the History list. You can double-click to check the video and use the tools on the preview window to cut, take a screenshot or adjust the volume.
Note: The trial version will allow you to record any screen on your computer without charge or time limit. But it will only allow you to record one minute of audio and add a watermark to your video recording. If you want to record your screen without a watermark, you are suggested to purchase the full version.
In Audio Recording mode, you can only record internal audio from your computer and external sound from plug-in devices. For example, system audio, video audio, game sound effects, music, microphone voice, headphones, etc.
Step 1: Choose Audio Recording Mode and Select Audio to Record

Select Audio Recording mode and enable the audio options to be recorded. Enable the System Audio or Microphone options to record internal or external audio. If both are required, turn on these two options.
Step 2: Adjust Audio Output Parameters
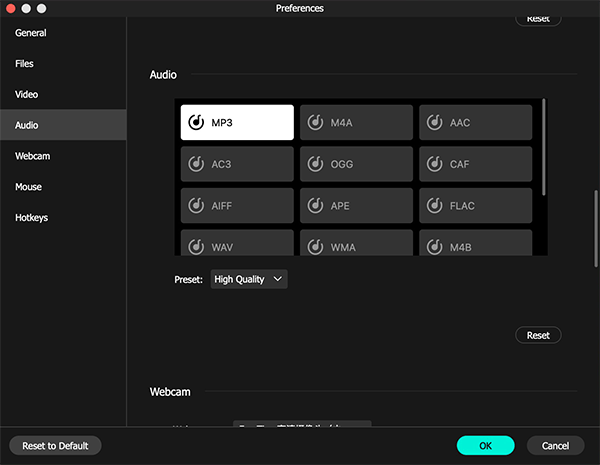
Before you start, click on the Options button to preset the audio recording. You can change the output folder and output format and customize the audio parameters such as codec, channel, sample rate, and bit rate.
Step 3: Start to Record Audio and Edit ID3 Tags

Prepare the audio to be recorded and click REC. A toolbar will be displayed while recording, and you can click Pause, Cut, Auto-Stop, and Stop on this bar. When you have finished, click the Stop button, and the recorded audio will be displayed in the History list. From here, you can preview, cut the audio, or click on the Tag icon to edit the ID3 tag.
Webcam Recording mode allows you to record your webcam and screen at the same time. Remember to plug in a specking device in case you want to capture your voice.
Step 1: Choose Webcam Recording Mode and Enble Options

Select Webcam Recording mode, and it will detect the webcam device you have plugged in. If you want to capture both internal and external audio, make sure you plug in a microphone or headset and enable the audio option.
Step 2: Adjust Webcacm Recording Options

You can drag the webcam to any position and change its shape, frame rate, and other options from the main interface or from the Options > Webcam Settings.
Step 3: Start the Webcam Recording with Voice

Now, click the REC button to start recording the webcam and other content. When you have finished, click the Stop button on the recording bar. The recorded webcam video will then be listed in the History list.
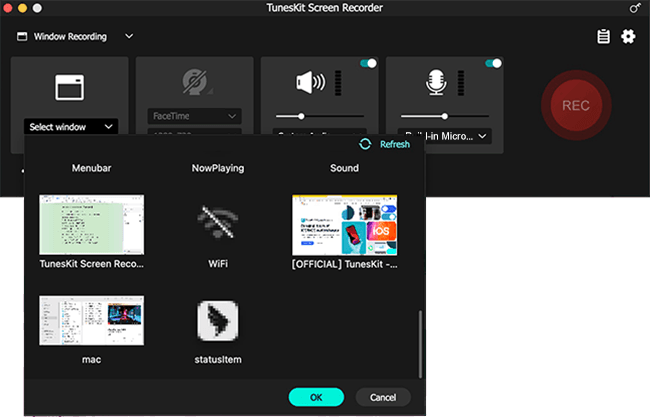
Window Recording mode can record a specific window you opened from your computer. And it will record the audio at the same time if you turn on the audio options.
Step 1: Choose Window Recording Mode and Select a Window

Select Window Recording from the recording mode options. Then click on the drop-down menu under the window icon and click on the open window you want to record.
Step 2: Adjust Window Recording Options

You can tap the Options button to preset the recording preferences, such as output folder, output format, mouse icon, hotkey, etc.
Step 3: Start Recording Any Window

When everything is ready, click REC, and it will automatically display the target window and start recording. You can continue working on the window and let it be captured. When you are finished, click the Stop button on the toolbar or press the shortcut key to end the recording. You can view the recorded video in the History list.
With Game Recording mode, you can record all the games perfectly. Whether it's a PC game that takes up high RAM or a simple online game, this mode can record them without loss and lag.
Step 1: Choose Game Recording Mode and Enable Options

Open the game you want to record. Choose the Game Recording mode from the TunesKit Screen Recorder and enable the audio options if required. Click on the drop-down menu under the game icon to select the game.

Step 2: Adjust Preferences for Game Recording
Before you start recording a game, you can set preferences for a better gaming experience. Click the Options button to select the output quality, hotkeys, and others. Here we strongly recommend that you set up easy-to-remember shortcuts that you can easily operate when recording a full-screen game, as the recording bar will then be minimized.
Step 3: Start to Record GamePlay without Lags

Now, click on REC and open the game. It will start the game recording immediately once you open the game. Press the shortcut keys when you finish the recording. And the recorded gameplay is still on the History list for you to check.
