How to Screen Record on Windows 10 Computer in 4 Ways
Recording screen is very popular today since everyone has their reasons to record screen. Recording gameplay, video tutorials, FaceTime call, YouTube videos, etc. They have one thing in common: they all happen on your computer screen. So, how do you screen record on your computer?
I guess some of you may use the built-in screen recording feature on media players, or choose online screen recorders. However, these kinds of tools are not as powerful as screen recording software. Therefore, in today's post, you will get through how to record computer screen on Windows 10 in 4 ways, please read below.
Part 1. How to Record Computer Screen on Windows 10
If you ever consider using a desktop screen recorder to record computer screen, today we will introduce you to TunesKit Screen Recorder, an intuitive and simple screen recorder for Windows 10, which can meet all you ask for from a screen recorder. The 3 screen recording modes of TunesKit Screen Recorder allow you to record computer screen and audio separately and simultaneously. Besides recording, it supports more than 30 video and 13 audio formats. There's also a built-in video trimmer to adjust the video after you finish recording.
TunesKit Screen Recorder
- Record and download video from YouTube, Skype video calls, Twitch game video, live streams, TV shows, etc. with high quality
- Record computer screen and audio separately or simultaneously
- Several recording options are available, including scheduling a recording, customizing the cursor, and more
- Convert recorded video to any format like MP4, MKV, WKV, MOV, etc. without watermark
So, next up, you are about to see how to screen record on a Windows 10 computer with TunesKit Screen Recorder.
How to Record Computer Screen with Audio on Windows 10
Step 1. Customize Record Settings
Install and launch TunesKit Screen Recorder on your PC. You can see that the initial interface is a rectangle toolbar. You need to click the Options button at the right corner to drop down the setting panel. There are 3 modules on the drop-down setting panel. In the Basic record options, you can change the output folder, output format, watermark, and shortcut keys.
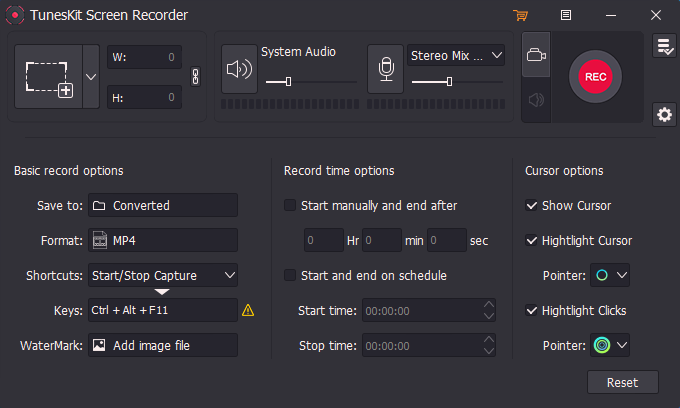
In the Record Time Options, you can use the time scheduler to set a time to begin and end the recording. This feature is very convenient and you can leave the recorder to finish everything automatically. In the Cursor Options, we suggest you uncheck all the boxes to hide the mouse if you don't want it to show in the recording.
Step 2. Select the Region to Record Computer Screen
In this step, you need to choose an area of your computer screen to record. Click the down-arrow icon next to the frame button with a "+" icon. There will be many fixed sizes for you to choose. Or you can also click Select area to customize the frame. Then you can adjust the position and the size of the record window.
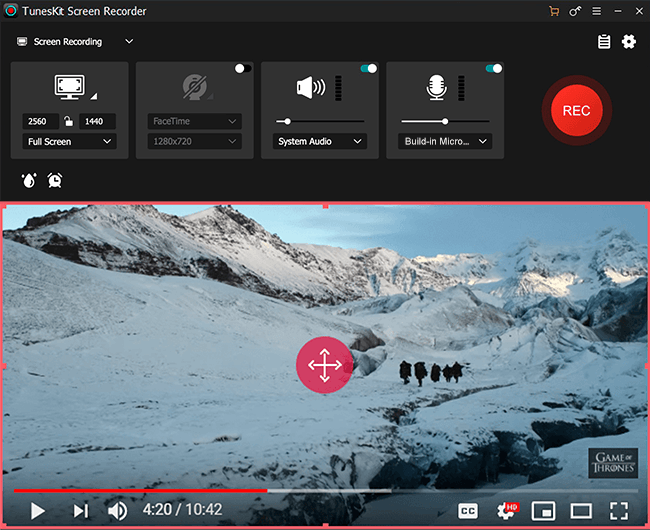
Step 3. Start Recording Your Computer Screen
When you finish, click the REC button on the right of the main interface and begin to record computer screen. Click the Stop button (the second icon from left to right) on the toolbar when you want to stop the recording. If you are recording the full screen, press the hotkey on your keyboard to stop recording will be easier. You just need to set a hotkey in Step 1.

Step 4. Edit the Screen Recording
Next, you will see the recorded video in the History list. You can double-click to preview it, or tap the Edit icon at the rear of the video track to cut the video. If you want to open the destination folder, just hit the Search button and it will display the target folder in front of you.

Part 2. How to Screen Record on Windows 10 Built-in Screen Recorder
Compared to previous versions of Windows, Windows 10 has added several new features, one of which is the Xbox Game Bar. It is a multifunctional toolbar that not only acts as a built-in screen recorder to record any computer screen other than the desktop, but also has the widgets to display computer performance, resources, and even chats with others in the Xbox community.
When you're playing a computer game or watching a show, simply hit Win + G to summon the screen recorder without exiting what you're currently doing. You can read the tutorial on how to record PC screen with the built-in screen recorder in Windows 10.
How to Record Screen on PC with Windows 10 Built-in Screen Recorder
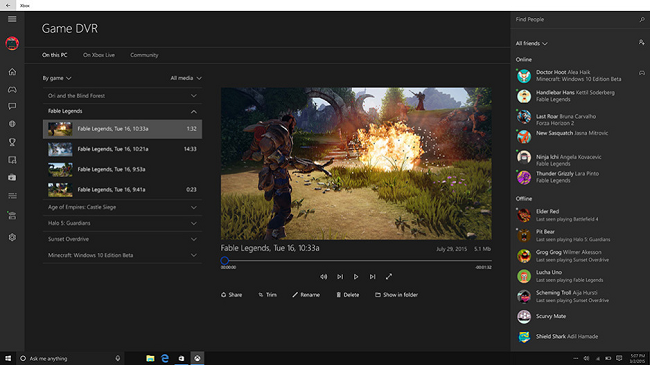
Step 1: Press Win + G key on your keyborad to launch the Xbox Game Bar. Your screen will then be covered with a translucent layer of tools.
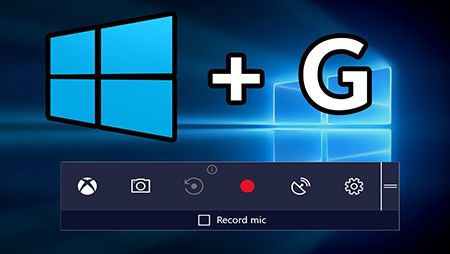
Step 2: Look to the Broadcast & Capture option at the top left and click the Record button to start recording.
Step 3: When you finish, click the Stop button, then the screen recording will be in the Captures list.
Part 3. How to Record Screen on Windows 10 for Free
If you're looking for screen recording freeware that features versatile functions to record screen on Windows 10, one such tool is ShareX. It provides several capture options, such as screenshots, screen recording, and more. What's more, you are able to customize the capture options, like creating screenshots of arbitrary shapes, adding highlights or changing colors to screenshots, etc. And you can adjust the cursor for recording, set recording time, use a transparent region, and other options as well. Now let's check the guid to record computer screen on Windows 10.
How to Record Computer Screen on Windows 10
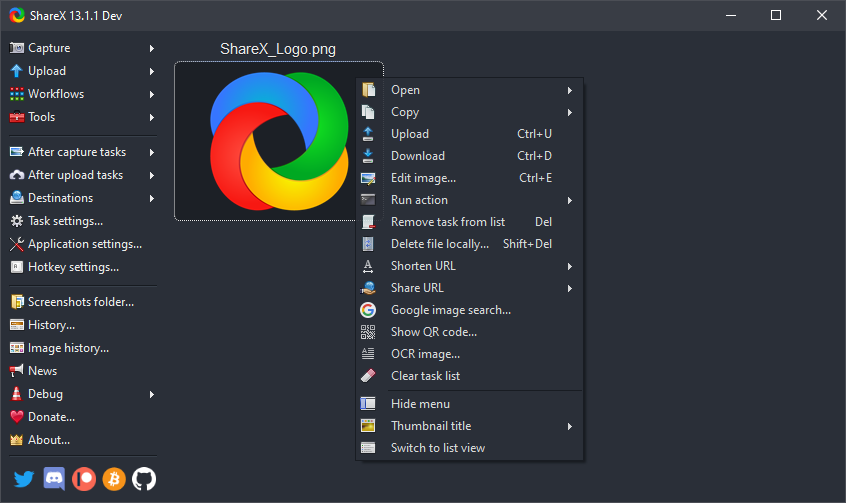
Step 1: Download and launch ShareX. Before you start recording, you can change the recording option by clicking on the Task settings on the left side. Then go to Screen recorder > Screen recording options. Here you select the video source, audio source, codecs, etc.
Step 2: After that, back to main interface of ShareX and click on Capture > Screen Recording, then drag the cursor to build a recording area on your target screen content.

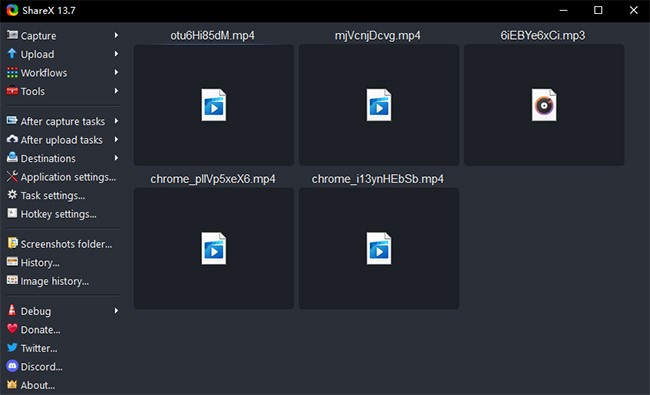
Step 3: Once you've built the area, it will start recording immediately, and you can hit Stop to finish the recording. Then the recorded screen video will be shown on the right side of the mian interface for you to preview.
Part 4. How to Record Computer Screen with Audio Online
We also give the choice for those who don't want to utilize any third-party program to record computer screen, which is choosing the online screen recorder. Although online recorders are not as powerful enough as third-party software, the advantages of easy startup and no installation have attracted a large number of loyal users. Thus, we're going to present you with a free online screen recorder, called Free Online Screen Recorder by Movavi.
With its help, you are able to record videos from all kinds of stream media websites, live streams, online lessons, the desktop program, etc. You can follow the steps below to record video on your Windows 10 computer.
How to Record Video on Windows 10 Computer
Step 1: Open a browser and access Free Online Screen Recorder. Choose the options you'd like to capture, such as microphone, system sound, webcam, and watermark. Then tap Start Recording.
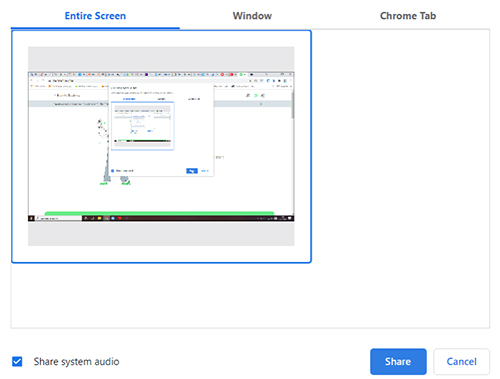
Step 2: It will pop up a window to let you select what you want to share, the entire screen, a single windows, or a Chrome tab are available. Hit the target one and tap Share.
Step 3: Now you can back to the target screen to let it be recorded. When it finishes, tap Stop Recording. Next, it will show a new page for you to examine the video recording. After confirming, click the Download icon to save the video on your Windows 10 computer.

Part 5. The Final Words
Now that you've learned 4 guides on how to record screen on Windows 10, you can accomplish many things you can't do with those screen recorders mentioned above. However, TunesKit Screen Recorder is more comprehensive. It has the ability to achieve screen recording, audio recording, screenshots, edit the recordings, and export them to various formats. Just download the free trial and check it out!