


iPad Won't Connect to WIFI: 5 Best Solutions
"While other devices can connect to WIFI perfectly, my iPad will not connect to WIFI from time to time. The frequency is so high that it hinders my usage. What should I do?" - A user from Reddit
Have you ever encountered this similar problem? Your iPad won't connect to WIFI for different lengths of time, and iPad becomes nearly useless since most functions of iPad require WIFI connection. Those who are bothered may be eager to find out why this problem occurs and how to fix it? You can find the perfect answers here.

Why Won't My iPad Connect to Wi-Fi
There are several reasons why your iPad may fail to connect to Wi-Fi. The issue can come from the iPad itself, the network settings, or even the router. Common causes include:
- 01 Wi-Fi or Router Problems: A weak Wi-Fi signal, router malfunction, or temporary network outage can prevent your iPad from connecting properly. Other devices connected to the same network may also experience issues.
- 02 Incorrect Wi-Fi Password: Entering the wrong password or having an outdated saved password can cause your iPad to repeatedly fail to join the network.
- 03 Software Glitches: iPadOS bugs, outdated system versions, or background errors may interfere with Wi-Fi connectivity.
- 04 Network Settings Errors: Corrupted network configurations, VPN settings, or incorrect connection preferences can prevent your iPad from establishing a stable Wi-Fi connection.
- 05 Hardware Issues: If the Wi-Fi antenna or internal components are damaged, your iPad may have difficulty detecting or connecting to nearby networks.
- 06 Overloaded Network: Too many connected devices or heavy network traffic can slow down your iPad's Wi-Fi connection.
 View Also:
 How to Fix iPad Won't Connect to Wi-Fi
After learning about the possible causes of iPad Wi-Fi connection problems, it's time to explore the solutions. Follow the troubleshooting steps below to restore your iPad's Wi-Fi connection and get back online smoothly.
1. Restart Your Router and Check the Wi-Fi Connection
Before making changes to your iPad, check whether the problem comes from your router or network. A router that has been running for a long time may encounter temporary errors, causing your iPad to fail to connect to Wi-Fi.
- Step 1. Make sure your router is turned on and your iPad is within the Wi-Fi signal range.
- Step 2. Check whether other devices can connect to the same Wi-Fi network.
- Step 3. Restart your router by unplugging the power cable.
- Step 4. Wait for about 30 seconds, then reconnect the power cable.
- Step 5. Wait until the router restarts completely and try connecting your iPad again.

2. Forget and Reconnect to the Wi-Fi Network
If your iPad shows errors like “Unable to Join the Network” even when the password is correct, the saved network information may be incorrect. Forgetting the Wi-Fi network and reconnecting can refresh the connection.
- Step 1. Open Settings on your iPad.
- Step 2. Tap Wi-Fi and find the problematic network.
- Step 3. Tap the Info (i) icon next to the Wi-Fi name.
- Step 4. Select Forget This Network and tap Forget to confirm.
- Step 5. Return to the Wi-Fi list and select the network again.
- Step 6. Enter the password and reconnect.

3. Disable Location Services for Wi-Fi Networking
Although Location Services help improve some system features, certain location-related settings may occasionally interfere with network connections. Turning off Wi-Fi-related location services can help troubleshoot Wi-Fi problems.
- Step 1. Open Settings on your iPad.
- Step 2. Go to Privacy & Security > Location Services.
- Step 3. Scroll down and tap System Services.
- Step 4. Turn off Networking & Wireless.
- Step 5. Restart your iPad and check whether it can connect to Wi-Fi.

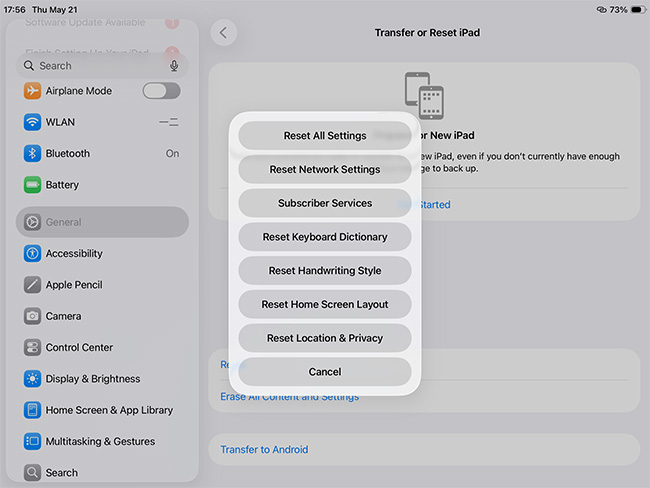
4. Reset Network Settings on Your iPad
Incorrect network configurations, VPN settings, or system errors can prevent your iPad from connecting to Wi-Fi. Resetting network settings removes saved Wi-Fi passwords and restores network-related settings to default.
- Step 1. Open Settings on your iPad.
- Step 2. Tap General > Transfer or Reset iPad. Select Reset.
- Step 3. Tap Reset Network Settings. Enter your passcode and confirm the reset.
- Step 4. Reconnect to your Wi-Fi network.
5. Fix iPad Wi-Fi Issues with TunesKit iOS System Recovery
There is a huge amount of possible causes for the iPad WIFI connection issue, and it is difficult to identify the specific reason that causes you the problem. Instead of lingering on the question "Why won't my iPad connect to WIFI", why not do a complete swipe to your iPad and resolve all the potential causes?
Unlike what most of us might think, TunesKit iOS System Recovery is the perfect tool to help you carry out this operation, not iTunes. The main reason is that TunesKit iOS System Recovery is able to restore your iPad without any data loss. Nothing will be lost after it did a restore to your phone, only the potential problems are eliminated.
In addition, this tool is highly user-friendly. Most of the restore process is automatic, and with just a few clicks, you will be able to enter the recovery of the iPad, download the firmware package and repair the iPad. The whole process will only cost you 3 - 5 minutes. Also, it can fix iPad unable to check for update and other system problems without data loss
Fix iPad Wi-Fi Issues Without Data Loss
TunesKit iOS System Recovery can repair iPad Wi-Fi connection problems caused by system errors while keeping your data safe.
 600,000+ Downloads
Here's a guide on how to fix iPad won't connect to Wi-Fi using TunesKit iOS System Recovery.
Step 1. Connect your iPad to the computer
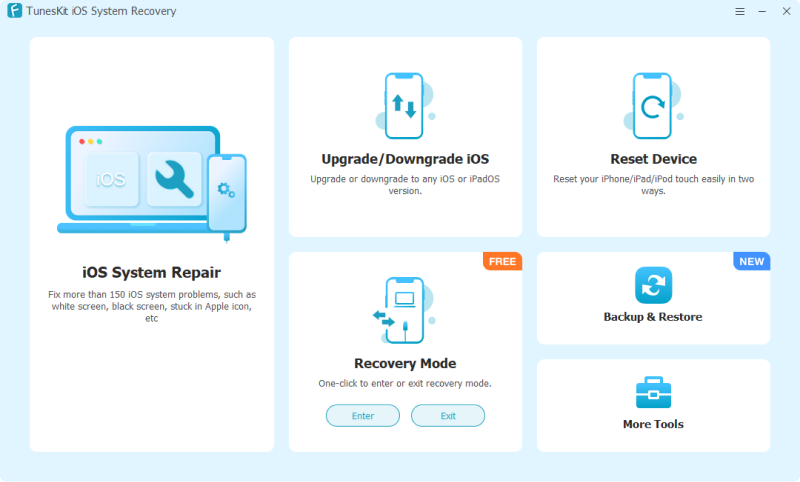
Launch TunesKit iOS System Recovery and connect your iPad to the computer with an Apple USB cord. Your iPad will be identified by the program, and if so, click the iOS System Repair button on the main screen, after that, press the Start button to continue.
Step 2. Choose the correct mode to Fix iPad WIFI issue
Next, a window with two boxes showing two modes will pop out. One of them is the Standard Repair, which will restore your iPad without data loss, and the other is the Deep Repair, which will repair your iPad with all data erased. To fix the iPad Wi-Fi issue, the Standard Repair is good enough.

Step 3. Download Firmware Package and Start to Fix
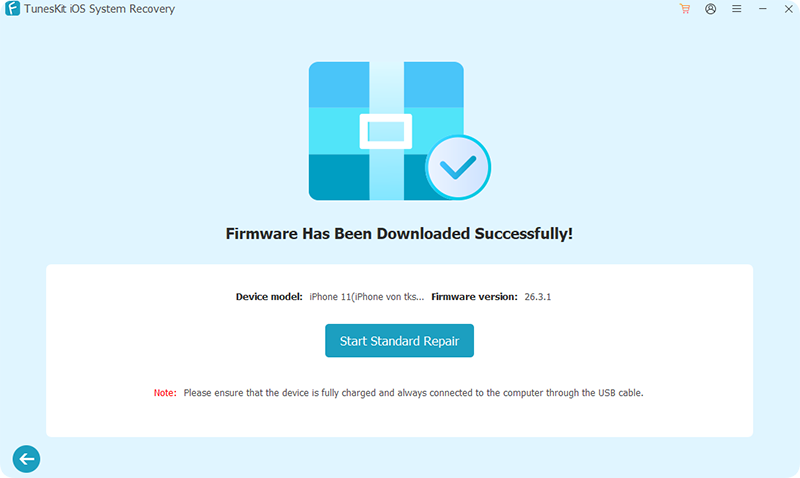
Then, the program will show some basic info about your iPad. What you need to do is to make sure all of the info is correct and correct those that are not, because the firmware package will be matched later according to it. Press the Download button to start downloading the matching firmware package.
When you finish downloading firmware, press the Start Standard Repair button to start the actual restore process. Several minutes later, your iPad should be able to connect to the Wi-Fi normally.
6. Contact Apple Support for Hardware Problems
If none of the methods work, the issue may be related to hardware damage, such as a faulty Wi-Fi internal component failure. In this case, contacting Apple Support or visiting an Apple Authorized Service Provider is the safest option.
- Step 1. Visit Apple Support or contact Apple customer service.
- Step 2. Explain the Wi-Fi connection problem and the troubleshooting steps you have tried.
- Step 3. Follow the recommended diagnosis and repair process.

Summary
All the solutions mentioned above are effective, but each one targets different causes of iPad Wi-Fi connection problems. Therefore, when your iPad won’t connect to Wi-Fi, you can restore the connection by trying these methods one by one. We hope these solutions help you get your iPad back to normal. If the problem is caused by deeper system errors, TunesKit iOS System Recovery can help repair your iPad and restore normal performance without data loss.