How to Fix iTunes Error 9 (2026 Guide)
"I was trying to restore iPhone when a notification of iTunes error 9 appeared on the screen and the restoring process stops. How do I fix it?"
Have you ever run into this trouble before? You are restoring or updating your iPhone but suddenly the iTunes error code 9 warning interrupts and what you are trying to do fails. It is naturally frustrating to run into such issue, because it makes you unable to either use the latest iOS or solve certain problems that you restore your iPhone to eliminate in the first place.
To help with users in trouble, I did some researches and tests and concluded 5 solutions. For some users who encounter the same issue on iPad and iPod, these solutions have been proven to be helpful too.

- What Is iTunes Error 9?
- Why Does iTunes Error 9 Happen?
- How to Fix iTunes Error 9 (6 Proven Ways)
- Way 1. Fix iTunes Error 9 by Ensuring the Perfect Connection
- Way 2. Forced Restart Your iPhone to Fix iPhone Error 9
- Way 3. Fix iTunes Error 9 by Updating iTunes to the Latest Version
- Way 4. The Most Efficient Solution to iTunes Error 9 - TunesKit iOS System RecoveryHOT
- Way 5. Fix iTunes Error 9 by Managing Your Firewall Settings
- Way 6. Resort to Apple Official Support to Resolve iTunes Error 9
- FAQs About iTunes Error 9
- Final Thoughts
What Is iTunes Error 9?
iTunes Error 9 is a communication error that typically occurs when you are attempting to update or restore your iPhone, iPad, or iPod touch using a computer. It signals that the device disconnected unexpectedly during the process, or that the computer cannot effectively communicate with the device. In simple terms, your iPhone fails to communicate properly with iTunes or Finder.
Why Does iTunes Error 9 Happen?
Understanding the cause helps you fix the issue faster. Here are the most common reasons:
- 01 Faulty USB cable or port – Damaged or non-original cables can interrupt the connection.
- 02 Outdated iTunes or Finder – Older versions may not support newer iOS systems.
- 03 Security software interference – Antivirus or firewall may block communication.
- 04 iOS system bugs – Glitches during update or restore.
- 05 Hardware issues – Battery, logic board, or internal damage.
How to Fix iTunes Error 9 (6 Proven Ways)
Now that you understand what iTunes error 9 is and why it occurs, it's time to fix it. Below are six methods you can follow to resolve the issue. Start with the basic checks, and if those don't work, move on to more advanced solutions.
Way 1. Fix iTunes Error 9 by Ensuring the Perfect Connection
iPhone error 9 has many causes, and the most easy-to-detect one is connection problem. Only Made for iPhone/iPod/iPad USB cables and adaptors (also known as original cables and adaptors) can maintain the perfect connection. If you are using your computer to update or restore your iPhone when encountering iPhone could not be restored error 9, then the cable or adaptor is possibly the cause.
To check whether you are using the appropriate type of cable and adaptor, follow these steps below using the current cables and adaptors:
- Step 1. Connect other Apple devices with your PC / Mac and see if the error notification pops up. If it shows up again, then these two accessories might not be designed for Apple devices.
- Step 2. Connect other Apple devices with other PC / Mac. If the iPhone restore error 9 warning still appears then it is possible that the accessories are not Made for Apple ones.
- Step 3. Switch to a set of Made for Apple devices USB cable and adaptor and see if the notification pops up again.

If the errors shows up in any one of the 3 steps above, you need to a set of Made for iPhone/iPod/iPad cable and adaptor.
Also, the port is an easily-omitted part of the iPhone, while actually its cleaning directly links to the connection. Clean the port so that it is not covered with dust, and the connection may resume to normal.
Way 2. Forced Restart Your iPhone to Fix iPhone Error 9
Sometimes the device's processor hangs while trying to switch from "Normal Mode" to "Restore Mode." A forced restart cuts the power to the logic board momentarily, clearing any temporary instruction loops that are preventing a clean connection.
- Step 1. Disconnect your iPhone/iPad from the computer.
- Step 2. Execute the Force Restart:
- iPhone 8 and later: Press and quickly release Volume Up, then Volume Down, then hold the Side button until the Apple logo appears.
- iPhone 7/7 Plus: Hold both Side and Volume Down buttons simultaneously until the Apple logo appears.
- iPhone 6s, iPhone SE (1st generation), and earlier: Press and hold the Home button and the Power button at the same time, and keep holding until the Apple logo appears.

- Step 3. Reconnect the device once it has rebooted to the lock screen.
Way 3. Fix iTunes Error 9 by Updating iTunes to the Latest Version
An outdated version of iTunes often lacks the necessary protocols to communicate with newer versions of iOS. If your software is out of date, the connection between your computer and your iPhone may fail, resulting in Error 9.
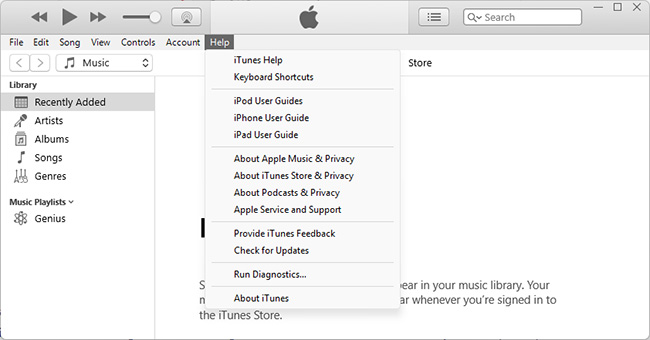
To update iTunes on Windows:
- Step 1. Open iTunes on your computer.
- Step 2. Click Help in the menu bar at the top of the window.
- Step 3. Select Check for Updates and follow the on-screen prompts to install the latest version.
![]() Note
Note
If you are using Windows 10 or 11 and have migrated to the new Apple Devices app, check for updates via the Microsoft Store instead.
To update your software on macOS:
If you are using a modern version of macOS, iTunes has been replaced by Finder. To ensure your system is compatible with your iPhone:
- Step 1. Click the Apple Menu () in the top-left corner of your screen.
- Step 2. Select System Settings (or System Preferences).
- Step 3. Navigate to General > Software Update. If an update is available for macOS, install it, as this contains the necessary driver updates for iPhone connectivity.

Now with the latest iTunes, updating or restoring iPhone can be operated normally.
Way 4. The Most Efficient Solution to iTunes Error 9 - TunesKit iOS System Recovery
If the previous three solutions fail, it is recommended to choose another option - TunesKit iOS System Recovery, an iOS system recovery program. With the free iTunes Repair feature, the software is bound to make your iPhone back to normal without costing too much efforts and time.
TunesKit iOS System Recovery is one of the best iOS system recovery tools. It is guaranteed to fix 150+ iOS problems such as iTunes error 53, iTunes error 75, and iTunes error 1667. The significant feature of this software is that not even a scrap of your personal data will be damaged after the recovery, and the problem you initially restore your phone to resolve might get fixed in the process.
Repair iOS system issues like iTunes Error 9 without data loss in just a few clicks.
Tutorial of using TunesKit iOS System Recovery
This tutorial tells you how to use TunesKit iOS System Recovery to automatically repair iTunes error 9, and the best way to make use of it is to download the free trial above and experience it according to the tutorial.
Step 1Connect iPhone to the Computer
Open TunesKit iOS System Recovery and connect your iPhone to the computer with the proper cable. Click the iTunes Repair on the main screen.

Step 2Start Diagnosing iTunes
Click the Repair button. The program will automatically scan and detect problems with your iTunes components. Once the issue is identified, TunesKit will download the required components and repair iTunes automatically.
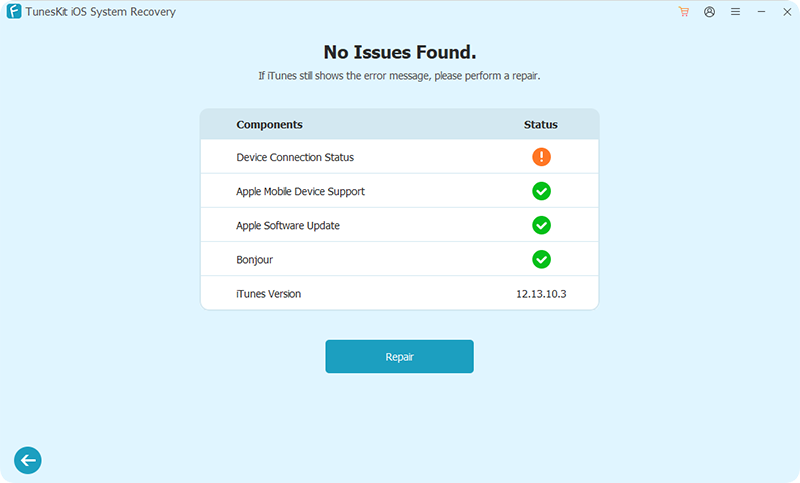
Step 3Restart iTunes
After the repair is complete, reopen iTunes and try restoring or updating your iPhone again. The error 9 should be resolved.

Way 5. Fix iTunes Error 9 by Managing Your Firewall Settings
The iPhone restore error 9 can result from Internet connection problem, which means that the exchange between your computer and Apple server might be blocked by firewall or security program. To eliminate the cause, check the firewall and security program on your computer to ensure iTunes is in the white list or not on the blacklist. Here are the specific steps.
- Step 1. Navigate to your computer's Control Panel (Windows) or System Settings (Mac) and locate the "Firewall" or "Security & Privacy" section.
- Step 2. Look for a setting titled "Allow an app through firewall" or "Exceptions."
- Step 3. Ensure iTunes (or "Apple Devices" on newer Windows versions) is checked for both Private and Public networks.
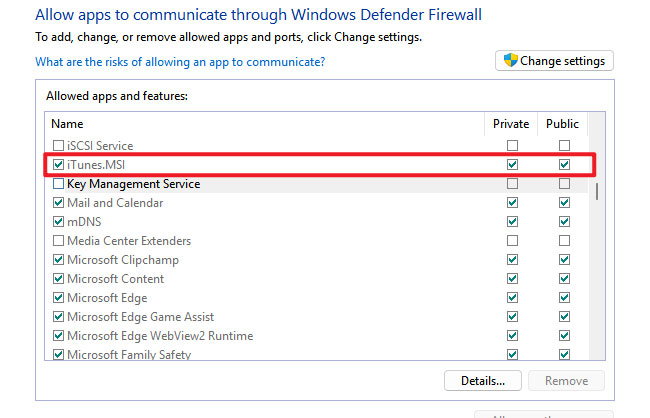
- Step 4. If you use software like Norton, McAfee, or Bitdefender, turn it off for 15 minutes to see if the restore completes. Remember to re-enable it once the process is finished.
Way 6. Resort to Apple Official Support to Resolve iTunes Error 9
I have seen similar articles telling people to factory reset or iTunes restore their iPhones to solve iTunes error 9, but I strongly object such action because, as mentioned before, all your data will be gone if you do so. If the previous solutions do not work, then the problem is serious enough for you to go to nearby Apple support center, because the professional staff knows how to handle the error without causing you unnecessary loss.

FAQs About iTunes Error 9
-
Can iTunes error 9 be fixed?
Yes, iTunes error 9 can usually be fixed with basic troubleshooting methods like checking your USB connection, updating iTunes, or restarting your devices. If the issue is system-related, using a professional iOS repair tool such as TunesKit iOS System Recovery can resolve it more effectively.
-
Is iTunes error 9 a hardware problem?
Not always. In many cases, it's caused by connection issues or software glitches. However, if the error persists across different cables and computers, it may indicate a hardware issue.
-
Can a low battery cause Error 9?
Yes. If the battery doesn't have enough charge to sustain the intensive restore process, the device may shut down or disconnect mid-transfer.
Final Thoughts
Through with all these practical methods, fixing iTunes error 9 is still energy-consuming and time-consuming. That is why I recommend TunesKit iOS System Recovery to improve efficiency and to solve the initial problem on your iPhone. At last, I sincerely hope that this article can help you resume your iPhone back to normal.
