Why Is My iPad Won't Connect to Internet? Here Are the Fixes!
If your iPad Won't Connect to Internet, you may have trouble browsing the web, streaming videos, playing games, or using online apps. The problem can be caused by your Wi-Fi router, network settings, software glitches, or a temporary issue with your iPad.
If your iPad is connected to Wi-Fi but still has no internet access, the issue may be related to the network rather than the Wi-Fi connection itself. Follow the troubleshooting methods below one at a time until your iPad can connect to the internet normally again.

- Why Won't My iPad Connect to the Internet
-
How to Fix an iPad That Won't Connect to the Internet
- Method 1. Turn Wi-Fi Off and Back On
- Method 2. Restart Your iPad
- Method 3. Check Your Router and Modem
- Method 4. Forget and Rejoin the Wi-Fi Network
- Method 5. Check Cellular Data
- Method 6. Check VPN and Security Software
- Method 7. Update iPadOS
- Method 8. Reset Network Settings
- Method 9. Repair Possible iPadOS Problems with TunesKit iOS System Recovery HOT
- Method 10. Contact Your ISP, Carrier, or Apple
- Closing Thoughts
Why Won't My iPad Connect to the Internet
Common reasons why an iPad won't connect to the internet include a weak or unstable Wi-Fi signal, problems with the router or internet service, an incorrect Wi-Fi password, network setting errors on the iPad, VPN or proxy interference, temporary software issues, or a public Wi-Fi network that still requires sign-in.
If the iPad shows that it is connected to Wi-Fi but still has no internet access, the router itself may be offline, the DNS settings may be incorrect, or the network may be restricting the device's access.
How to Fix an iPad That Won't Connect to the Internet
If your iPad won’t connect to the internet, the problem may come from the Wi-Fi network, router, cellular connection, VPN settings, or iPadOS itself. Instead of trying random fixes, work through the following methods in order. Start with the basic network checks and move on to more advanced solutions if the problem continues.
Method 1. Turn Wi-Fi Off and Back On
A temporary Wi-Fi glitch can sometimes prevent your iPad from connecting properly. Refreshing the connection is one of the easiest fixes to try first.
- Step 1. Open Settings on your iPad.
- Step 2. Tap WLAN. Turn WLAN off.
- Step 3. Wait a while. Turn Wi-Fi back on. Select your Wi-Fi network and check whether the internet connection works.
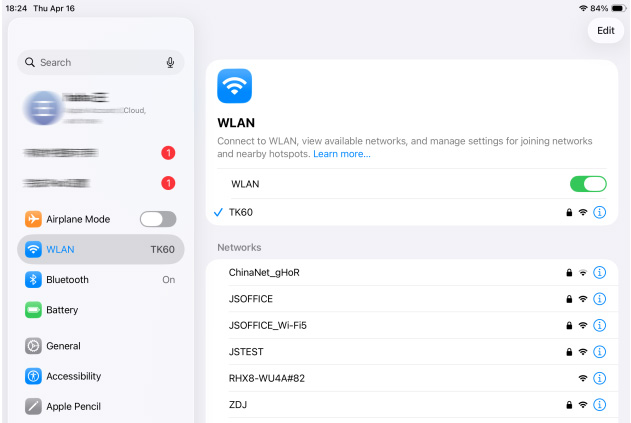
Also make sure Airplane Mode is turned off.
Method 2. Restart Your iPad
If Wi-Fi is enabled but your iPad still cannot access the internet, a temporary iPadOS or networking process may be causing the problem. Restarting the device can clear minor software glitches.
- Step 1. Press and hold the appropriate top and volume buttons until the power-off slider appears. On iPads with a Home button, press and hold the top button.
- Step 2. Drag the slider to turn off your iPad.
- Step 3. Wait about 30 seconds. Turn the iPad back on.
- Step 4. Reconnect to Wi-Fi and test the internet connection again.

Method 3. Check Your Router and Modem
The problem may not be your iPad at all. If other devices also cannot access the internet through the same Wi-Fi network, your router, modem, or internet service is more likely to be responsible.
- Step 1. Check whether another phone, tablet, or computer can use the same Wi-Fi network.
- Step 2. Make sure your iPad is within a reasonable range of the router.
- Step 3. Unplug your router and modem from power. Wait for several seconds.
- Step 4. Plug them back in and allow the network to restart completely. Reconnect your iPad to Wi-Fi.

Method 4. Forget and Rejoin the Wi-Fi Network
Saved Wi-Fi information can occasionally become invalid or corrupted. Forgetting the network allows your iPad to create a fresh connection.
- Step 1. Go to Settings > WLAN. Tap the information button next to the Wi-Fi network you are using.
- Step 2. Tap Forget This Network. Confirm the action.
- Step 3. Return to the Wi-Fi list. Select the network again. Enter the correct Wi-Fi password and reconnect.

Make sure the password is entered correctly, especially if it contains uppercase letters, numbers, or special characters.
Method 5. Check Cellular Data
This method applies only to Wi-Fi + Cellular iPad models. If Wi-Fi is unavailable and your iPad is supposed to connect through mobile data, check whether Cellular Data is enabled.
- Step 1. Open Settings app on your iPad.
- Step 2. Tap Cellular Data or Cellular, depending on your iPad and region.
- Step 3. Make sure Cellular Data is turned on.
- Step 4. Turn Cellular Data off and then back on to refresh the connection.
- Step 5. Check that your cellular plan is active and has network coverage.
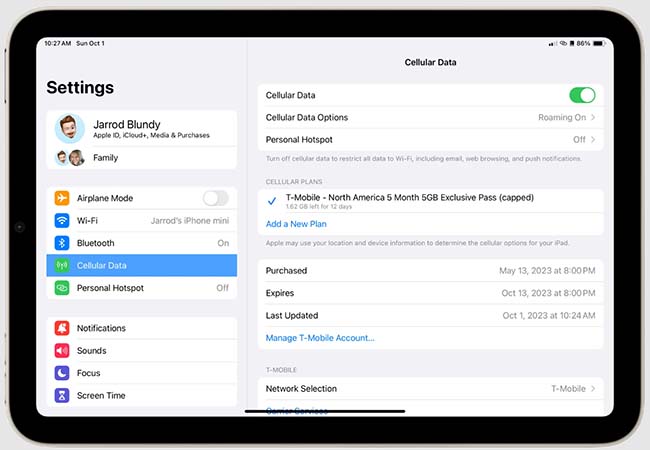
If your iPad shows No Service or Searching, you may also need to contact your carrier.
Method 6. Check VPN and Security Software
VPNs, security apps, filtering tools, and certain network profiles can interfere with an iPad’s internet connection.
- Step 1. Open Settings > General > VPN & Device Management and check whether a VPN is currently active.
- Step 2. Temporarily disconnect the VPN.
- Step 3. Restart your iPad and test the internet connection.
- Step 4. If the problem continues, consider temporarily removing the VPN or third-party security software. Reconnect to Wi-Fi and test again.
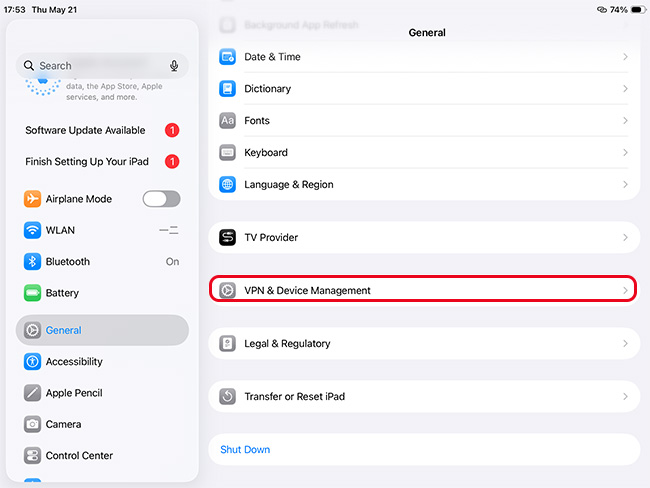
If removing the VPN solves the problem, check the VPN configuration or contact the VPN provider before reinstalling it.
Method 7. Update iPadOS
An outdated version of iPadOS may contain software bugs that affect Wi-Fi, cellular data, or other networking functions. Installing the latest compatible system update may help.
- Step 1. Go to Settings > General > Software Update.
- Step 2. Wait while your iPad checks for available updates.
- Step 3. If an update is available, tap**** the Update Now button.
- Step 4. Follow the on-screen instructions. After the update is complete, reconnect to the internet.
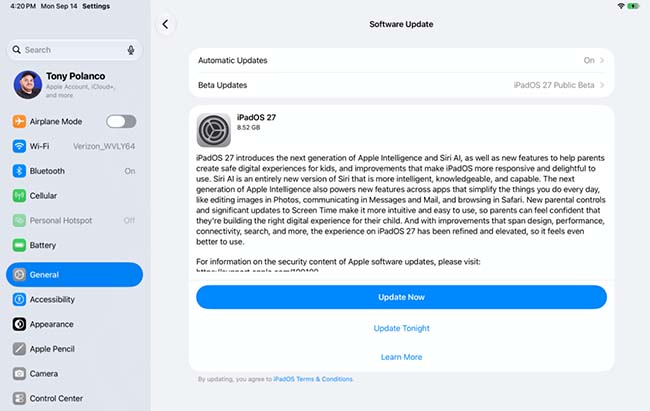
It is a good idea to back up important iPad data before installing a system update.
Method 8. Reset Network Settings
If the connection problem continues, resetting the network settings can remove incorrect Wi-Fi, cellular, VPN, or APN configurations.
- Step 1. Open Settings app on your iPhone.
- Step 2. Go to General > Transfer or Reset iPad.
- Step 3. Tap Reset. Select Reset Network Settings.
- Step 4. Enter your passcode if prompted. Allow the iPad to restart. Rejoin your Wi-Fi network and enter the password again.

Keep in mind that resetting network settings removes saved Wi-Fi networks and passwords, cellular settings, and VPN/APN settings. It does not erase your personal photos, apps, or documents.
Method 9. Repair Possible iPadOS Problems with TunesKit iOS System Recovery
Many times, what you think is a small problem may take a lot of your valuable time but it still doesn't work. Why not ask the professional software help you to solve the problem easily with only a few clicks?
TunesKit iOS System Recovery is a great tool that can offer professional services to those users whose iPad have trouble in disconnecting from Wi-Fi because of system error with several clicks. Additionally, this program specializes in dealing with various iOS system problems including iPhone hotspot keeps disconnecting, black screen, update failure, stuck in repair mode, DFU mode, white apple and other system problems on iPhone, iPod touch, and iPad.
Even a clever woman can't cook a meal without the rice. So, before you start your iPad repairing, download the tool onto your computer.
Fix iPad Internet Issues with TunesKit
Repair iPadOS-related Wi-Fi and connectivity problems in just a few clicks, without complicated troubleshooting.
 600,000+ Downloads
To make sure iPad connects to your Wi-Fi network by using TunesKit iOS System Recovery, simply follow these steps and things will get fine soon.
Step 1. Connect Your iPad to the Computer
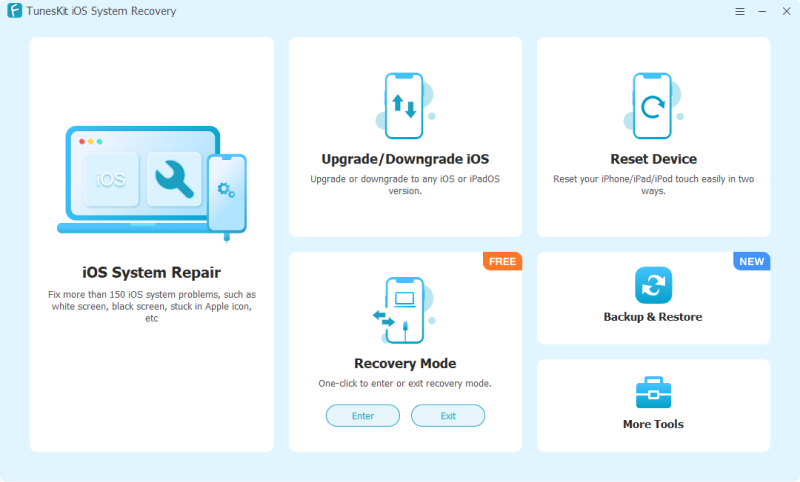
Connect iPad to the computer with the USB cable, and then turn on TunesKit iOS System Recovery. Next, click "iOS System Repair > Start" option. If the program without shows you an interface to continue, please choose your iPad to DFU or Recovery Mode through one click for free.
Step 2. Select a Mode
TunesKit provides two repair modes for iOS devices—"Standard Repair" and "Deep Repair". "Standard Repair" can fix the common system issues and retain all data. "Deep Repair" supports to fix the complex system issues but data will be erased.

Step 3. Download Firmware Package
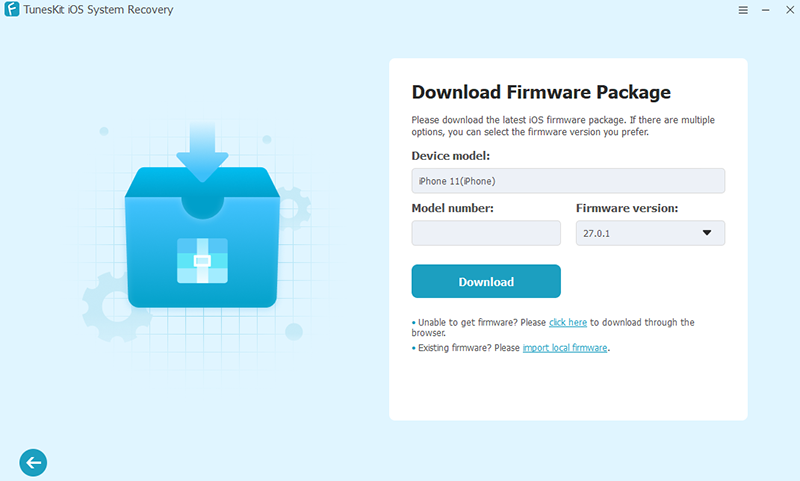
The program will automatically detect your device model and system. Check the information, and click "Download" button. It takes some times to download the proper firmware. While downloading, make sure your network connection is stable.
Step 4. Start Fixing iPad Internet Connection
Click "Start Standard Repair" button and wait for the process bar load to 100%. Congrats! Your iPad has successfully connected to the internet once again.

Method 10. Contact Your ISP, Carrier, or Apple
If none of the previous solutions works, identifying whether the problem affects one network, cellular service, or every network can help determine whom to contact.
- Step 1. Try connecting the iPad to another Wi-Fi network.
- Step 2. If the original Wi-Fi network does not work on any device, contact your internet service provider.
- Step 3. If a Wi-Fi + Cellular iPad cannot connect to the mobile network, contact your wireless carrier.
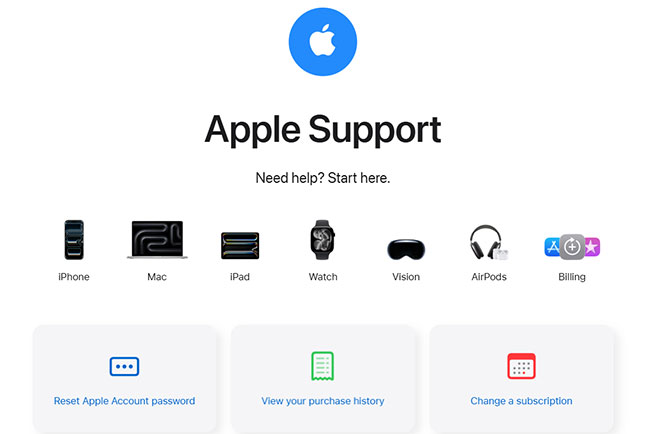
- Step 4. If your iPad cannot connect to any Wi-Fi network even after resetting its network settings and updating iPadOS, contact Apple Support for further diagnostics or service.
Closing Thoughts
If your iPad won't connect to the internet, start with simple fixes such as reconnecting to Wi-Fi, restarting the router, forgetting and rejoining the network, or resetting network settings. If the issue appears to be caused by iPadOS, you can also try a system repair tool like TunesKit iOS System Recovery. If the problem still persists, contact your internet provider, carrier, or Apple Support for further help.