Solved: Allow Apps to Request to Track Greyed Out
Apple's Allow Apps to Request to Track feature gives users more control over app tracking and data privacy by letting them decide which apps can request permission to track activity across other apps and websites. However, some users may find this option greyed out and unavailable on their devices. If you're facing this issue, this guide explains the possible reasons and effective solutions to fix it.

- Why Is the "Allow Apps to Request to Track" Option Greyed Out?
- How to Fix "Allow Apps to Request to Track" Greyed Out?
- Solution 1: Change to an Unrestricted Apple Account
- Solution 2: Reset Location & Privacy Settings
- Solution 3: Turn Off Screen Time Restrictions
- Solution 4: Remove Intercepting Configuration Profiles
- Solution 5: Fix iOS System Glitches with TunesKit iOS System RecoveryHOT
- Solution 6: Contact Official Apple Support
- Conclusion
Why Is the "Allow Apps to Request to Track" Option Greyed Out?
There are several reasons why the Allow Apps to Request to Track option may be greyed out on your iPhone:
- 01 You are using a child account or are under 18 based on the birth year linked to your Apple Account.
- 02 Your Apple Account is managed by a school, business, or other organization.
- 03 Your device is managed through a configuration profile or mobile device management (MDM) policy that restricts tracking settings.
- 04 Your Apple Account was created within the last three days.
- 05 Your iPhone is running iOS 14.4 or earlier, as App Tracking Transparency is only available in iOS 14.5 and later.
- 06 Temporary iOS system glitches or software bugs may also cause this option to become unavailable.
How to Fix "Allow Apps to Request to Track" Greyed Out?
After understanding the possible causes, it's time to fix the issue. Whether the problem is caused by account restrictions, device settings, or temporary iOS glitches, the following solutions can help restore the Allow Apps to Request to Track option on your iPhone.
Solution 1: Change to an Unrestricted Apple Account
If your Apple Account is managed by a school or business, or if it belongs to a child under the age of 18, the system will forcefully disable the app tracking feature at a fundamental level. Switching to a standard adult account usually removes this restriction immediately. Please note that signing out of your current account might temporarily affect some synchronized cloud data.
- Step 1. Open the "Settings" app on your device and tap your Apple Account name banner at the top.
- Step 2. Scroll down to the bottom, select "Sign Out," and follow the prompts to keep or remove local data.

- Step 3. Sign back in using a standard Apple Account that is not managed by an educational institution and belongs to someone over 18.
Solution 2: Reset Location & Privacy Settings
Over time, underlying privacy configuration files can occasionally conflict or become corrupted, which causes the tracking toggle to unexpectedly freeze.
Resetting these settings is a highly secure procedure. It will not delete your photos, apps, or passwords, but will simply restore all application permission prompts to their factory defaults.
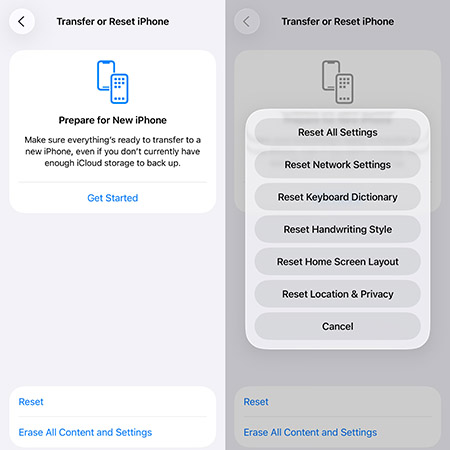
- Step 1. Navigate to "Settings" > "General," and scroll all the way down to the bottom.
- Step 2. Select "Transfer or Reset iPhone" and tap on "Reset."
- Step 3. Choose "Reset Location & Privacy" from the pop-up menu, enter your lock screen passcode to confirm, and wait for the device to refresh.
Solution 3: Turn Off Screen Time Restrictions
The Content & Privacy Restrictions within Screen Time hold the highest level of authority and can override standard system settings. If ad or privacy changes are restricted here, the tracking toggle in the main menu will be completely greyed out.
Disabling these restrictions is one of the most common and effective ways to fix this problem.
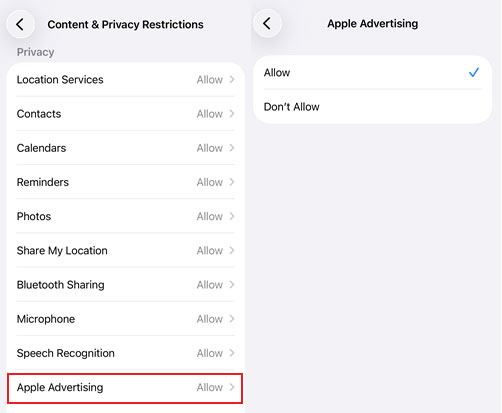
- Step 1. Go to "Settings" and tap on "Screen Time."
- Step 2. Select "Content & Privacy Restrictions" and enter your Screen Time passcode if you previously set one up.
- Step 3. Toggle off the main "Content & Privacy Restrictions" switch at the top, or scroll down to "Apple Advertising" and change it to "Allow."
Solution 4: Remove Intercepting Configuration Profiles
If you have ever participated in beta testing, installed specific networking tools, or connected to a corporate intranet, your device might have a configuration profile installed. These profiles have the power to globally disable ad tracking across the entire operating system.
Clearing out unnecessary profiles can quickly restore your default privacy controls.
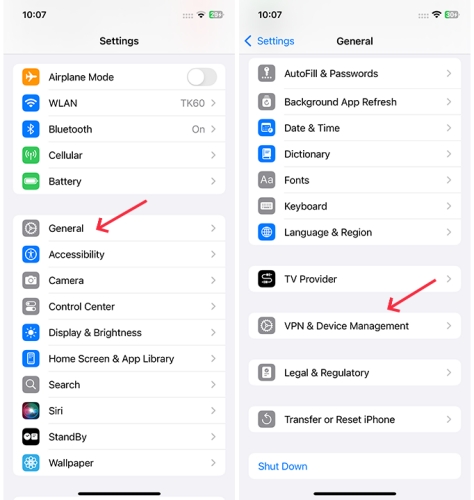
- Step 1. Open "Settings" and tap on "General."
- Step 2. Scroll down and select "VPN & Device Management" (this may appear as simply "Profiles" on older iOS versions).
- Step 3. Check for any installed profiles, tap on any suspicious ones to select "Remove Profile," and then restart your phone.
Solution 5: Fix iOS System Glitches with TunesKit iOS System Recovery
As mentioned above, temporary iOS system glitches or software bugs may cause the Allow Apps to Request to Track option to appear greyed out. In this situation, fixing the underlying iOS issue is the first step.
TunesKit iOS System Recovery is a professional repair tool designed to resolve over 150 iOS system issues without causing data loss. It can help fix problems such as boot loops, black screens, apps keep crashing on iPhone, and other system-related errors. Once the system issue is resolved, the tracking setting may become available again.
Repair iOS Bugs Causing Tracking Settings Issues
TunesKit iOS System Recovery fixes stubborn iOS issues that prevent the “Allow Apps to Request to Track” option from working properly.
With TunesKit iOS System Recovery, you can fix the "Allow Apps to Request to Track" greyed-out issue in just 4 steps.
Step 1 Link iPhone to PC
First of all, you are required to download and install this program on your Windows or Mac computer. When it is done, run this program and attach your iPhone/iPad to your PC using a USB data cable. Choose iOS System Repair.
Then on the next page, various device system problems will be listed. It doesn't matter if your iOS error isn't on the list, just click Start to continue.

Step 2 Choose Standard Repair
Here are two repair modes for you to choose from. Standard Repair will fix your iOS device without losing data and Deep Repair will erase all the data after repairing. It is recommended that you choose Standard Repair first and if it doesn't work, then choose another repair mode.

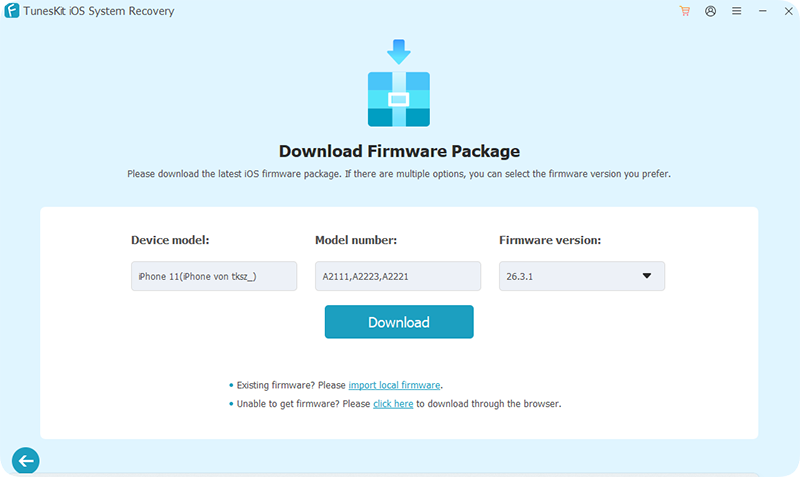
Step 3 Download Firmware Package
TunesKit will automatically detect your device information such as device model, and iOS version. Select the appropriate firmware package and click the Download button to download and verify the firmware package.
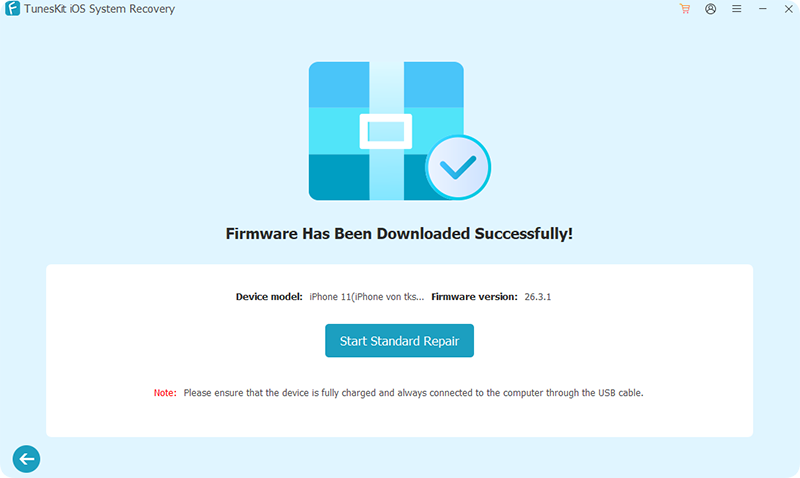
Step 4Start to Repair
Once you have finished downloading the firmware package, click on the Start Standard Repair button. This software will automatically start fixing all the problems on your iOS device. After the fix is done, your device will reboot and you can check if this issue has been resolved.
Solution 6: Contact Official Apple Support
When all software-level resets and troubleshooting fail to wake up the toggle, you might be facing a deeper cloud synchronization error or a rare bug specific to your iOS version. At this point, handing the issue over to the official team is the most efficient choice. They possess backend tools to accurately diagnose your Apple ID status.
- Step 1. Download the official "Apple Support" app from the App Store.
- Step 2. Open the application and select your current device from the list.
- Step 3. Type "App Tracking Transparency" into the search bar, then choose to chat or schedule a callback for assistance from a senior advisor.

Conclusion
This article has outlined the reasons and solutions for allowing apps to request to track greyed-out issues. You can select any of the solutions mentioned above to resolve the issue and enable the allow apps to request to track feature at your convenience. We suggest using TunesKit iOS System Recovery, as it fixes all iOS issues without data loss and brings the device back to normal.
