10 Solutions to Fix Wrong Apple ID When Updating Apps
Hey there! I need help. While updating apps on my iPhone, a wrong Apple ID pops up. I don't know who owns this Apple ID and the correct passcode. I try to sign out of App Store and force restart my iPhone, but the incorrect Apple ID keeps popping up when I try to update some apps. What should I do to fix this problem?
It is a frustrating experience: you go to the App Store to update your applications, but instead of your current account, a window pops up asking for the password to an old or unfamiliar Apple ID. This happens because of Apple’s digital rights management (DRM) system, which ties every app permanently to the ID used at the moment of download. Even if you have signed into a new account on your device, the individual app remains "owned" by the previous identity.
In this guide, we will list all solutions you can try to solve the Wrong Apple ID When Updating Apps issue.

- Why Is My App Store Asking for a Different Apple ID?
- Top 10 Solutions to Fix Wrong Apple ID When Updating Apps
- Solution 1. Sign out and Back in
- Solution 2. Check Your Family Sharing Settings
- Solution 3. Check for Stuck Downloads
- Solution 4. Update iOS Version
- Solution 5. Uninstall Apps from iPhone and Install Again
- Solution 6. Reset All Settings
- Solution 7. Erase All Content and Settings
- Solution 8. Remove Apple ID via TunesKit iPhone Unlocker HOT
- Solution 9. Remove Apple ID via iTunes
- Solution 10. Remove Apple ID via iCloud
- FAQs About Wrong Apple ID While Updating Apps
- Summary
Why Is My App Store Asking for a Different Apple ID?
The App Store is asking for that old or wrong Apple ID for one simple reason: An app on your iPhone was downloaded or purchased using that specific Apple ID.
Think of it like a deed to a house. Each app has a digital "deed" that permanently ties it to the Apple ID that originally acquired it. It doesn't matter if you're signed into your new Apple ID everywhere else on your phone. To update that specific app, the App Store needs proof of ownership from the original account.
So, why would an app be tied to the wrong account?
- You used a different Apple ID in the past and downloaded apps with it.
- You bought a used iPhone, and the previous owner didn't wipe it properly.
- A family member used your phone to download an app with their account.
- You're part of a Family Sharing group, and the app was purchased by the family organizer or another member.
Top 10 Solutions to Fix Wrong Apple ID When Updating Apps
We'll start with the simplest solutions and work our way to the ones that are guaranteed to fix the problem permanently.
Solution 1. Sign out and Back in
Before you do anything drastic, let's try the classic "turn it off and on again" approach for the App Store. Sometimes, your phone's authentication token just needs a quick refresh. This is a specific sign-out for the App Store itself, not your entire iCloud account.
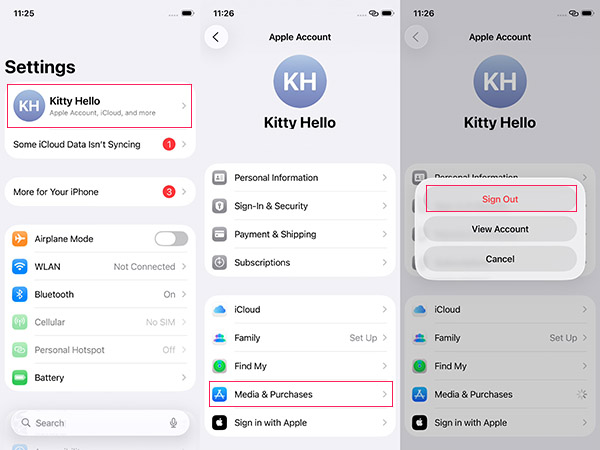
- Step 1. Open the Settings app on your iPhone.
- Step 2. Tap your name at the very top of the screen.
- Step 3. Tap on Media & Purchases. A small menu will pop up.
- Step 4. Tap Sign Out. This will log you out of the App Store and other media services.
- Step 5. Tap Media & Purchases again. This time, sign back in with your correct Apple ID and password. Now, go back to the App Store and try updating your apps again.
Solution 2. Check Your Family Sharing Settings
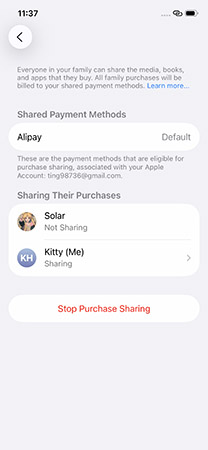
If you are part of an Apple Family Sharing group, the purchase might be tied to the Family Organizer's account. This can sometimes cause a conflict. A quick fix is to temporarily turn off purchase sharing.
- Step 1. Go to Settings and tap your name.
- Step 2. Tap Family Sharing, then tap Purchase Sharing.
- Step 3. Tap Stop Purchase Sharing. Try updating the app again. You can always turn this feature back on later.
Solution 3. Check for Stuck Downloads
Sometimes, the issue isn't an old app but a current app that got stuck while downloading or updating. This can put the App Store in a weird state where it keeps prompting for a password.
- Step 1. Look at your Home Screen. Do you see any apps that are darkened, grayed out, or say "Waiting..."?
- Step 2. If you find one, tap on it to try and resume the download. If that doesn't work, long-press the app icon and choose Cancel Download. Once you've cleared any stuck apps, try updating again.

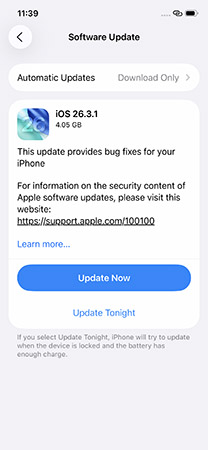
Solution 4. Update iOS Version
Sometimes, the wrong Apple ID when updating apps problem will appear frequently if you are using an outdated iOS version. Therefore, you can try to update your iOS version to the latest. You can update the iOS version from your phone directly, or connect your iPhone to iTunes and update it from computer. If you don't know how to make it, you can follow the steps below.
- Step 1. Open the Settings app on your iPhone.
- Step 2. Select the General option.
- Step 3. Click on the Software Update > Update Now and update your iOS version to the latest.
Solution 5. Uninstall Apps from iPhone and Install Again
The best solution to stop the wrong Apple ID when updating apps is to uninstall the apps that are purchased through the former owner's Apple ID. After that, you can go to the App Store and and reinstalling them with your current, correct Apple ID. Here's how to do it.
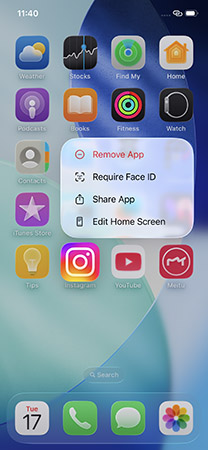
- Step 1. Find the problem app on your Home Screen. Usually, it's the one that won't update. If you don't know which app is causing the issue, you may have to do this for several apps until you find the culprit.
- Step 2. Press and hold the app's icon until a menu appears.
- Step 3. Tap Remove App, and then confirm by tapping Delete App. This will completely uninstall it.
- Step 4. Open the App Store.
- Step 5. Search for the app you just deleted and tap the cloud icon (or "Get" button) to download it again. This time, the app will be downloaded under your current Apple ID.
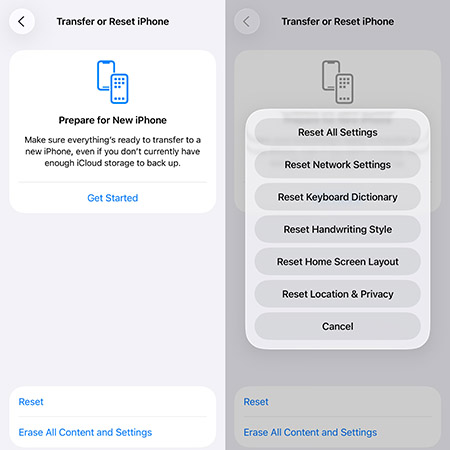
Solution 6. Reset All Settings
This is anther option to fix wrong Apple ID in app store issue. It won't delete your data, apps, or photos. However, it will reset all your system settings to their defaults. This includes Wi-Fi passwords, notification settings, screen brightness, and wallpaper. It's a bit of a hassle, but it can clear out underlying system conflicts causing the App Store issue.
- Step 1. Go to Settings > General > Transfer or Reset iPhone.
- Step 2. Tap Reset. On the pop-up menu, select Reset All Settings. Enter your passcode to confirm.
- Step 3. After your iPhone restarts, you will need to re-enter your Wi-Fi passwords and reconfigure a few other settings, but the Apple ID problem will likely be gone.
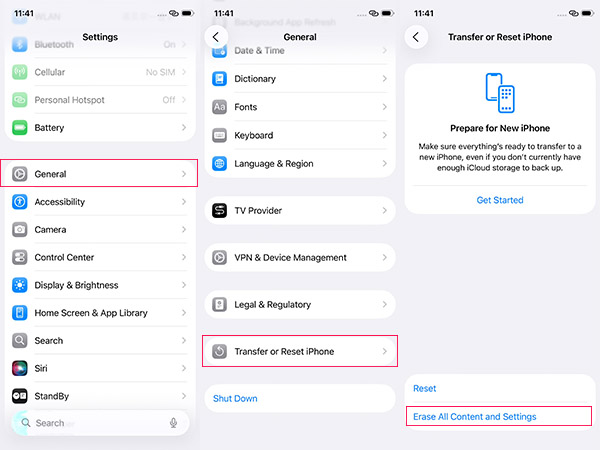
Solution 7. Erase All Content and Settings
If the wrong Apple ID issue is showing up on multiple apps (and you just bought the phone from someone else), a full factory reset might be necessary. This will delete everything on your iPhone. So, please back up your data first. To factory reset your device, you can follow the quick steps below.
- Step 1. Go to Settings > General > Transfer or Reset iPhone.
- Step 2. Tap Erase All Content and Settings.
- Step 3. Set up the iPhone again with your own Apple ID.
Solution 8. Remove Apple ID from iPhone to Fix Wrong Apple ID When Updating Apps
Users can also get rid of the wrong Apple ID when updating apps by removing Apple ID on the iOS device. This is particularly helpful when you don't know the Apple Account password. Here, I will strongly recommend TunesKit iPhone Unlocker to you.
TunesKit iPhone Unlocker is a well-established Apple ID removal that can help users remove Apple ID from iOS devices without entering any password. Besides, it can help users unlock disabled iPhone, bypass MDM restrictions, and remove Screen Time. This program is safe and easy to use. Anyone can easily handle it within several simple clicks.
Why Choose TunesKit iPhone Unlocker?
Fix wrong Apple ID when updating apps without password. 100% Working & easy to operate.
Let's see how to remove Apple ID from iPhone to fix wrong Apple ID when updating apps with TunesKit iPhone Unlocker.
Step 1Connect iPhone to Computer
Download and install TunesKit iPhone Unlocker on your computer. Then, connect your iPhone to the computer. Select the Unlock Apple ID option on TunesKit iPhone Unlocker and then hit on the Start button.

Step 2Check Device Status
Find My is Disabled: Apple ID removal is supported on all iOS versions, and your data will remain intact.
Find My is Enabled: Apple ID removal is only supported if your device is running iOS 11.4 or later, with a screen lock passcode and two-factor authentication enabled. Devices running earlier iOS versions are not supported.

Step 3Download Firmware Package
Then, TunesKit iPhone Unlocker will download the firmware package to fix the problem on your iPhone. Please correct the wrong onscreen information, and then click on the Download button.

Step 4Fix Wrong Apple ID When Updating Apps
Now, click Unlock button and TunesKit will start to remove the Apple ID from your device and fix the App Store showing wrong Apple ID issue. After removing the incorrect Apple ID, set up your iPhone again and the problem will not exist again.

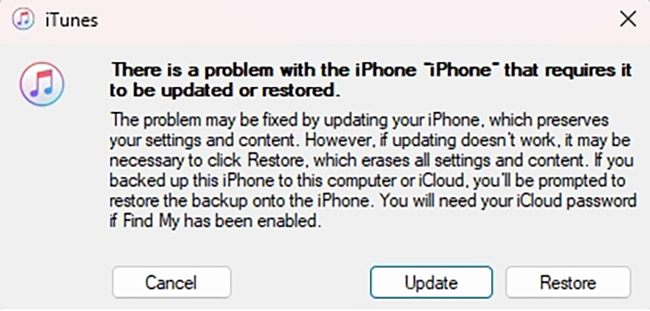
Solution 9. Remove Apple ID via iTunes
To remove the Apple ID from your iOS device, using iTunes is a wise and simple choice. Using iTunes to restore your iPhone will erase everything on your iPhone including the Apple ID and downloaded apps. If there is something important on your iPhone, you can use the iTunes built-in feature to back up your iPhone first. After restoration, you can restore the backup file and you will not lose any data. Now following the below steps to fix the wrong Apple Account on App Store issue.
- Step 1. Install and launch iTunes on your computer. Then, connect your iPhone to the computer.
- Step 2. Put your iPhone into Recovery Mode.
- Step 3. When a prompt appears on your computer, select the Restore option.
Solution 10. Remove Apple ID via iCloud
If you cannot connect your iPhone to iTunes, you can also try using iCloud to wipe your iPhone remotely. To use iCloud to wipe your iPhone, the Find My iPhone feature should be enabled on your iPhone, and you will need to know the Apple ID and password. Let's see how to do it by using iCloud.
- Step 1. Launch a browser on your iPhone and go to the iCloud.com website. Log into your Apple ID account.
- Step 2. Select the Find My iPhone feature.
- Step 3. Click on the All Devices button and select the iPhone that you would like to remove the Apple ID from.
- Step 4. Hit on the Erase This Device button to erase the iPhone to remove the Apple ID from iOS device.

FAQs About Wrong Apple ID when Updating Apps
-
Can I update the app without deleting it?
Only if you know the original Apple ID and password. Otherwise, no — you must delete and reinstall.
-
Will I lose app data if I delete the app?
It depends. Some apps (like Instagram or Facebook) store your data in the cloud — so you'll be fine. Others (like games or standalone tools) may lose local data unless they support cloud backup. If you're unsure, check the app's support page or settings menu before deleting.
-
What if I don't know the Apple ID password?
If you don't know the password, you can delete and reinstall from scratch. Another option is to use TunesKit iPhone Unlocker to remove Apple ID restrictions completely.
-
Is this a virus or hack?
No. It's just Apple's licensing model in action. Apps are owned by the ID that downloaded them.
-
How to avoid this problem in the future?
Here are some useful tips for you:
1. Always download or purchase apps using your own Apple ID.
2. Avoid restoring your device from a backup that was created under someone else's Apple ID.
3. Always factory reset a secondhand iPhone completely before setting it up.
4. Use Apple's Family Sharing feature instead of logging into each other's Apple ID, if you want to share purchased apps with family.
5. Before installing a new app, double-check you're signed in to your Apple ID.
Summary
It is always a troublesome problem when you need to update apps but the incorrect Apple ID pops up. Now you konw how to fix it effectively. To remove the Apple ID from iPhone without password, using TunesKit iPhone Unlocker is the best-recommended choice. If you have other questions, please feel free to leave us a comment below.
