Try to Erase iPhone But Verification Failed? 2026 Fixes!
Encountering the "Verification Failed" error while trying to factory reset your iPhone can be incredibly frustrating. This issue typically occurs due to unstable network connections, Apple Account server glitches, or outdated software. In this guide, we provide 7 verified solutions when you try to erase iPhone but verification failed.

Why Erase iPhone But Verification Failed?
The "Erase iPhone Verification Failed" error usually appears when the verification process fails while resetting the iPhone. The following are possible reasons why this error may occur.
- 01 Network Connection Issues: Your device may not be properly connected to the internet.
- 02 Apple Account Verification Problem: The error might occur if there's a problem with the Apple Account you're using.
- 03 Apple's Server Issues: Sometimes, Apple's servers might be down or undergoing maintenance.
- 04 Software Glitches: A temporary software glitch could also be the cause.
- 05 Two-Factor Authentication: If two-factor authentication is enabled for your Apple Account, ensure you're able to receive and enter the required verification code.
- 06 Outdated iOS Version: Running an outdated version of iOS may lead to compatibility issues.
- 07 Restrictions or Profiles: If your iPhone has any restrictions or profiles set up (common in corporate or educational devices), these may prevent erasing the device.
Effective Ways to Fix Erase iPhone But Verification Failed
Attempt the following troubleshooting methods in sequence to resolve the "Erase iPhone Verification Failed" error.
Way 1. Disable the Find My iPhone Feature
Find My iPhone prevents you from erasing your iPhone in Settings and may cause the activation lock to be activated and factory data to be reset. If there is a problem with Find My iPhone, it can cause the erase iPhone verification failed. Therefore, please disable Find My before the erasure process.
- Step 1. Navigate to your iPhone's Settings app, then tap on your profile icon at the top of the screen.
- Step 2. Tap Find My > Find My iPhone, and slide the Find My iPhone toggle to off.

Way 2. Reset Network Settings
Erase iPhone verification failed error can also occur if the network settings are not compatible. Sometimes, iOS users change the network settings and as a result, it affects the network settings. To fix this issue, try reset the network settings.
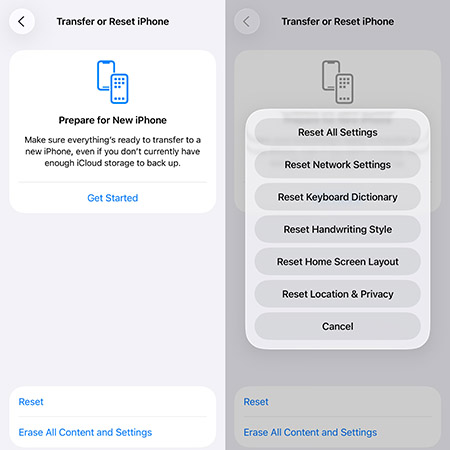
- Step 1. On your iPhone, move to Settings > General, then slide to the bottom to select Transfer or Reset iPhone .
- Step 2. Tap on Reset > Reset Network Settings, enter your passcode, tap Reset Network Settings again when the pop-up windows prompt.
- Step 3. This action will restart your iPhone, after that, check if the problem is solved.
Way 3. Link Your iPhone to a Stable Network
If you find that the Wi-Fi network always disconnects automatically. This bad connection may result in "Erase iPhone verification failed" error. You can fix this problem by forgetting about the Wi-Fi network and rejoining it. Many iPhone users claim that this method fixes the error. Here's how:
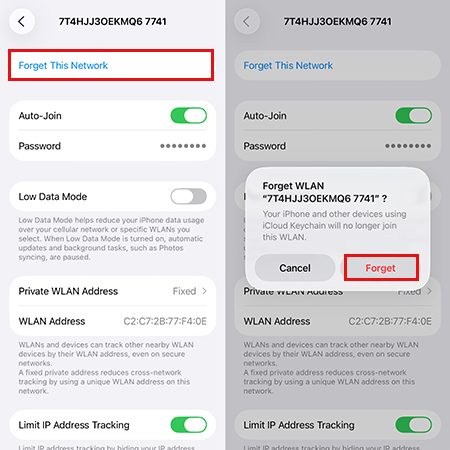
- Step 1. Open your Settings app on iPhone, select WLAN.
- Step 2. Tap the (i) icon next to the Wi-Fi name and then tap on Forget This Network at the top.
- Step 3. Click Forget when a pop-up window appears.
- Step 4. Disable your Wi-Fi, wait for a short period, and then reactivate it.
- Step 5. Enter the password to join the network and attempt to erase your iPhone once more.
Way 4. Check Apple System Status Page
The reason for erasing iPhone verification failed is the inability to connect to the server. So if Apple is having problems with its own servers, you'll experience verification failures when trying to erase your iPhone. You can check the Apple System Status page to see if there are any issues with related services. You'll learn if any services are under maintenance, preventing verification from completing.

Way 5. Erase iPhone Remotely Using iCloud
Erasing an iPhone via iCloud can fix the "erase iPhone verification failed " error. It will erase all data and settings on the device, including some corrupted data.
To perform this method, you need to know your Apple Account and password. Erasing your iPhone will take some time, depending on the size of the data in your phone. Once the reset process is complete, your iPhone will return to its default settings.
- Step 1. Open any browser and visit iCloud.com, sign in with the Apple Account and password on your iPhone.
- Step 2. Select Find iPhone, choose All Devices, and pick the iPhone you wish to erase.
- Step 3. Select the Erase This Device option and verify your choice by confirming the action.

Way 6. Reboot Your iPhone
Restarting your iPhone can fix a lot of system errors, and it's a method worth trying. Try restarting your iPhone to see if that solves the problem of erasing iPhone verification failed.
For an iPhone without Home button:
- Step 1. Press and hold the Side button along with either of the Volume buttons until two sliding buttons appear.
- Step 2. Drag the slider that says "slide to power off" to the right, and your iPhone will begin to shut down.
- Step 3. After the device turns off completely, press and hold the Side button again until you see the Apple logo, indicating that your iPhone is restarting.
For an iPhone with a Home button:
- Step 1. Press and hold the Top (or Side) button until the "slide to power off" slider appears.
- Step 2. Slide it to the right to power off the iPhone.
- Step 3. Once the device is off, press and hold the Top (or Side) button again until the Apple logo appears, and your iPhone will reboot.

A Smarter Choice for Fixing Erase iPhone Verification FailedHOT
This erase iPhone verification failed issue is mainly related to your Apple Account and network. Repairing your internet connection is relatively easy to do. However, when the verification fails and you cannot log out of Apple Account, at this time you can try to remove Apple Account from the device so that you can finally erase your iPhone. Then TunesKit iPhone Unlocker comes in handy.
It enables you to bypass the password and unlock your Apple Account. In just a few simple steps, you can quickly remove the Apple Account from your device. Additionally, it can bypass iPad lock screen, which is useful in situations where the original password is forgotten or the device is disabled after multiple wrong attempts.
Key Features of TunesKit iPhone Unlocker
Allows you to erase Apple Account without password. Remove Screen Time Passcode, screen lock, Apple Account without password.
Before you use this software, please download and install it on your computer.
Step 1Connect iPhone to PC
Connect the iPhone to the computer using a USB data cable, and click Unlock Apple ID on the main interface of the software. Simply hit Start button to continue.

Step 2Download Firmware Package
After confirming your device information, click the Download button to download the firmware package.

Step 3Fix Erase iPhone Verification Failed
Click the Unlock button after the firmware package downloads successfully, TunesKit iPhone Unlocker will start removing the Apple Account from your device.

FAQs About Erasing iPhone Verification Failed
-
Can I erase my iPhone without entering my Apple Account?
It is up to your iPhone status. If the Find My feature on your iPhone is turned off, your can use TunesKit iPhone Unlocker to erase your iPhone without Apple Account. If not, you have to enter Apple Account.
-
Why does this error happen during remote erase via iCloud?
If you're erasing the iPhone remotely using Find My iPhone on iCloud, the error can occur if the device is not online or connected to a network.
-
Does "Erase iPhone Verification Failed" affect iCloud data?
No, this error does not directly affect your iCloud data. However, ensure your data is backed up before attempting to erase the device.
Conclusion
When you are trying to erase your iPhone but verification failed, it may drive you crazy. But this article provides several ways to help you solve this problem. TunesKit iPhone Unlocker is the best solution if you determine that this issue is caused by incorrect Apple Account information. It is a one-stop iOS device unlocking tool. Therefore, download TunesKit iPhone Unlocker for free now and enjoy the endless experience it brings you.
