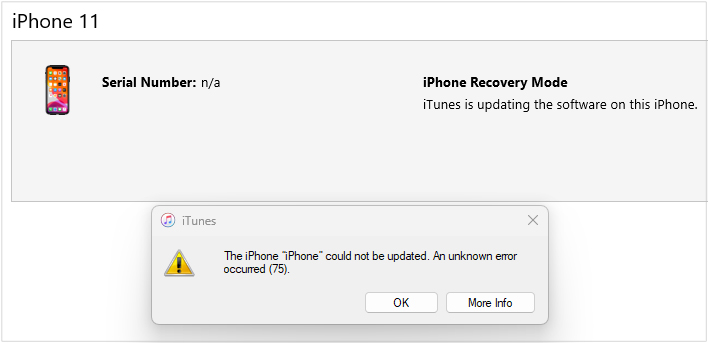
iTunes Error 75 Occurs While Updating to iOS 26? Fix It Easily
Using iTunes to manage and update your iOS devices is generally a seamless experience. Occasionally, the process breaks down and throws a frustrating alert known as iTunes error 75. This specific roadblock typically surfaces when you are trying to install the latest iOS version on your iPhone or iPad using a computer. It effectively halts the installation, leaving your device stuck on the old firmware. In this guide, I will show you 7 workable ways to fix it immediately.

- What Is Error 75 & Why Does It Occur While Updating to iOS 26?
- How to Fix iTunes Error 75 [7 Methods]
- Fix 1. Refresh Your Connection and Hardware
- Fix 2. Update iTunes Version or Mac/PC System
- Fix 3. Force Restart Your iPhone
- Fix 4. Temporarily Disable Antivirus on Computer
- Fix 5. Use the Professional iTunes Repair Tool—TunesKit for Free [100% Lossless]
- Fix 6. Restore iPhone via DFU Mode [Data Loss]
- Fix 7. Update iOS and Bypass Error 75 Without Data Loss
- FAQs Related to Error 75 iTunes
- Summary
What Is Error 75 & Why Does It Occur While Updating to iOS 26?
Error 75 is a specific error code encountered exclusively during the process of updating an iPhone or iPad through iTunes. This error prevents the user from successfully completing the update, and without a resolution, the affected iPhone or iPad remains un-updated.
While Apple does not provide a definitive public explanation for this specific alert, technical experts have identified several consistent triggers. The problem almost always stems from a breakdown in communication between your local computer and Apple's remote servers.
Here are a few common culprits behind the failure:
- An unstable internet connection or a damaged physical Lightning cable.
- Outdated iTunes software or an incompatible macOS version.
- Security programs or antivirus software blocking the necessary network ports.
How to Fix iTunes Error 75 [7 Methods]
Here are 7 useful ways to solve the iPhone update error 75. Start with the straightforward native solutions. Most communication glitches can be resolved with a few simple adjustments to your hardware or system settings.
Fix 1. Refresh Your Connection and Hardware
Always begin by ensuring your physical and network connections are secure. A weak Wi-Fi signal will cause the firmware download to time out and trigger the alert. Similarly, a frayed or uncertified cable can disrupt the data transfer mid-stream.
- Step 1. Switch to a stable, high-speed Wi-Fi network rather than relying on a cellular hotspot.

- Step 2. Replace your current USB cord with an official Apple MFi-certified Lightning cable.

Fix 2. Update iTunes Version or Mac/PC System
Running outdated bridge software like iTunes is a guaranteed way to encounter compatibility issues during an installation. Your computer must have the latest security protocols to verify the digital signatures required by Apple. Updating your system takes only a few minutes but solves the vast majority of these alerts.
How to Update iTunes:
- Step 1. Find the Help tag on the top toolbar
- Step 2. Click the Check for Updates to update your iTunes.

How to Update Mac:
- Step 1. On your Mac, head to System Preferences.
- Step 2. Then, click on Software Update.
- Step 3. You can update to the latest macOS version by clicking "Update Now" on the screen.

How to Update Windows:
- Step 1. Open your PC and go to Start → Settings shaped like a gear icon.
- Step 2. Select the Update and Security tab and then click on Windows Update.
- Step 3. Now, hit Check for Updates. If new updates are available, the latest version will be installed right away.

Fix 3. Force Restart Your iPhone
A hard reset clears out temporary memory caches and minor software bugs that might be interfering with the connection. This process forces your phone to perform a complete power cycle. Follow the corresponding way to force restart your iPhone and fix the error code 75 iTunes issue.
- iPhone 8 or later: Press and quickly release the Volume Up button , and then press and quickly release the Volume Down button. Finally, press and hold the Side button until the Apple logo appears on the screen.
- iPhone 7 or 7 Plus: Keep holding the Volume Down button and the Side button simultaneously. When the Apple logo shows up, release them quickly.
- iPhone 6s or earlier: Keep holding the Side button and Home button simultaneously. When the Apple logo appears, release the two buttons.

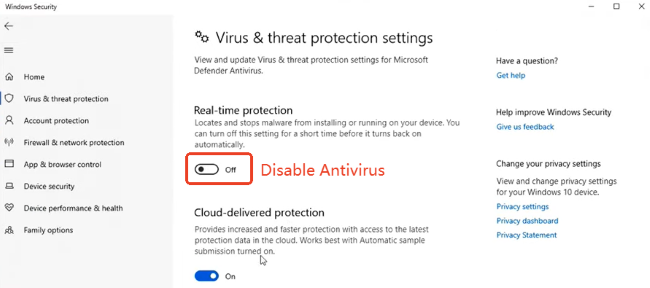
Fix 4. Temporarily Disable Antivirus on Your Computer
While antivirus software is essential for protecting your computer against malware, its security filters can sometimes be too aggressive. These programs occasionally mistake routine Apple server communications for network threats, unintentionally blocking the iOS update process. Temporarily disabling your antivirus program is a highly effective, proven way to bypass iTunes error 75. Remember to turn the protection back on immediately after your iOS device finishes updating.
How to Temporarily Disable Windows Defender
- Step 1. Open your Start menu, type Windows Security into the search bar, and hit Enter to launch the dashboard.
- Step 2. Click on Virus & threat protection from the left-hand menu, then select Manage settings under the main heading.
- Step 3. Toggle the Real-time protection switch to the Off position and confirm the prompt.
How to Disable Third-Party Antivirus Software
- Step 1. Locate your specific antivirus program's icon like Norton, McAfee, or Avast in the Windows system tray at the bottom right corner of your taskbar.
- Step 2. Right-click the icon and select the option to "Disable", "Pause", or "Stop protection" for a designated period (usually 10 to 15 minutes).
- Step 3. Once your active antivirus shields are paused, completely close out of iTunes and relaunch it before attempting the iOS update again.

Fix 5. Use the Professional iTunes Repair Tool—TunesKit for Free [100% Working]
If you want to save time and fix iTunes error 75 quickly, try to use a free iTunes repair tool named TunesKit iOS System Recovery. As a comprehensive iOS repair tool, TunesKit can also fix 210+ iTunes errors such as iTunes error 53, 0x80090302, 4010, 2009, and more.
Why Choose TunesKit iTunes Repair Tool?
Fix iTunes error code 75 while updating to iOS 26 without data loss at no cost. Easy to fix within a few steps.
- Step 1. Download and install TunesKit iOS System Recovery on your computer. Select the iTunes Repair from the interface.
- Step 2. TunesKit will detect your iTunes on this PC. If it shows any error, click the Repair button to start repairing iTunes.
- Step 3. Wait for a while until the process is completed. Click the Restart button to restart TunesKit and apply the changes.

Fix 6. Restore iPhone via DFU Mode [Data Loss]
If using Recovery mode will continuously cause iTunes error code 75, your next manual option is Device Firmware Update (DFU) mode. This is a deep restore state that allows iTunes to interface with your iPhone regardless of the operating system's condition. A standard DFU restore will completely erase your personal data.
-
For iPhone 8 & later models:
Keep holding the Side button for 3 seconds, then hold the Volume Down button at the same time. Hold both buttons for 10 seconds and then release the Side and keep holding the Volume Down button for 5 seconds. If your screen is still black, it means that you have entered your iPhone into DFU mode successfully.
-
For iPhone 7/7 Plus:
Keep holding the Side button and Volume button simultaneously for 10 seconds. Then release the Side button and keep holding the Volume Down button for 5 seconds. If the screen remains black, you have done the DFU mode successfully.
-
For iPhone 6 & earlier models:
Keep holding the Power button for 3 seconds, then hold the home button at the same time for 10 seconds. Release the Power button and keep holding the home button for another 5 seconds. If the screen turns black, it means that your iPhone have entered DFU mode.

Fix 7. Update iOS and Bypass Error 75 Without Data Loss
For users who are uncomfortable with DFU mode or lack a recent backup, dedicated third-party iOS repair tools offer an alternative route. TunesKit iOS System Recovery is a one-stop solution that can also help you upgrade iOS without causing data loss. It provides a streamlined, stress-free interface without the technical learning curve.
- Step 1. Launch TunesKit iOS System Recovery and connect your iPhone to a computer.
- Step 2. Choose Upgrade/Downgrade iOS and then iOS Upgrade to continue.
- Step 3. Click Download button to download the suitable firmware package .
- Step 4. Finally, click Start Upgrade button to update iOS without data loss.

FAQs Related to Error 75 iTunes
-
Will error code 75 permanently damage my iPhone?
No, this alert simply means the software installation was interrupted; it does not indicate physical hardware damage. Your device remains perfectly safe, though it may temporarily be stuck in recovery mode until the update successfully completes. Using the proper troubleshooting steps or a dedicated repair tool will safely resolve the loop.
-
Will error 75 delete my iPhone data?
The alert itself does not delete your personal files or wipe your device storage. However, if you are forced to perform a factory restore through your computer to resolve the underlying system corruption, that process will wipe the device completely if you do not have a backup readily available.
-
Can I update my iPhone without a computer to avoid iTunes error 75?
Yes, bypassing the computer entirely is an excellent way to avoid this communication alert. You can update your device over-the-air (OTA) by connecting to a strong Wi-Fi network and ensuring your battery is charged.
Step 1. Open your iPhone Settings and tap on General.
Step 2. Select Software Update to download and install the latest firmware directly.

Summary
iTunes error 75 occurs while updating to iOS 26 is not a severe issue. Several methods can be used to troubleshoot it by ourselves easily. But which method is most recommended? TunesKit iOS System Recovery, featuring easy-to-use, quick repair, and lossless, is a top-rated choice.
But if you cannot follow the instructions above, simply contact our technical support team by email or leave your comment. Our email pros will speedily troubleshoot the issue for you. Hopefully, you got the concept of how to do it effectively.
