How to Backup WhatsApp to iTunes/Finder? A Step-by-Step Guide Here
If WhatsApp is your main messaging app, it's important to regularly back up your chats, work files, and memories so you don't lose anything valuable. One reliable way to do this is with iTunes, which can back up your entire Apple device, including WhatsApp data, and restore it to another device when needed. This guide will show you how to backup WhatsApp to iTunes or Finder with simple clicks. Read it on.

- Part 1. Why Should You Backup WhatsApp Data to iTunes?
- Part 2. How to Backup WhatsApp to iTunes/Finder
- Part 3. How to Restore WhatsApp Backup from iTunes/Finder
- Bonus: Best iTunes/Finder Alternative to Backup WhatsApp - TunesKit WhatsApp TransferHOT
- Part 4. FAQs About How to Backup WhatsApp to iTunes
Part 1. Why Should You Backup WhatsApp Data to iTunes?
You may wonder why not just use the built‑in WhatsApp backup method, such as iCloud, to back up your data. While that option is convenient and often the first choice for many users, it has several limitations. iTunes can help overcome these drawbacks and also offers its own unique advantages when it comes to backing up WhatsApp data.
- Offline Backup: Unlike iCloud backups, iTunes backups are stored locally on your computer. This can be beneficial if you prefer not to use cloud services or if you have limited cloud storage space.
- No Storage Limitations: Since the backup is stored on your computer, iTunes backup is only limited by your computer's available storage, unlike iCloud which may require you to purchase additional storage if you exceed the free 5GB limit.
- Restoration Flexibility: Restoring your iPhone from an iTunes backup can be done without an internet connection, making it useful in situations where connectivity is an issue. It also allows you to restore all data, including WhatsApp, in one go.
Part 2. How to Backup WhatsApp to iTunes or Finder
Backing up WhatsApp to iTunes is straightforward. iTunes will back up your entire device, including WhatsApp data, rather than just WhatsApp. Here's how to do it. Depending on your operating system, there are different methods to back up WhatsApp to iTunes on either Windows or Mac.
Step-by-Step Guide for Windows (Using iTunes)
Step 1. Use a USB cable to connect your iPhone to your Windows PC.
Step 2. Launch the iTunes application. If "Trust This Computer" prompted on your iPhone, tap Trust and enter your device passcode.

Step 3. Click on the small iPhone icon that appears near the top-left corner of the iTunes window.
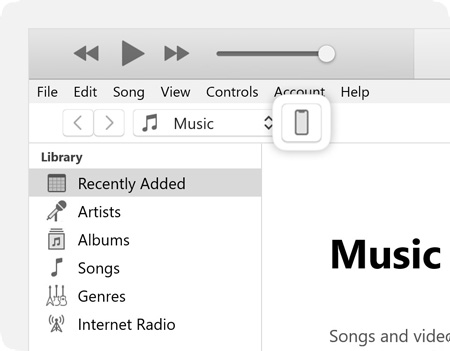
Step 4. You should now be on the iTunes Summary screen for your device.
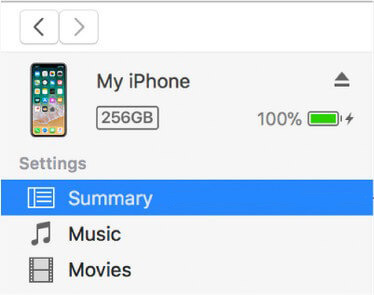
Step 5. Under the "Backups" section, ensure This Computer is selected. For added security, we highly recommend checking the box for Encrypt local backup. This protects your data with a password and includes sensitive information like saved passwords and health data.
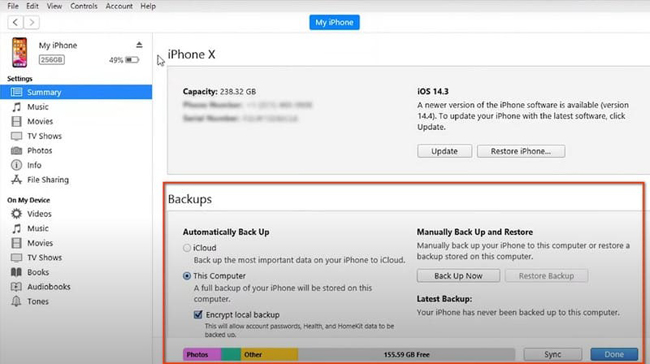
Step 6. Click the Back Up Now button to begin the process. The time it takes will depend on how much data is on your iPhone.
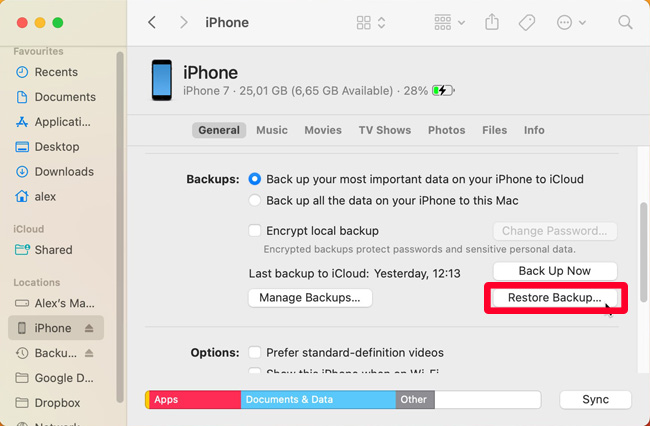
Step-by-Step Guide for Mac (Using Finder)
On macOS Catalina (10.15) and newer versions, Apple replaced the device management functions of iTunes with Finder.
Step 1. Use a USB cable to connect your iPhone to your Mac.
Step 2. Open a Finder window. You should see your iPhone listed in the sidebar under "Locations."
Step 3. Click on your iPhone in the sidebar. You may need to trust the computer on your iPhone if this is your first time connecting.
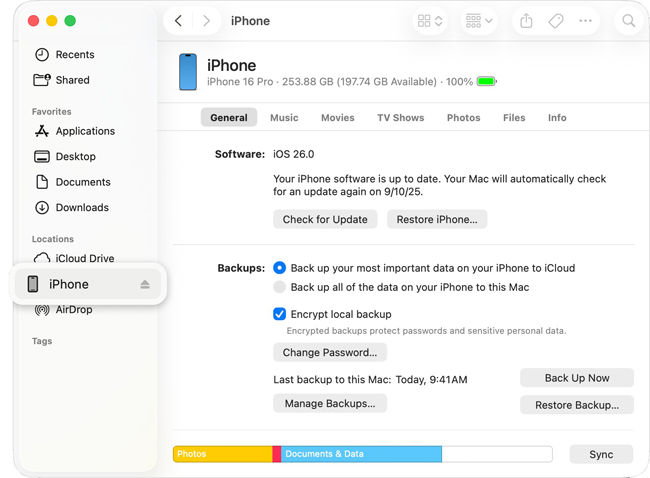
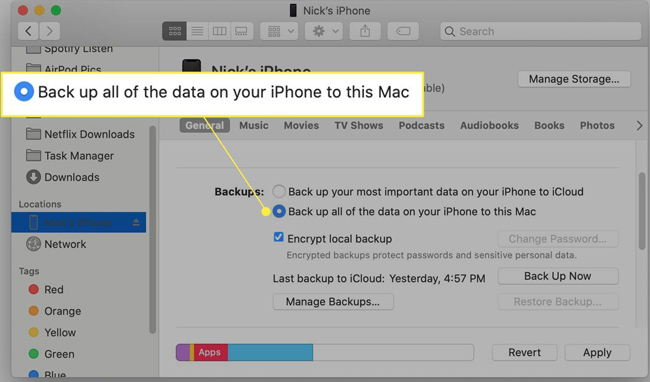
Step 4. Make sure you are in the "General" tab at the top of the Finder window.
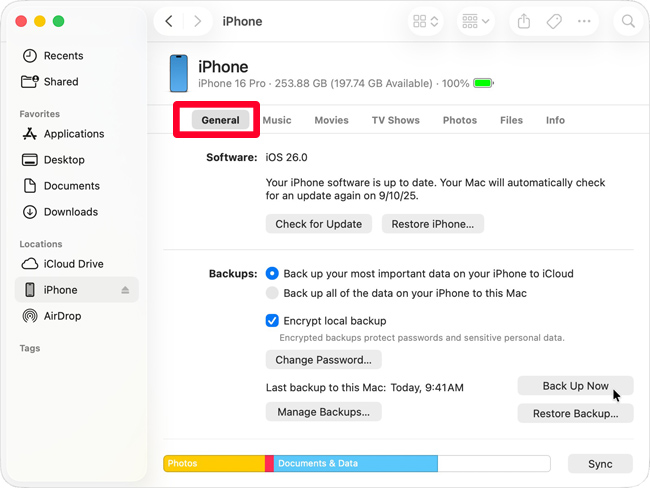
Step 5. In the "Backups" section, select Back up all of the data on your iPhone to this Mac. Again, we strongly advise selecting Encrypt local backup and setting a memorable password.
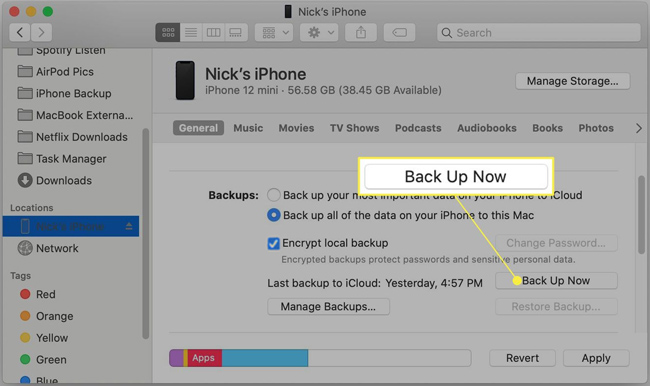
Step 6. Click the Back Up Now button to start the backup.
Part 3. How to Restore WhatsApp Backup from iTunes or Finder
Once you have created a backup, you may eventually need to restore it—perhaps you've bought a new iPhone or your current one experienced a software failure.
When you restore, iTunes will erase all current content and settings on your iPhone and replace them with the data from the backup file. Any photos, messages, or app data created after the backup was made will be permanently lost unless you back them up elsewhere first. Just Follow the steps below to restore your WhatsApp backup from iTunes.
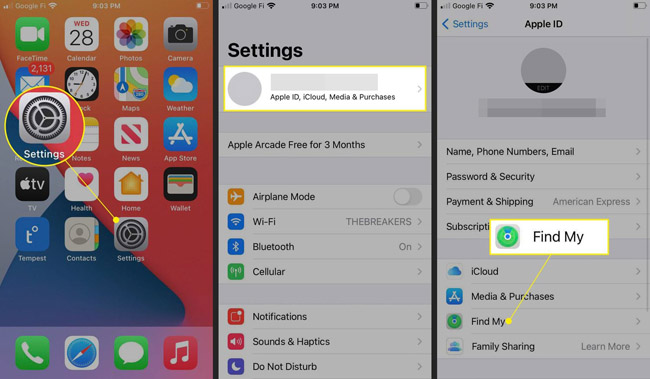
Step 1. On your iPhone, go to Settings > [Your Name] > Find My > Find My iPhone and turn it off. You will need to enter your Apple ID password to do this. iTunes cannot restore a device if this feature is active.
Step 2. Connect your iPhone to the computer where your backup is stored using a USB cable and launch iTunes/Finder.
Step 3. Click on your iPhone icon in iTunes or select it from the sidebar in Finder.
|
|
Step 4. According to your operating system, follow the steps below to get your WhatsApp backup from iTunes or Finder:
- In iTunes: Click on the Restore Backup button located in the "Backups" section of the Summary tab.
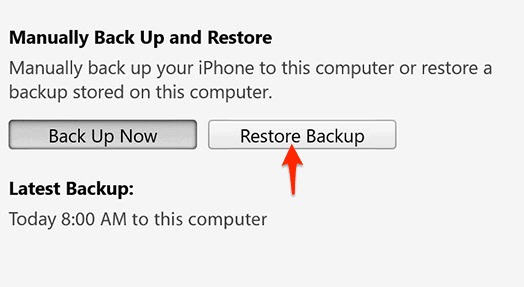
- In Finder: Click the Restore Backup... button in the General tab.
Step 5. A pop-up window will appear. Use the dropdown menu to select the most relevant backup file. Look at the date and size to ensure it contains the WhatsApp data you want to recover.
Step 6. If you encrypted your backup (as recommended), you will be asked to enter the password you set earlier.
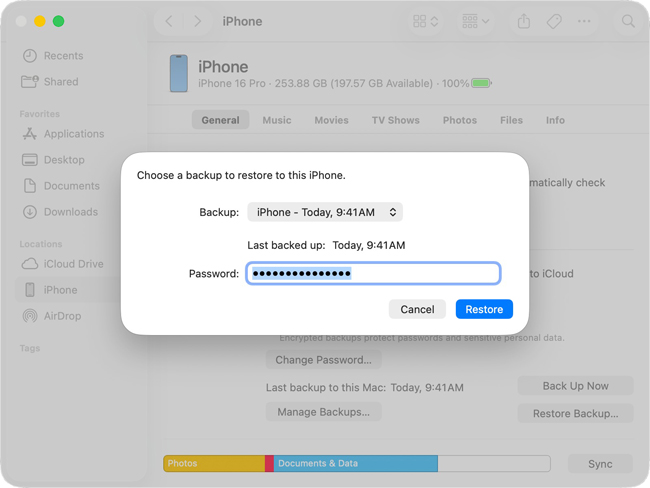
Step 7. Click Restore and wait. Your iPhone will restart and begin syncing with your computer. Do not disconnect the cable until the sync is fully complete.
Bonus: Best iCloud/iTunes Alternative to Backup WhatsApp - TunesKit WhatsApp Transfer
For backing up data, iCloud and iTunes are excellent. However, both of them back up your entire iPhone data, not just WhatsApp data. It will take a long time if there are large data on your iPhone. For specific WhatsApp backup, TunesKit WhatsApp Transfer would be a better choice, as it is a professional and efficient WhatsApp transfer and backup tool. Besides, this software allows you to transfer WhatsApp messages from iPhone to iPhone directly without backup if you want to get your old WhatsApp data on your new iPhone.
Key Features of TunesKit Viber Transfer
Back up WhatsApp messages to your computer easily. Transfer, restore, and export Viber data between iOS devices without encountering any hassle.
How to backup WhatsApp data via TunesKit WhatsApp Transfer
Step 1 Prepare to backup WhatsApp data
Get TunesKit WhatsApp Transfer software and install it on your computer.
Click the Backup icon when the software is open to access the backup page. use a USB cable to link your iPhone to your PC. Follow the instructions on your iPhone screen to make the connection successful.

Step 2 Start backing up WhatsApp data
After the connection succeeds, you can click the Start Backup button to begin the backup process. There are some prompts on your computer and iPhone screen. You should follow those prompts so that this process can be completed as soon as possible.

Step 3 Find WhatsApp backups
All WhatsApp backups can be found in the Restore and Export panel. In these two different sections, you can restore your backups to your target iOS devices and export your backups to your computer to save them forever.

Part 4. FAQs About How to Backup WhatsApp to iTunes
-
1. Is the iTunes backup of WhatsApp encrypted?
Only if you manually select the "Encrypt local backup" option before starting the backup. Standard backups are not encrypted.
-
2. Can I view my WhatsApp messages inside the iTunes backup file?
No. The file is not designed to be browsed. The data can only be accessed by restoring the entire backup to an iOS device.
-
3. Can I use an iTunes backup to move my WhatsApp from iPhone to Android?
Absolutely not. The backup formats are completely incompatible between iOS and Android.
Conclusion
iTunes gives Apple users a large storage to backup WhatsApp. You can get detailed tutorials to backup WhatsApp to iTunes/Finder from the above content. However, iTunes is not the only way to backup WhatsApp. iCloud Drive and TunesKit WhatsApp Transfer are also available for iOS users. You can choose the one suitable for you.
